How to make your house more passive

Here, we look at some things to consider if you are thinking of retrofitting an existing home to achieve Passivhaus or near-passive house performance, that is, excellent indoor comfort and air quality, and very small heating bills.
Whilst we mostly concentrate on the passive house principles, at the end there are some videos of homeowners talking about making their homes ‘more passive’ rather than ‘near’ or ‘fully’ passive.
Some homeowners’ experience of living in their homes having retrofitted to the passive house standard
If you love your current house or are having difficulty finding a building plot for a self-build home, you may be thinking about upgrading its energy efficiency. Is this a viable alternative? Very probably! And in the five video links below you can hear homeowners talk about the benefits they have experienced by retrofitting their homes to be more passive:
a Victorian semi-detached home with significant damp and mould problems;
a 1930’s detached house with cavity walls in the New Forest;
a deep retrofit of a several hundred years-old building in Ireland;
the conversion of a 19th Century workshop and timber yard to a home; and
a radical and very efficient Victorian townhouse retrofit in Manchester.
And you can read about some of the technical aspects of a number of other retrofit projects on this Green Building Store webpage.
We’ve described living in our new-build Passivhaus in another post, and the examples in the list above show that a high quality, ‘passive’ indoor living environment with its near-constant temperature and total lack of draughts and condensation is also achievable in many existing buildings.
First - a warning!
Retrofitting to a high energy efficiency standard is a substantial task and may best be undertaken in stages. Or you may look at upgrading various aspects of the building but not going 'fully passive’. Whatever you do, we’d strongly recommend that you get advice from a suitably qualified and experienced professional. Adding insulation to an existing building and/or installing substantial draught-proofing without an adequate way of managing indoor humidity can lead to condensation and mould as well as ‘interstitial condensation’ in the building’s fabric that can cause structural decay. Don’t let this be a show-stopper: you just need a proper strategy to manage the risk; the benefit is a substantial improvement in the quality of your indoor living environment.
Taking out the guess work
Originally created for the design of new Passivhaus buildings, the Passive House Planning Package (PHPP) can also be used for retrofit projects where it has been found to be just as valid as it is for new builds. A key benefit of using the PHPP for any passive building design is that you can model the effects of different options on the building’s performance (such as varying levels of insulation in different places) and thus avoid over-engineering. And if you then accurately build, or retrofit, to this specification you can be confident of getting exactly what it says on the tin.
Using the PHPP is not compulsory, and it really requires someone skilled in its use, but it will take out the guesswork and avoid evidence-free claims of the effectiveness of differing retrofit approaches. And even if you subsequently choose to retrofit differently, you will have a much better idea of the likely impact of what you are doing, which is especially important when it comes to developing a ventilation strategy to avoid interstitial condensation and mould.
The key heating issues to address
In the main, the issues to address when looking to make an existing building more passive are the same as the fundamental Passivhaus principles:
upgrading insulation to reduce heat loss;
minimising heat loss through gaps in the building’s fabric by draught-proofing adequately;
reducing, where possible, ‘thermal bridges’, usually at junctions, which transmit heat through the insulating layer;
upgrading windows and any glazed doors, usually with triple glazing, to eliminate convection currents and thus draughts caused by the relative coldness of the inner pane of double glazing, or (shiver!) single glazing; and
installing a mechanical ventilation heat recovery system to avoid condensation problems through properly managed ventilation that also recovers heat and warms incoming air in the colder months, and by providing a constant draught-free supply of 100% fresh, filtered air.
Obviously, you can’t change the basic shape of your house or its orientation relative to the sun’s movement to optimise solar gain. However, subject to any planning requirements, you may be able to design the upgrades of some of the windows to enhance this, as is briefly described in the video on the Victorian townhouse described above (see from 0:20). Again, using the PHPP will help you to design your retrofit to greatest benefit taking all aspects into account.
Insulation

Internal wall insulation. Picture from Centre for Sustainable Energy: Solid wall insulation - internal
Increasing the level of roof insulation is probably the simplest aspect of this, but there are different methods; and it’s vital to take proper account of the effect of the increased insulation on humidity levels in the loft space (if you have one) and on the roof structure itself.
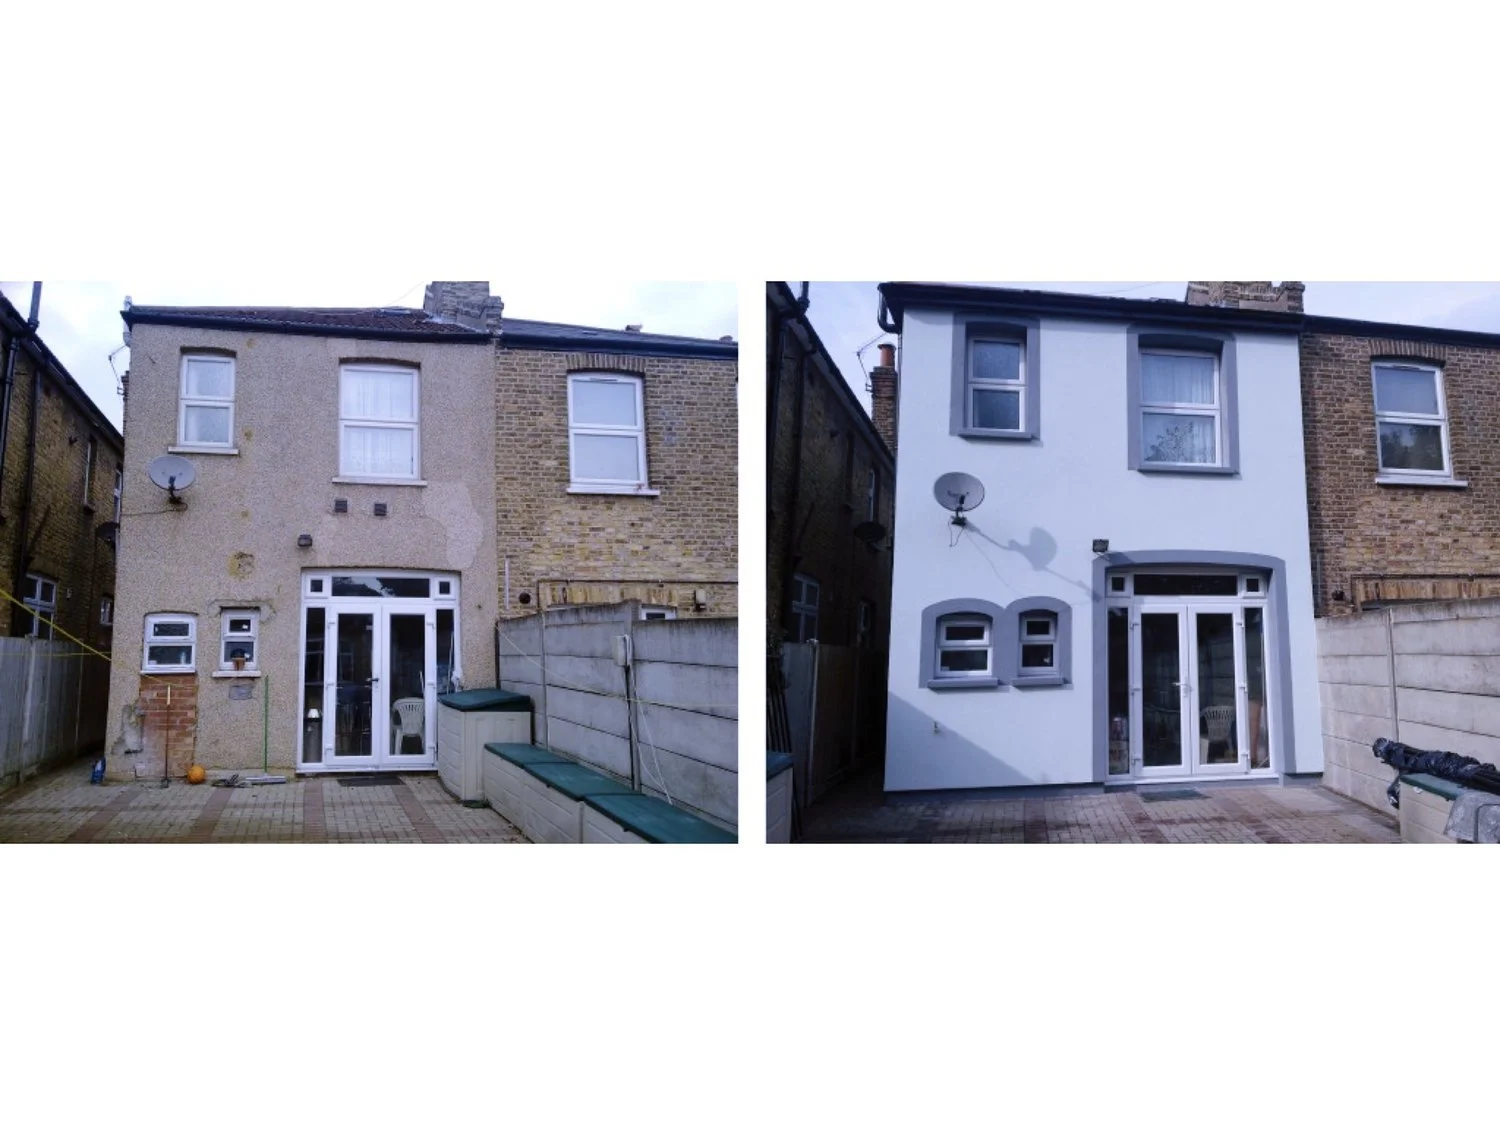
There are three main options for wall insulation: internal and external (for solid wall buildings) and cavity wall. Internal wall insulation maintains the house’s external appearance but will reduce floor space and have may an impact on the windows and external doors and features such as chimney breasts and ornate coving. External wall insulation will preserve internal floor area but will change the house’s external appearance (which may have planning permission implications) and will also have an effect on the windows and external doors. Installing cavity wall insulation where this was not done at the time of construction is likely to be relatively straightforward, but make sure you use suitable materials!
External insulation. Picture from The Greenage: External solid wall insulation
With all types of wall insulation, consideration must be given to its impact on interstitial condensation. Ideally, external walls should be progressively more ‘vapour open’ towards the outside, thus making it difficult for water vapour to get into them internally but, if it does so, to make it easier for it to escape to the outside. Adding internal, external or cavity wall insulation will affect this and you’d do best to get expert advice on what insulation materials would be most suitable for your building. Installing a mechanical ventilation heat recovery system is vital when you increase insulation levels and install effective draught-proofing, but you will still need to consider how different wall insulation methods and materials will impact your property from a condensation perspective.

Cavity wall insulation. Picture from BBC: Home insulation scheme must guarantee high-quality work, say campaigners

Underfloor insulation. Picture from Homebuilding & Renovating: Insulating floors - what insulation do I need?
Installing underfloor insulation, also important in making your house more passive, is more complex, depending on whether you have a solid concrete floor or a suspended one. In the case of the latter, underfloor insulation will probably also play a significant part in draught-proofing.
If installing insulating material between floor joists it’s very important to ensure a tight fit between the insulation and the joists or the ensuing draughts through the gaps will substantially reduce the insulating effect. It’s also vital to consider the impact on condensation, requiring adequate sub-floor ventilation and the use of appropriate insulating materials.
If you have a solid concrete floor then the most effective, but also the most expensive and most disruptive method, is to remove it, install proper insulation and relay it. Alternatively, it is possible to lay insulation on top of the concrete but this will raise the ground floor level affecting door thresholds and skirting boards, and possibly the height of kitchen work tops and power points, and probably the rise of the first step of the stairs.
Draught-proofing

Air tightness tape sealing a duct that penetrates the airtightness layer of the house wall (internally in the upper picture, externally in the lower one), in this case, carrying the TV satellite dish cabling; see more detail in this blog
Whilst adding insulation and fitting new windows and doors (see below) will help to reduce draughts, there are other structural sources of draughts, and thus heat loss in winter and heat gain in summer, that need to be considered. Air vents within the insulation envelope, kitchen and bathroom extractor fans, and chimney flues are more obvious draught sources needing attention, and, as previously referred to, you must have an effective strategy for managing internal moisture vapour to avoid condensation and damp and possible consequential structural damage.
There may also be draughts through the fabric of parts of the building (such as cracks in plaster) as well as around pipes and ducts that penetrate the external walls. And there can be draughts around electrical power sockets and light fittings.
The installation of a vapour-check membrane and the use of airtightness tape may be necessary to deal with structural draught sources. And there is a relatively new product, an air sealing system called AeroBarrier, which is being used in some retrofits, but this is not something that we have any experience of so research it very thoroughly yourselves if you think this might be of use.
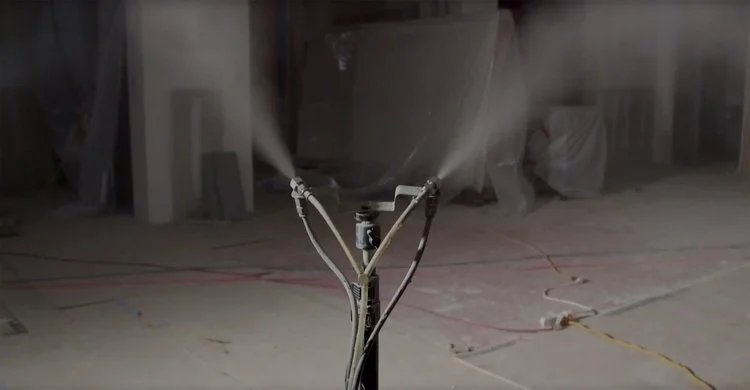
Picture from AeroBarrier installation device: Matt Risinger Explains AeroBarrier
Dealing with thermal bridges
Thermal (‘cold’) bridges are usually aspects of the building’s structure (for example, steel or concrete lintels) that breach any insulation and thus transmit heat through it causing cold spots (especially in winter) and consequentially also risk the development of dampness. They can also occur, for example, at uninsulated joints between walls and the roof structure (such as at the eves), as well as between external walls and the floor; between joists and walls; and between walls and the frames of windows and doors. Thermal bridges are much easier to avoid by design in a new build and more difficult to deal with in an existing building but are not necessarily impossible to manage. In any event, the Passive House Planning Package can be most useful in exploring ways to deal with these or compensating for them with, say, additional insulation elsewhere.
Upgrading windows and doors
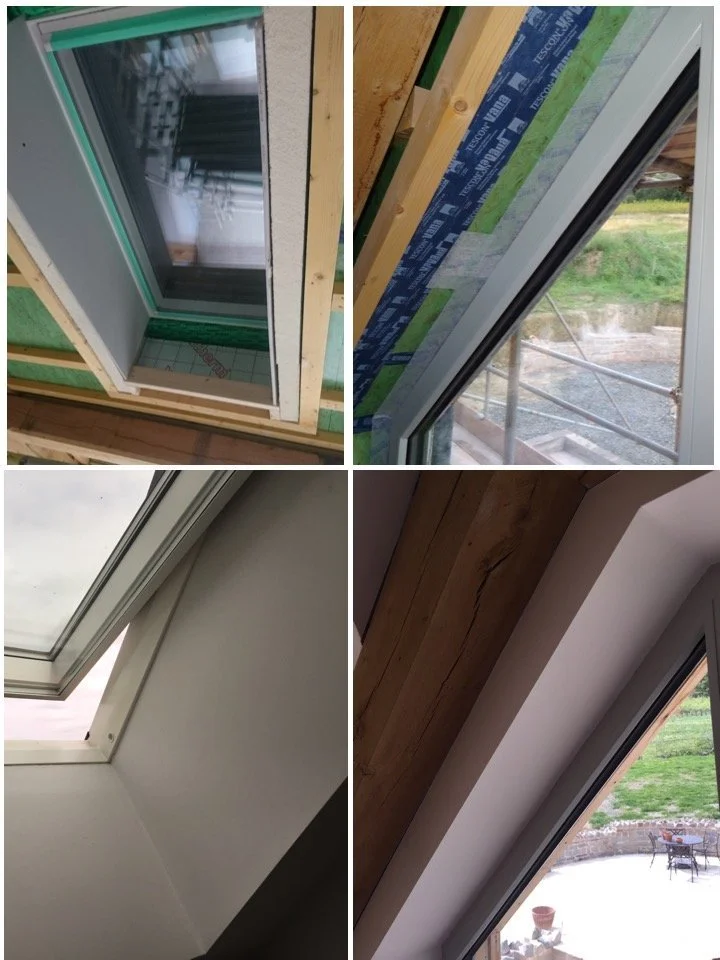
Additional insulation wrapping window frames internally to reduce thermal bridge effect of frame (insulation also added around the frame externally)
In the UK, achieving the Passivhaus standard will almost certainly require the installation of high-performance triple-glazed windows and special external doors (all of which, in our case, have full-height glass). This applies just as much to a retrofit as to a new-build. (Read more about the advantages of triple glazing and the vital need to install it correctly in another blog.)
Somewhat counter-intuitively, more heat is lost through the window frames than the glass; mullions and transoms especially transmitting heat from inside to outside and adversely affecting U-values. Choosing the design of replacement windows is thus very important:
non-opening windows will lose the least heat through their structure (noting that the Passivhaus standard requires at least one opening window in each room);
simpler windows, with a higher glass:frame ratio will have better whole-window U-values; and
internally-opening (often tilting) windows usually offer better U-values than the more UK-traditional externally-opening casement windows.
It is vital to install triple-glazed windows properly, requiring: (i) fitting them roughly in the middle of the wall insulation, (ii) fixing them with external L-shaped brackets rather than with screws through the frame (which will act as thermal bridges), (iii) placing additional insulation inside and outside the frame, continuous with the walls’ insulation, to reduce thermal bridging, and (iv) ensuring the highest possible level of airtightness around the frames. The same principles apply to external doors, which, at Woodlands are, effectively, full-height opening windows.
In many respects, properly installing triple-glazed windows and doors in a Passivhaus or near-Passivhaus retrofit project should be much the same as in a new-build, with similar effectiveness and benefits.
Mechanical ventilation with heat recovery
The mechanical ventilation heat recovery (MVHR) unit at Woodlands. An MVHR system is a vital part of any Passivhaus or near-passive house retrofit
A mechanical ventilation heat recovery (MVHR) system is a key part of any highly energy-efficient building because it:
provides a continuous supply of 100% fresh, filtered air throughout (the incoming and outgoing air flows do not mix, and there is no recirculation);
ensures controlled and predictable ventilation which, if the system is properly designed, installed and commissioned will ensure healthy levels of humidity and prevent condensation. (The effectiveness of ‘traditional ventilation’ using trickle vents, gaps in the building fabric and occasionally-opened windows varies with the vagaries of the wind and air pressure and creates draughts and cold spots, whilst an MVHR system is predictable and consistent);
extracts the majority of the heat from the outgoing air passing this, via a heat exchanger, to the incoming air;
creates a high-quality ‘always fresh’ indoor environment; and
can be used to provide both heating and cooling (albeit little being needed).
It will be necessary to have the system designed by an expert and, once installed, to be ‘commissioned’ properly, that is for the various room inlet and outlet vents to be adjusted so that all the incoming and outgoing air flows balance precisely.
The MVHR unit is the one piece of kit where it’s advisable to buy one that is certified by the Passivhaus Institut. There are many different MVHR units and their performance differs, with some only recovering about 75% of the heat from the outgoing air. A Passivhaus Institut-certified MVHR unit will recover at least 90% of the heat from the outgoing air.
It will also be necessary to install ducting to rooms and possibly some open spaces. Because there will be existing structures and beams in the way, for a retrofit you will almost certainly have to use flexible ducting rather than rigid steel for much of this.
Other considerations
It is entirely possible to retrofit many buildings to a passive house standard and the Passivhaus Institut has developed a special standard, EnerPHit, to help in the design of retrofits. It is also possible to get formal certification, following assessment, of achieving the EnerPHit standard and you can then expect your house to perform at least as well as this for many years to come. Some aspects of the EnerPHit standard are slightly lower than for new builds, recognising the difficulties of retrofitting, but it is still very substantially higher than the current building regulations for England (or elsewhere). EnerPHit certification is not a requirement, but does offer an external quality assurance that your retrofit was designed, and built, as intended.
Taking a staged approach
Retrofitting an existing property to a much higher standard of energy efficiency is no small task, especially if you are still living there. However, it is quite possible and may be preferable, to do this in stages but it’s vital to do things in the right order as well as the right way. The EnerPHit Retrofit Plan helps you to develop a step-by-step approach which can, if you wish and if things are done correctly, lead to certification.
A more passive retrofit, but not to the EnerPHit level
You may not want, or be able, to retrofit to the EnerPHit standard but still want to make your home ‘more passive’. In the video on the right, you can hear Dan’s story about improving the energy efficiency of his mid-terrace Victorian home.
In this video, you can hear the experience of Lorenza and her husband, Paul’s experience of retrofitting a mid-terrace 1960’s home. They did some of the work themselves and brought in professionals for other aspects.
And in this video, Gavin talks about retrofitting his 1970’s urban semi-detached house
You can experience the Passivhaus difference at Woodlands, Malvern B&B. We’ll be pleased to discuss our experiences of building and living in a Passivhaus and how this may be able help you to decide what you want to achieve with your retrofit project.