Window and door installation and the first air tightness test

In this section we look at the installation of our triple-glazed windows, doors and roof windows and the first airtightness test – which we were all delighted to pass.
The windows are a key component of a passive house: they enable the sun to warm the house to a significant degree and play a major part in keeping heat in. But they also play a vital role in avoiding overheating through facilitating adequate ventilation, for example through ‘Mediterranean purging‘, that is keeping windows closed during hot summer days and at night opening them on upper floors to allow warm air to escape and on the ground floor to let cool air enter). And there are also aesthetic considerations: not only do windows need to look good in themselves, but they need to enable excellent views to the outside and to let in lots of light - a key contribution to the fantastic internal living environment of a passive house.
Triple glazing
Triple glazing is a requirement for Passivhaus Institut certification. One aspect of the need for triple-glazed windows is to ensure thermal comfort. This is not just avoiding draughts (partly achieved through ensuring airtightness) but also avoiding discomfort from thermal stratification.
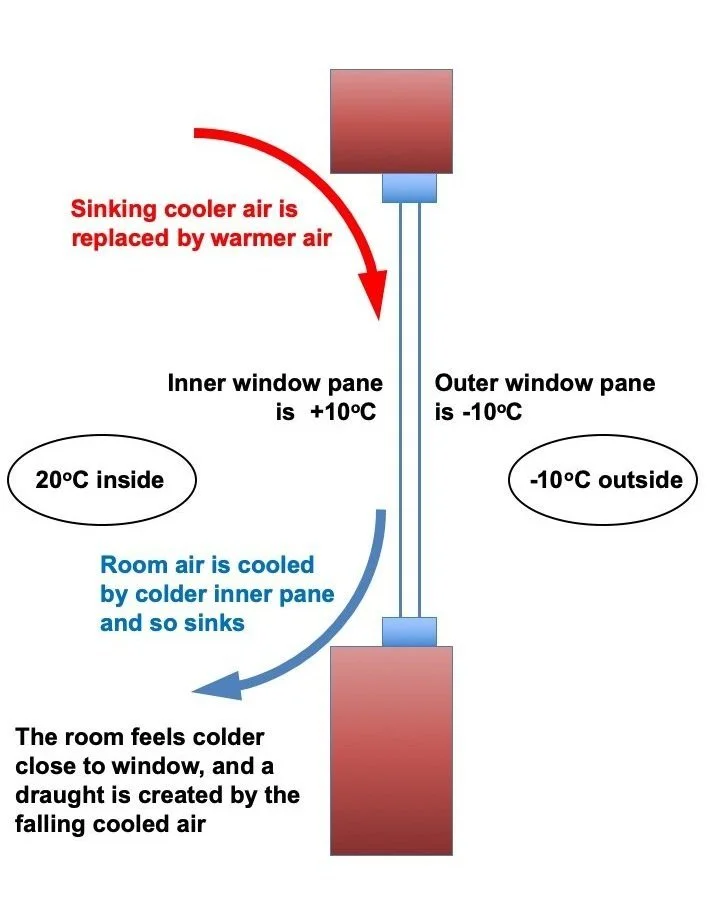
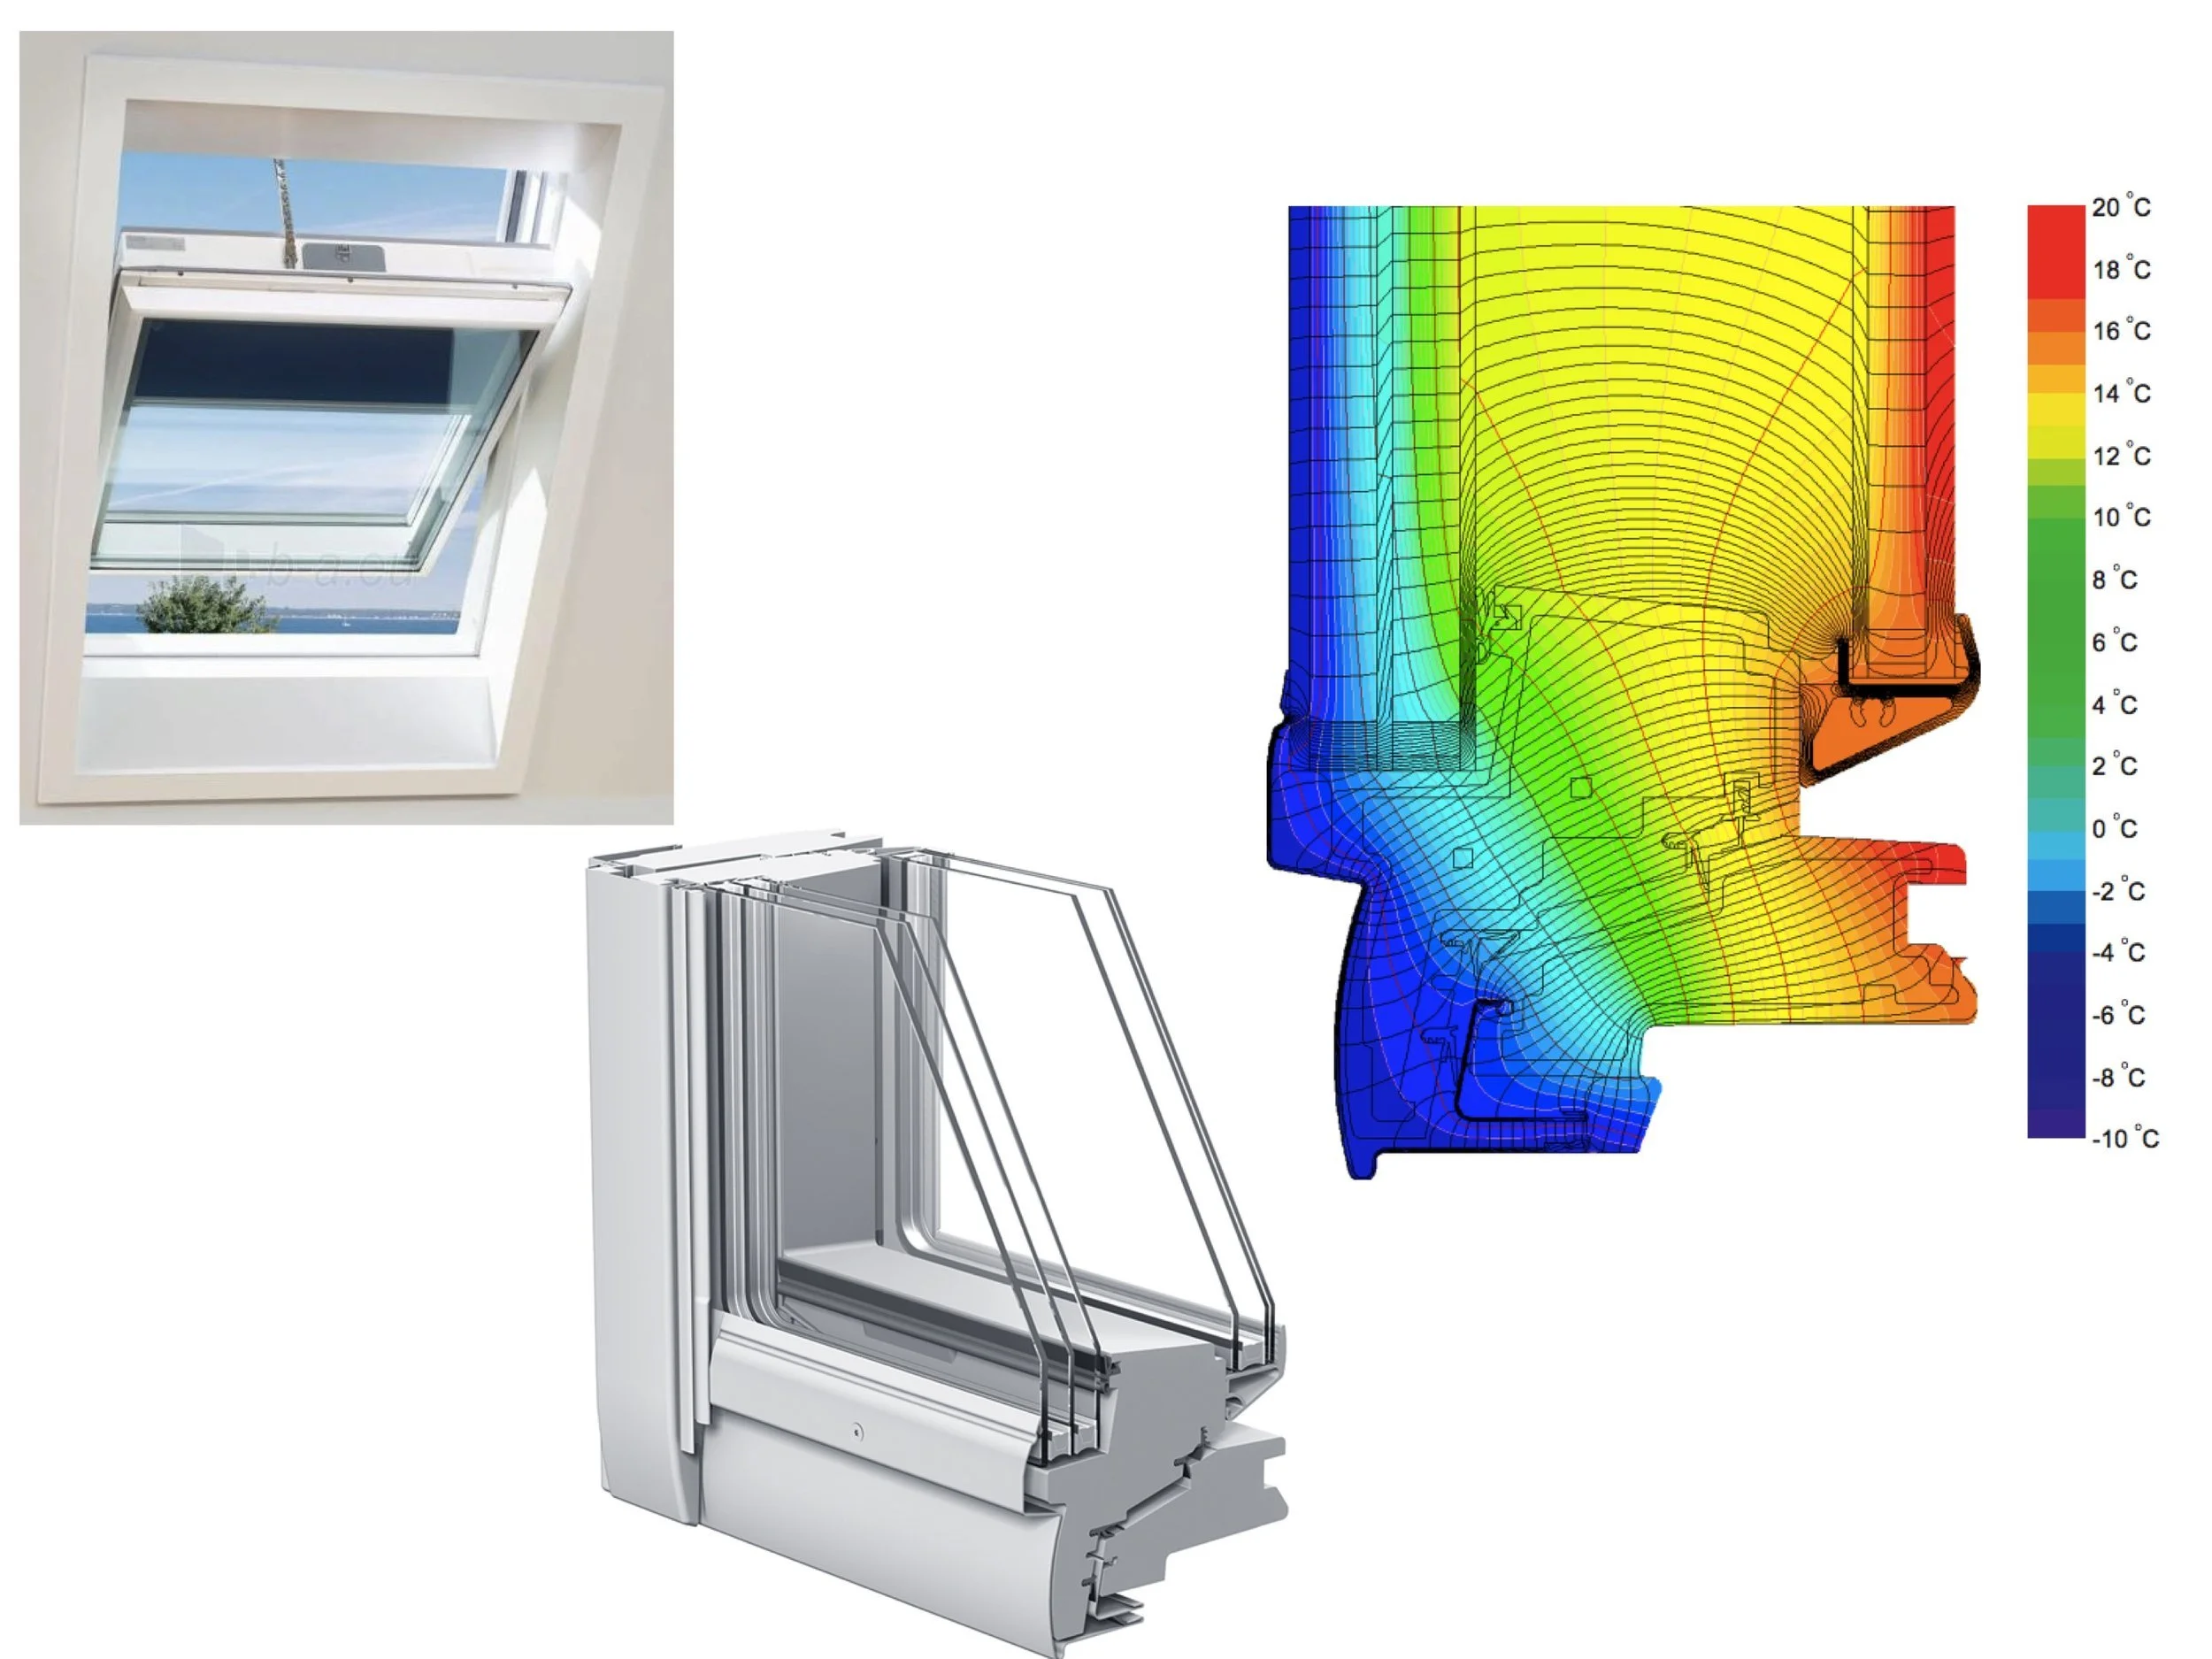
Convection currents are a cause of temperature stratification in a room, as depicted in the diagram on the right. When it is cold outside, the inner pane of a double-glazed window is also relatively cold. This cools the room air next to it creating a cooler area near the window and air circulation (because cooler air falls) leading to the room air being cooler nearer the floor and warmer nearer the ceiling. This can create a draught as well as an uncomfortable sensation, if the temperature difference is high enough, of one’s feet being colder and one’s head being hotter. Radiators are usually placed underneath windows to counter this effect.
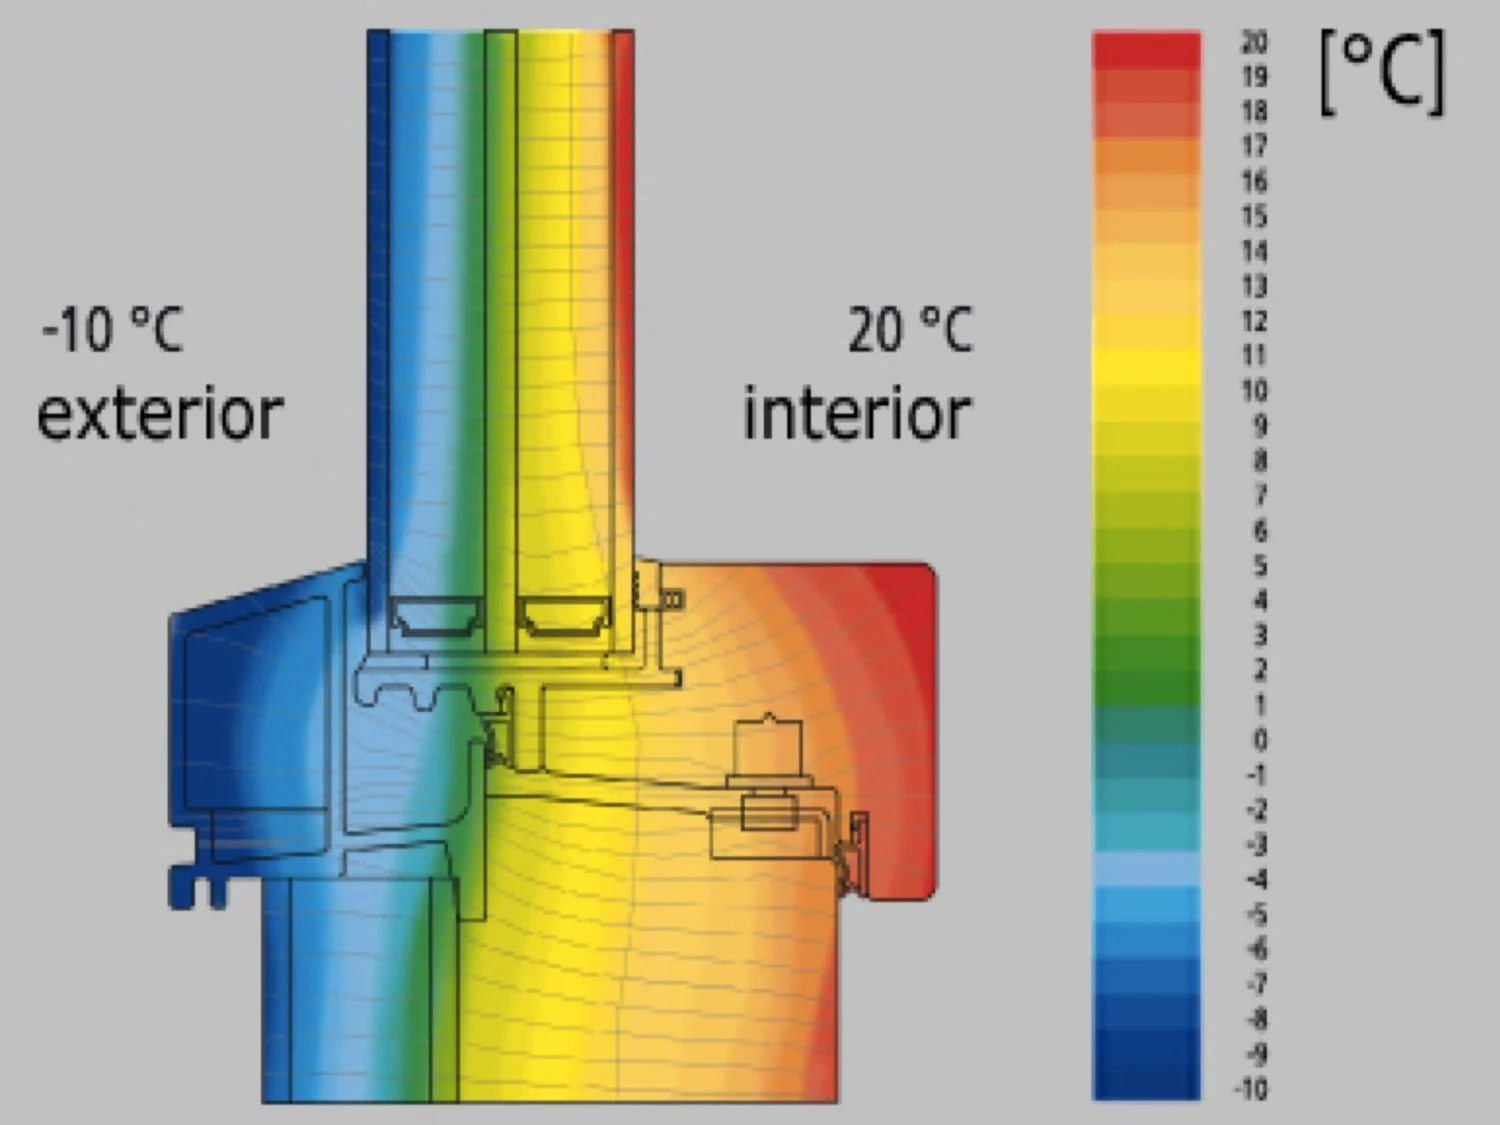
The picture on the left shows a thermal image of a triple-glazed window. With triple-glazed windows there is an additional air layer as well as additional glass coatings to help keep heat inside. The temperature of the innermost pane is thus much closer to the room temperature . This prevents convection currents (as depicted in the picture above) and makes it comfortable when close to the glass (there is no ‘cold radiant‘ effect when heat moves from our bodies to nearby things that are colder thus making us feel cold). This therefore increases the room’s usable floor area.
Having looked at a number of window suppliers, including visiting some at various national exhibitions, we chose Green Building Store to both supply and fit our windows, particularly because of their experience in fitting triple-glazed windows.
We used windows and doors from the Green Building Store Ultra range. These are manufactured in Lithuania by Meranti and are argon-filled with Swisspacer ‘warm’ spacers to minimise cold bridging between the glass panes. You do not necessarily need to have Passivhaus Institut-certified windows and doors in order to achieve Passivhaus certification. This is where use of the Passive House Planning Package can help to avoid over-engineering: it shows the balance between the performance of the various components of the house in order to achieve the Passivhaus standard; there is no need to exceed this by a substantial margin and so it is not always necessary to use the highest specification (and most expensive) components.
Not only did we like Green Building Store’s window and door products but it was clear that the company had a lot of experience with passive houses and, importantly, of installing triple glazed windows and doors to achieve the Passivhaus standard. We took the view that there is no point in spending more money on high-specification triple-glazed windows and then not installing them effectively: poor installation will allow heat to leak through and around the frame and negate the benefits of the triple glazing system.
The importance of properly fitting triple-glazed windows
Properly installing triple-glazed windows is vital to get their full benefit. This is principally because, perhaps counterintuitively, a high proportion of the heat loss through windows occurs through the frame.
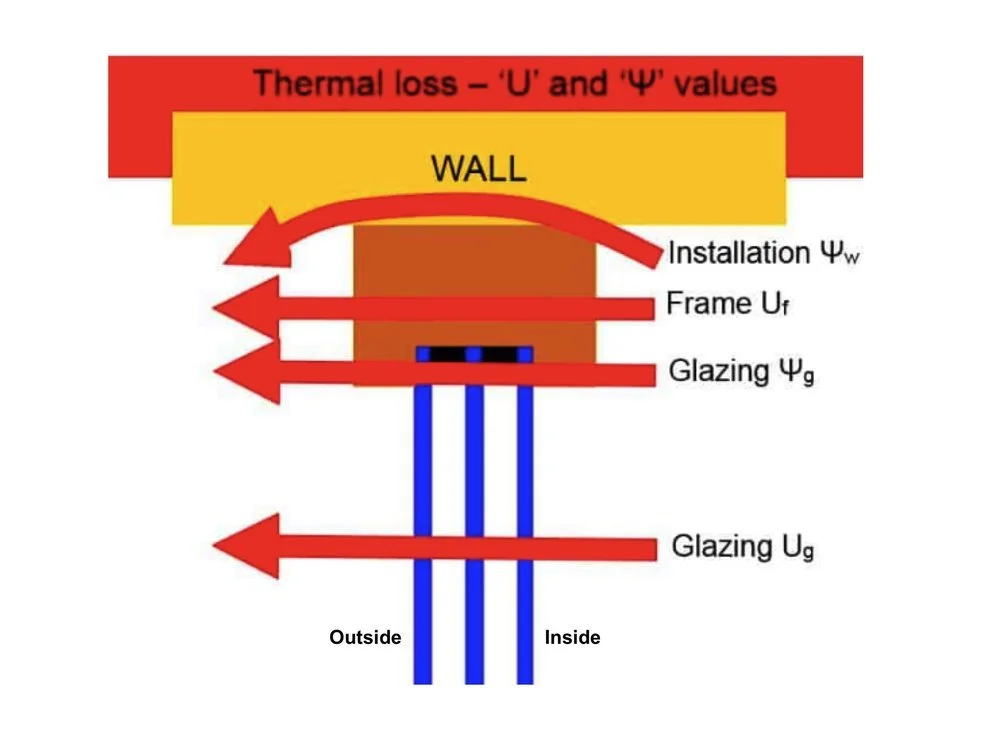
The diagram on the right, from a Green Building Store blog, shows how heat is lost through a window. The U value is an expression of heat transmittance, in this case, through both the window pane and the window frame. The Ψ (psi) value is a measure of the rate of heat transfer through a thermal bridge, for example at a junction of two materials such as a window frame and a wall. This raises another point: the U values for the pane and the frame are different and it’s important to consider the whole window U value not just the windowpane U value (which will appear more favourable). Indeed, because of the importance of how a window is installed, the Passive House Planning Package also takes into account the installed U value.
Ideally, the window frame needs to be placed in the middle of the wall’s insulation section rather than close to the outer edge, with insulation wrapped around it (certainly the outer part of much of the frame and, as is possible, also the inner part). This helps to reduce cold-bridging through the frame. Green Building Store calculated psi values for our windows to identify the best position for them within the insulating encapsulation panels. This gave us a double benefit: optimised insulation and deep interior window cills.
In addition to this, we asked Green Building Store to put expanding foam tape around the window frames to ensure a tight fit against the walls. They identified that one type of this, Vitaseal, made in different widths, was available in a sufficient width to cover the whole of the edge of our window and door frames. This video is a discussion on why this additional insulation is required and how the window itself is only ‘half the story’, the quality of the installation being the other half.
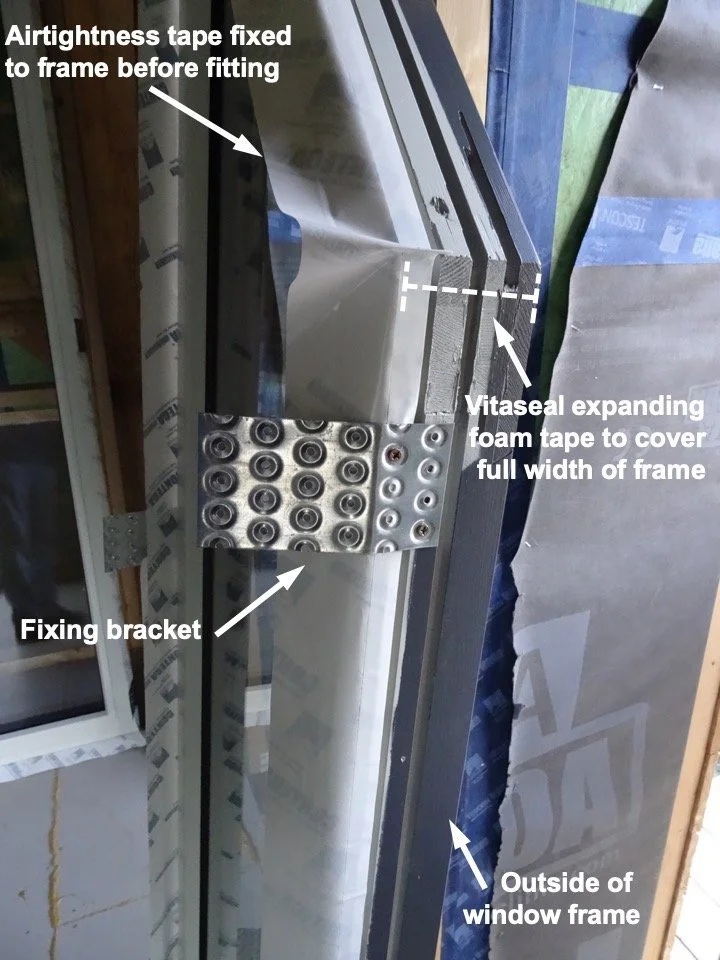
The picture on the right shows one of the windows being prepared for fixing. Two important points to note are: (i) the internal airtightness tape is fixed to the frame before installation (there is a separate cover on this that is peeled off to reveal the adhesive layer after the window is in place), and (ii) unlike many double-glazed windows, the frame is not fixed to the wall with fixings through the frame (which would act as a cold bridge) but by brackets on the outer surface of the frame that will be enveloped in insulation. You can see these brackets fixed to the wall in the pictures on the right and below.
The picture on the right was taken before the Vitaseal foam tape was set around the outside of the window frame. (Because it expands relatively quickly, this needs to be done just before installation into the window opening.)
The picture below shows different aspects of the window and door fixing. The two images on the left show the fixing brackets and yet-to-be-attached airtightness tape between the frame and the internal wall surface. All three images show the Vitaseal expanding foam tape creating a tight seal around the window frame internally and externally.

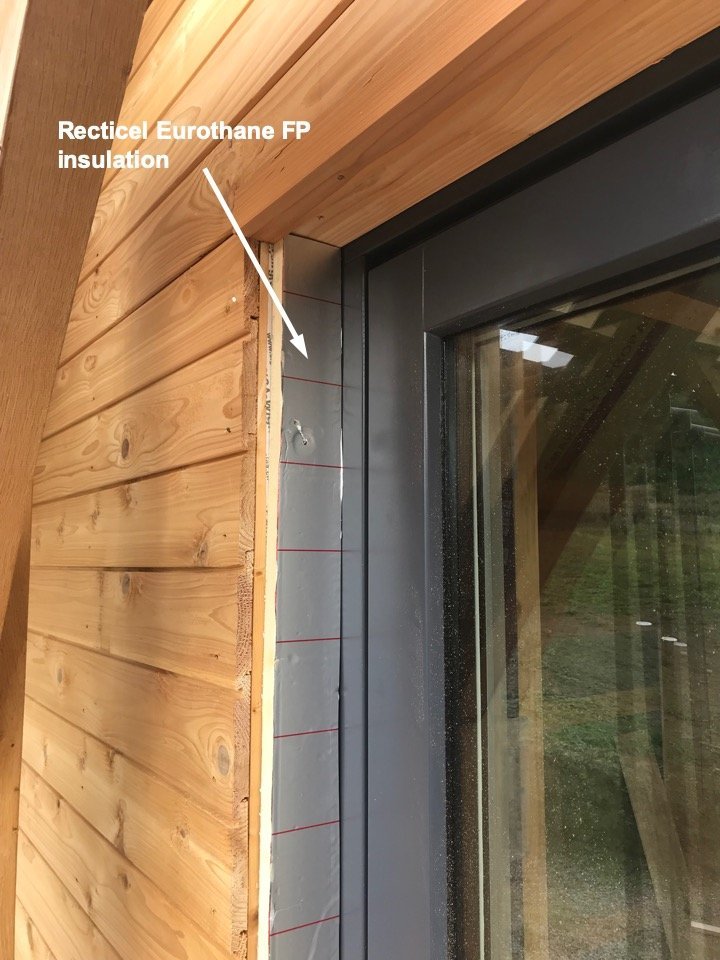
In terms of enveloping the window frame in insulation, a layer of Recticel Eurothane FP PIR (polyisocyanurate) insulation board was placed onto all four sides of the external window reveals to close the cavities behind the brick and the wood cladding rainscreens and to cover a substantial portion of the window frame itself.
In this way the window frame and the Vitaseal expanding foam tape were effectively ‘sunk’ into the insulation of the wall thereby reducing cold bridging through the window frame. An example of Recticel Eurothane insulation can be seen in the picture below.
The lift-and-slide doors and the front door and windows and the back door were insulated from the groundfloor concrete slab with Compacfoam, as recommended by Green Building Store. The purpose was to avoid any risk of cold-bridging between the bottom of the frame and the concrete slab beneath. This can be seen in the picture below showing (i) the Compacfoam glued into position, (ii) a cross-sectional diagram showing the relationship of the Compacfoam with the Isoquick foundation insulation and the ground floor slab, and, (iii) a picture of the the Isoquick foundation insulation before the concrete slab and overlying screed were both poured.

The roof windows
Roof windows can create difficulties for a Passivhaus design because (i) they have to be located on the outer edge of the insulating layer to enable rain run-off, which compromises the insulation performance of their frames, and (ii) because heat rises, more will be lost through a roof window (which is at an angle or is horizontal) than through a vertically-orientated window. Again, the Passive House Planning Package is a crucial tool in managing such issues at an early design stage.
At one self-build exhibition we spoke with sales staff and looked at the products of some manufacturers of roof windows suitable for passive houses. We chose to install Velux roof windows which are Passivhaus certified. These are actually quintuple-glazed, with outer triple-glazed and inner double-glazed sections, as shown in the picture below. They can also be operated automatically which was key for two of our roof windows which are out of everyday reach. Velux can also put you in touch with installers who have been specially trained for this particular product – it is not the same as installing a standard roof window because of the need for additional insulation, avoidance of cold bridges, and airtightness – although it was our builder installed them for us.
Because the roof windows had to be set at the outer edge of the roof encapsulation system, we placed a thick layer of Recticel Eurothane insulation on the inner faces of the openings to reduce heat loss through the window frame.
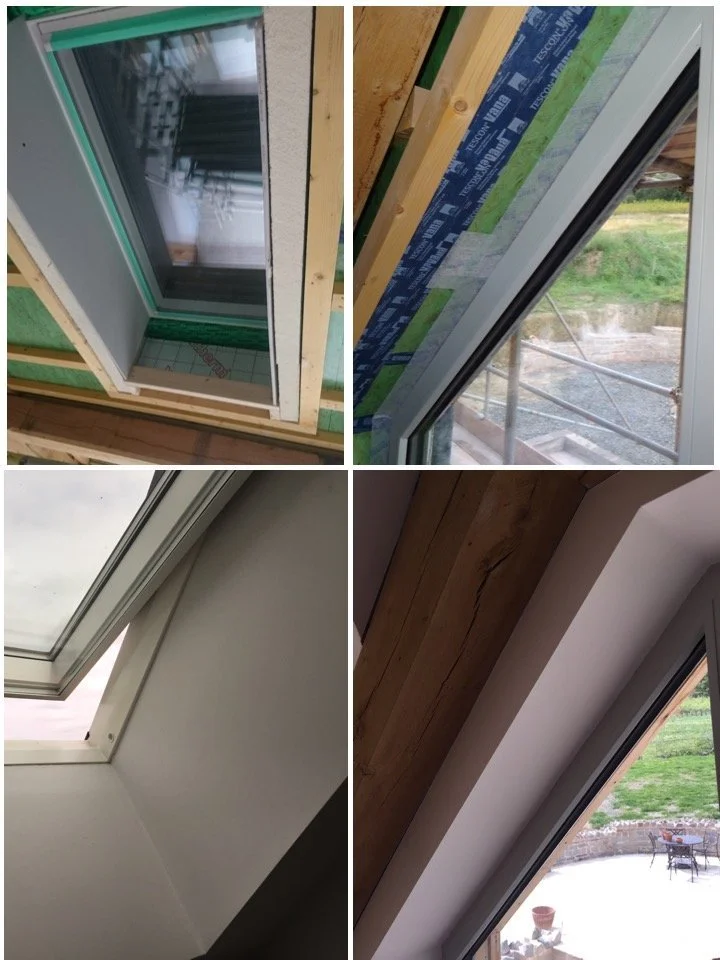
The difference in the width of window frame that is visible internally between the roof windows and the ordinary windows is shown in the picture below. The top-left image shows one of the roof windows with the internal insulating layer in place before the plasterboard was fixed. There is airtightness tape beneath this between all of the window frame and the insulating encapsulation panel in which it is set. The bottom-left image shows this with another of our Velux windows with the finished plastering (they are all the same): there is only a sliver of window frame exposed. In contrast, the top right-hand image shows one of the ordinary window before the application of the plasterboard. Even with a 46mm service void behind it, as shown in the bottom-right image, there is a much larger amount of window frame exposed internally (but, as shown above, these window frames have a layer of Recticel on the outside.
The first airtightness test
Creating as near as possible an airtight envelope for the whole building is a key component of a Passivhaus. It is important to keep the number of penetrations of the airtightness layer to a minimum, and where these are unavoidable, to ensure that they are sealed tightly. The picture below shows one such example being a conduit passing through the airtightness layer and the insulation to the outside through which will be passed the cabling for out TV satellite dish. The upper image shows this internally and the lower one the not-yet-completed tape-sealing onto the outside surface of the encapsulation system. When a cable is passed through such a conduit it is sealed within the conduit as well.
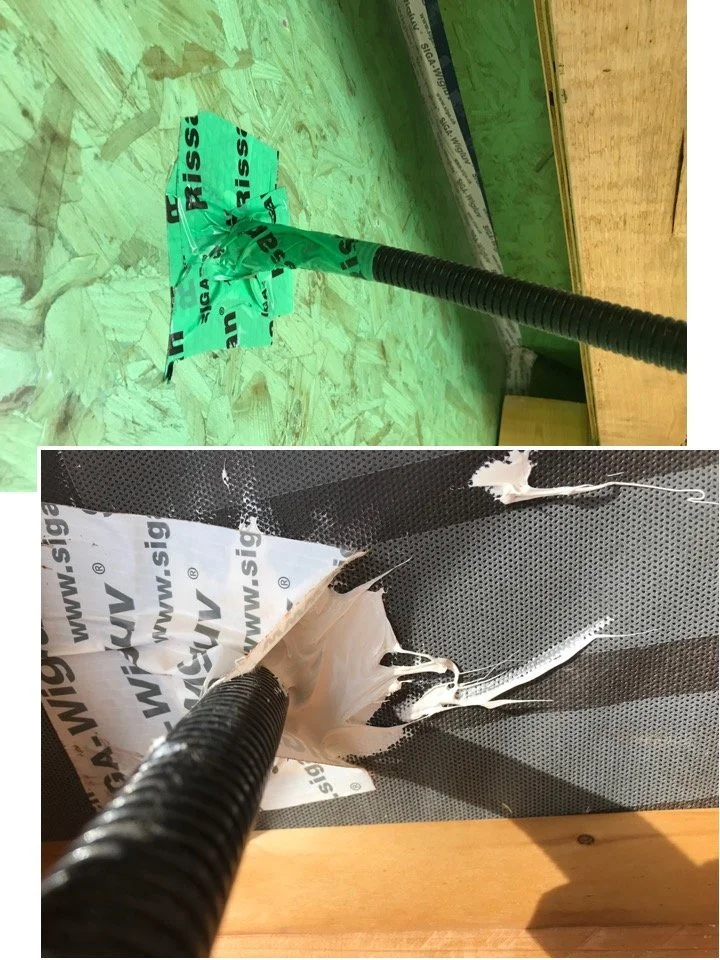
Our builder was keen to have an airtightness test before the plasterboard was installed so that we could fix any air leaks in the encapsulation layer before it was permanently covered. Several people from both our builder’s team and the Oakwrights team, and ourselves, spent time during the early stages of the air teat feeling over the walls and, especially, at junctions (for example, where the window and door frames were fitted) for air leaks. Where these were found we applied additional airtightness tape to seal them. The two images on the left in the picture below show where air leaks were detected and sealed with extra strips of airtightness tape.

The image on the right, above, shows the air blower used in the air pressure test (often referred to as a ‘door blower test’ in America). It is sealed into an opening, usually, as in this case, a door and a fan is then used to blow air into the house and, for the second part of the test, to suck air out. Standing inside the house these changes in air pressure are imperceptible, but are sufficient to identify any significant leaks in the building fabric or in the window and door seals.
The test is undertaken in two stages, one blowing air in and subsequently sucking it out (that is, positive and negative air pressure) to test whether there is any significant movement of seals on both sides of window and door joints, as well as any leaks elsewhere. Usefully, this first airtightness test showed a seal leak in one of the lift-and-slide doors. We sealed all of these doors with plastic sheeting (shown in the picture below) and were able to demonstrate that the house was otherwise meeting the Passivhaus airtightness standard. Green Building Store quickly returned and, with only minor adjustments, fixed this problem.

A much more detailed description of the Passivhaus airtightness standard and its measurement can be found at this link and a video description can be found here. It is also noteworthy that whilst all new houses in England are required to meet air tightness levels defined in the national building regulations, the Passivhaus airtightness standard is much more stringent.