The outer coverings: bricks, timber cladding, roof tiling & flat roof sealing

Here, we discuss the brickwork, timber cladding, and the roof. These determine the house’s external appearance but, most importantly, they both keep rain out and enable any water vapour arising indoors that gets into the fabric of the encapsulation system and roof space to escape outside and not remain to cause mould and, ultimately, rot and structural failure.
Keeping rain out
We chose to have bricks on the ground floor, timber cladding on the first floor and clay tiles on the roof because this is a style we like and was in keeping with nearby buildings. These materials are not structural; the house is held up by the oak frame and insulated by the encapsulation system.
Any water that penetrates what is really just a rain screen cladding of brick, wood and tiles (they are all porous) tracks down in cavities behind them. As these cavities are ventilated, this water can escape and the cavity can dry naturally. This ventilation also means that any water vapour that gets into the encapsulation system from indoors can evaporate and thus keep it dry. The sections and pictures below demonstrate various aspects of this.
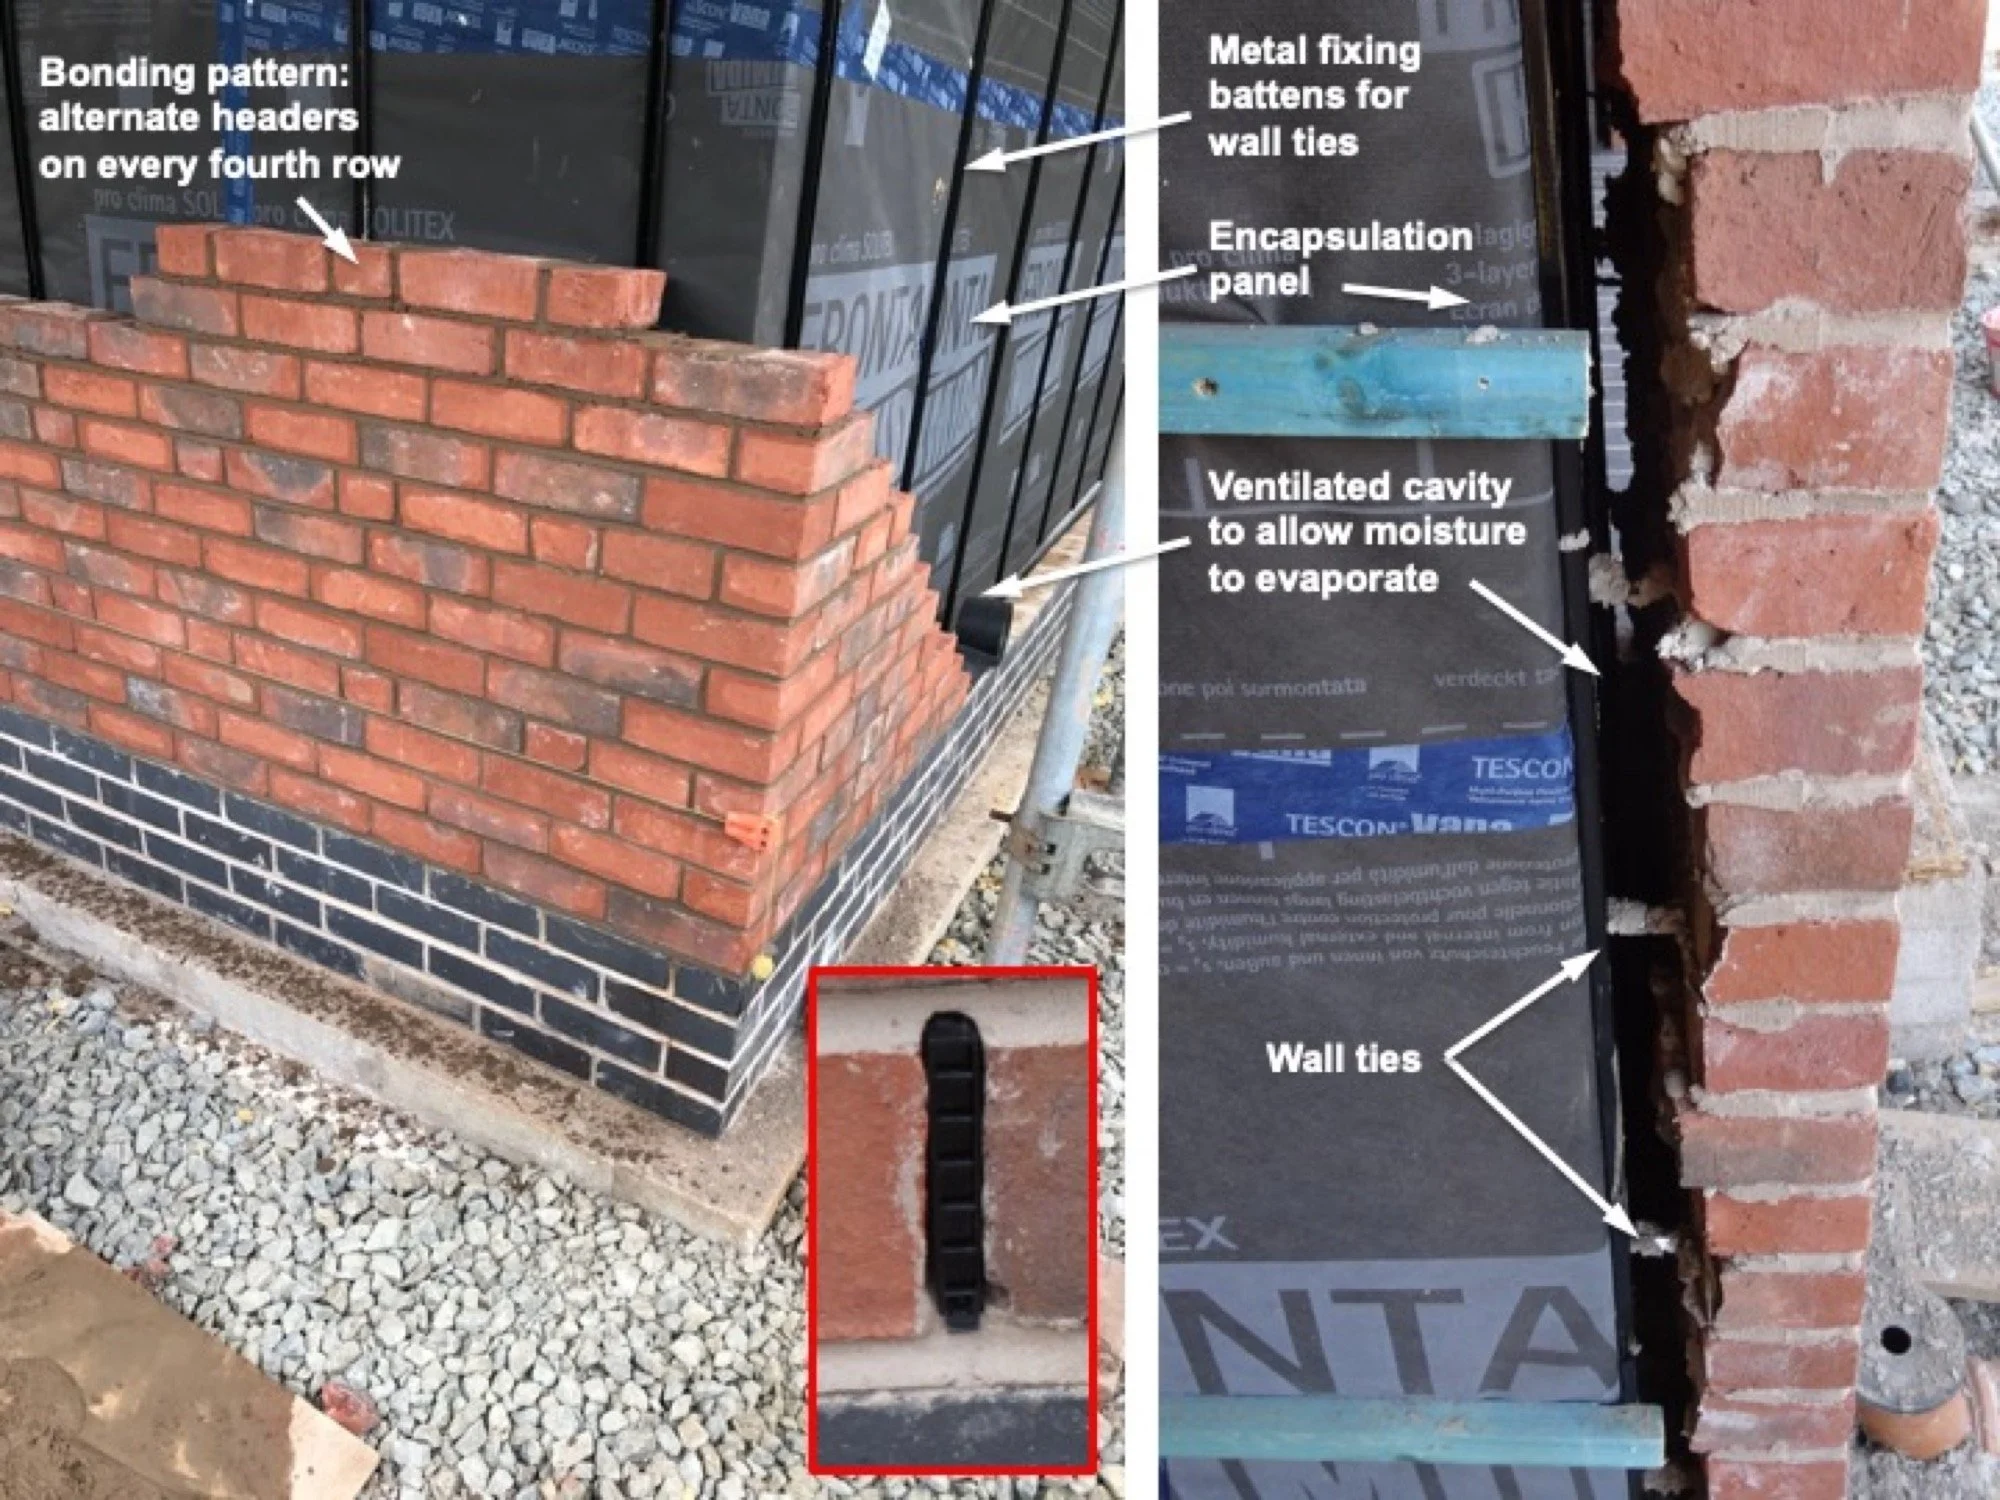
The ground floor external brick walls
In terms of appearance, we chose a brick type and a colour similar to those of neighbouring buildings and, in discussion with our builders, the same brick bonding pattern to help our house blend in. As shown in the pictures below, the bricks, set on a blue engineering brick layer (itself sitting on the Isoquick insulation slab) have a gap between their inside face and the outer face of the encapsulation system creating a cavity. Any water vapour from within the building that penetrates the encapsulation system can pass into this cavity and thence to the outside, as can any water that penetrates through the bricks from outside. This process is aided by ventilation weep vents between the bricks at the bottom (inset in the left-hand image below). The brick facade is fixed at regular intervals to steel battens on the outside of the encapsulation panels by stainless steel wall ties.
Window and door openings
We found that building our own house came with lots of decisions to make on details. One was brick type and the brick bonding pattern and another was the brick pattern above and below the door and window openings. Here, our builder was again helpful in suggesting options. This including taking account of the fact that the face of the first floor timber cladding was set back from the plane of the ground floor bricks because it is not as deep as the brick cladding (see top right image in the picture below and in the next section about timber cladding).
We chose a ‘soldier course’ above each window and a ‘half course’ beneath, as shown on the left in the picture below, but there are many options.
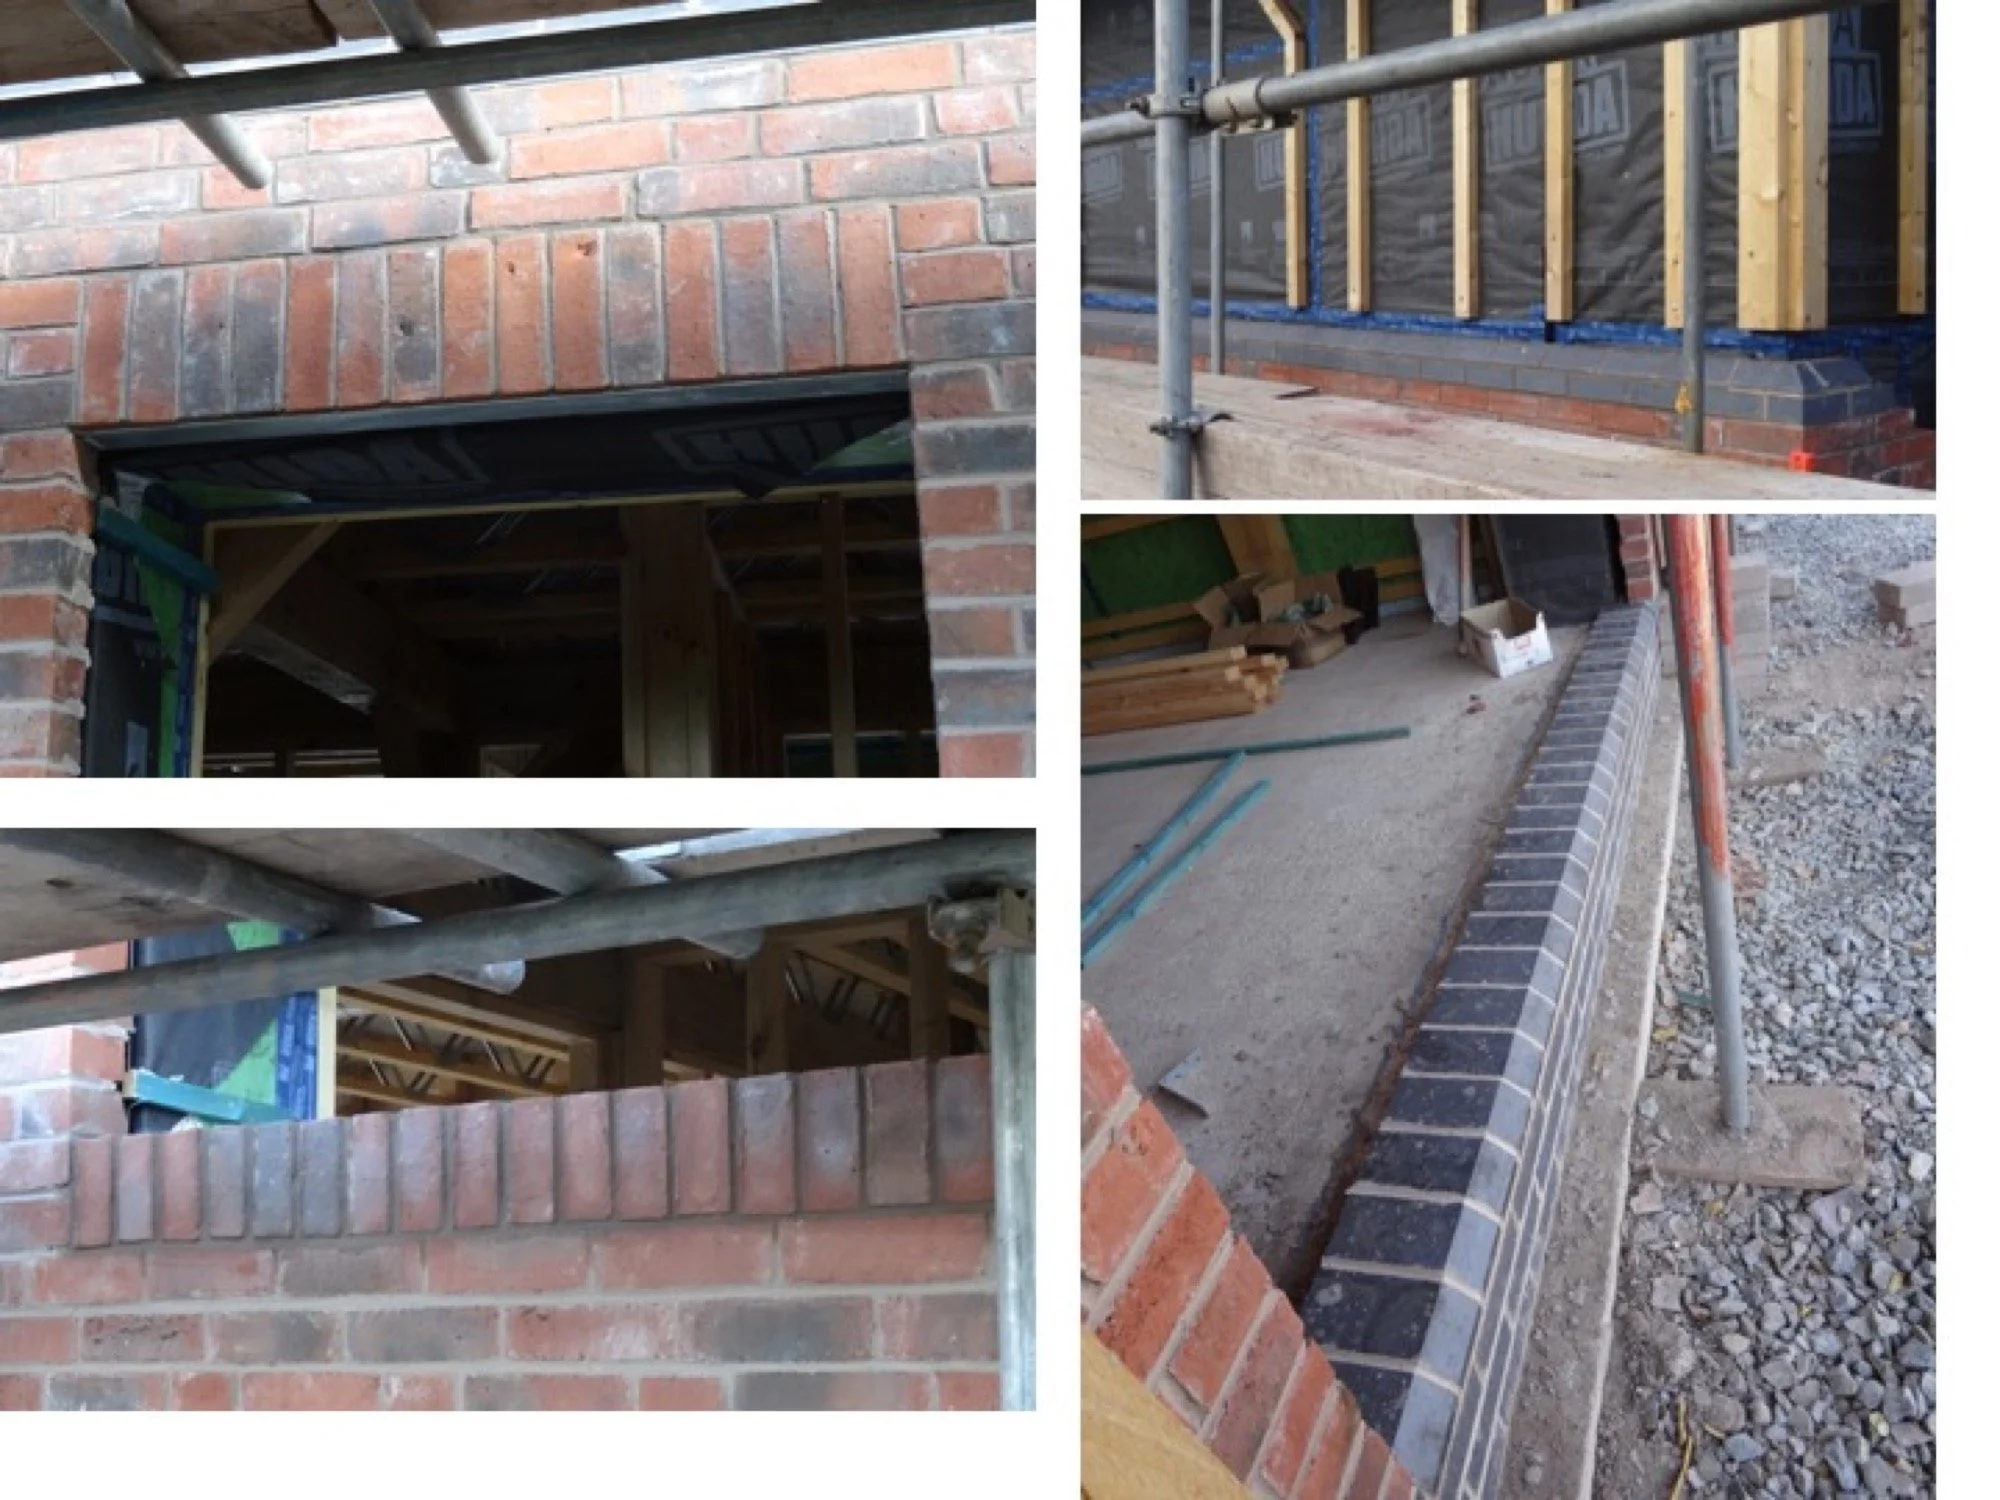
For the ground floor lift-and-slide windows and the front and rear doors, we chose a bevelled-edge blue brick that matched the blue engineering bricks beneath the damp-proof membrane as these would be visible (see bottom right in the picture above). And we chose bullnose blue engineering bricks, complementing the ground floor ones, for the threshold between the brick wall and the timber cladding (top right in the picture above).
The first floor timber cladding
We had to consider options for timber cladding including wood type and its edging and jointing. We chose British western red cedar because it is cheaper than oak but, in our view, looks similar on weathering (it silvers). Also, it doesn’t have an issue of tannin staining from rain run-off that we have seen with some oak cladding (although this washes off in time, we understand). Untreated western red cedar can also be expected to last 30-60 years, which is similar to oak.
As you can see in the pictures below, we chose a half-lap profile (bottom left photo) and, on our builder’s advice, oak corner posts. We have found that both the oak corner posts and the western red cedar have weathered similarly. Importantly, as it was especially sunny during this stage of the construction, the cladding was kept inside the house to avoid irregular sun bleaching prior to fixing.
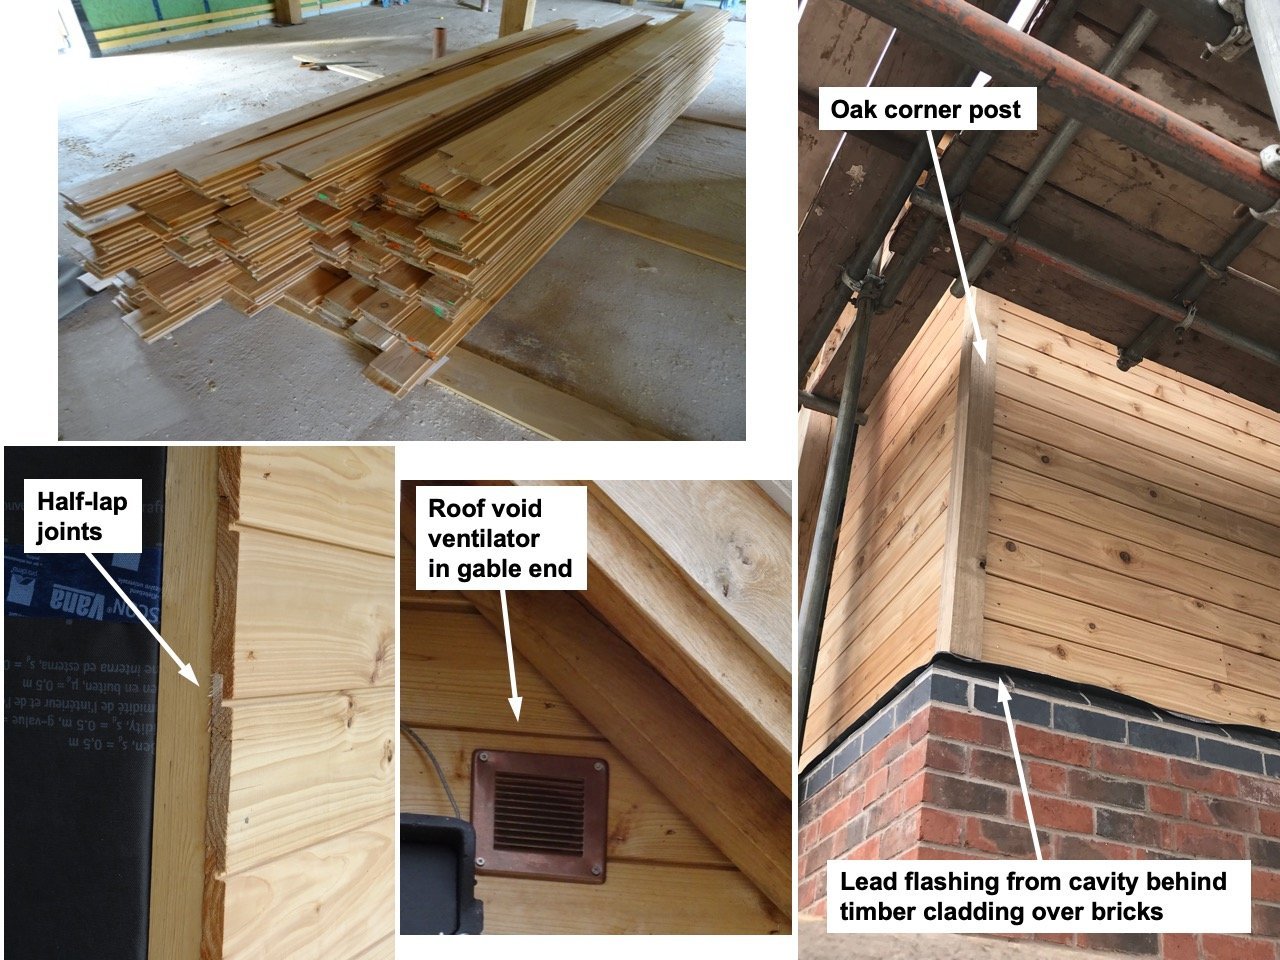
We used stainless steel nails with their heads positioned just below the surface to fix the cladding to the factory-fitted battens on the encapsulation panels. Stainless steel nails do not react with tannin and other chemicals in the boards to cause staining on the wood.
As with the brick facade, there is a ventilated cavity between the outer breather membrane on the encapsulation panels and the timber cladding. This allows any water vapour from inside the house to escape and any rain water that penetrates the cladding to drain away and allow the cavity and the cladding to dry fully.

The pitched roofs
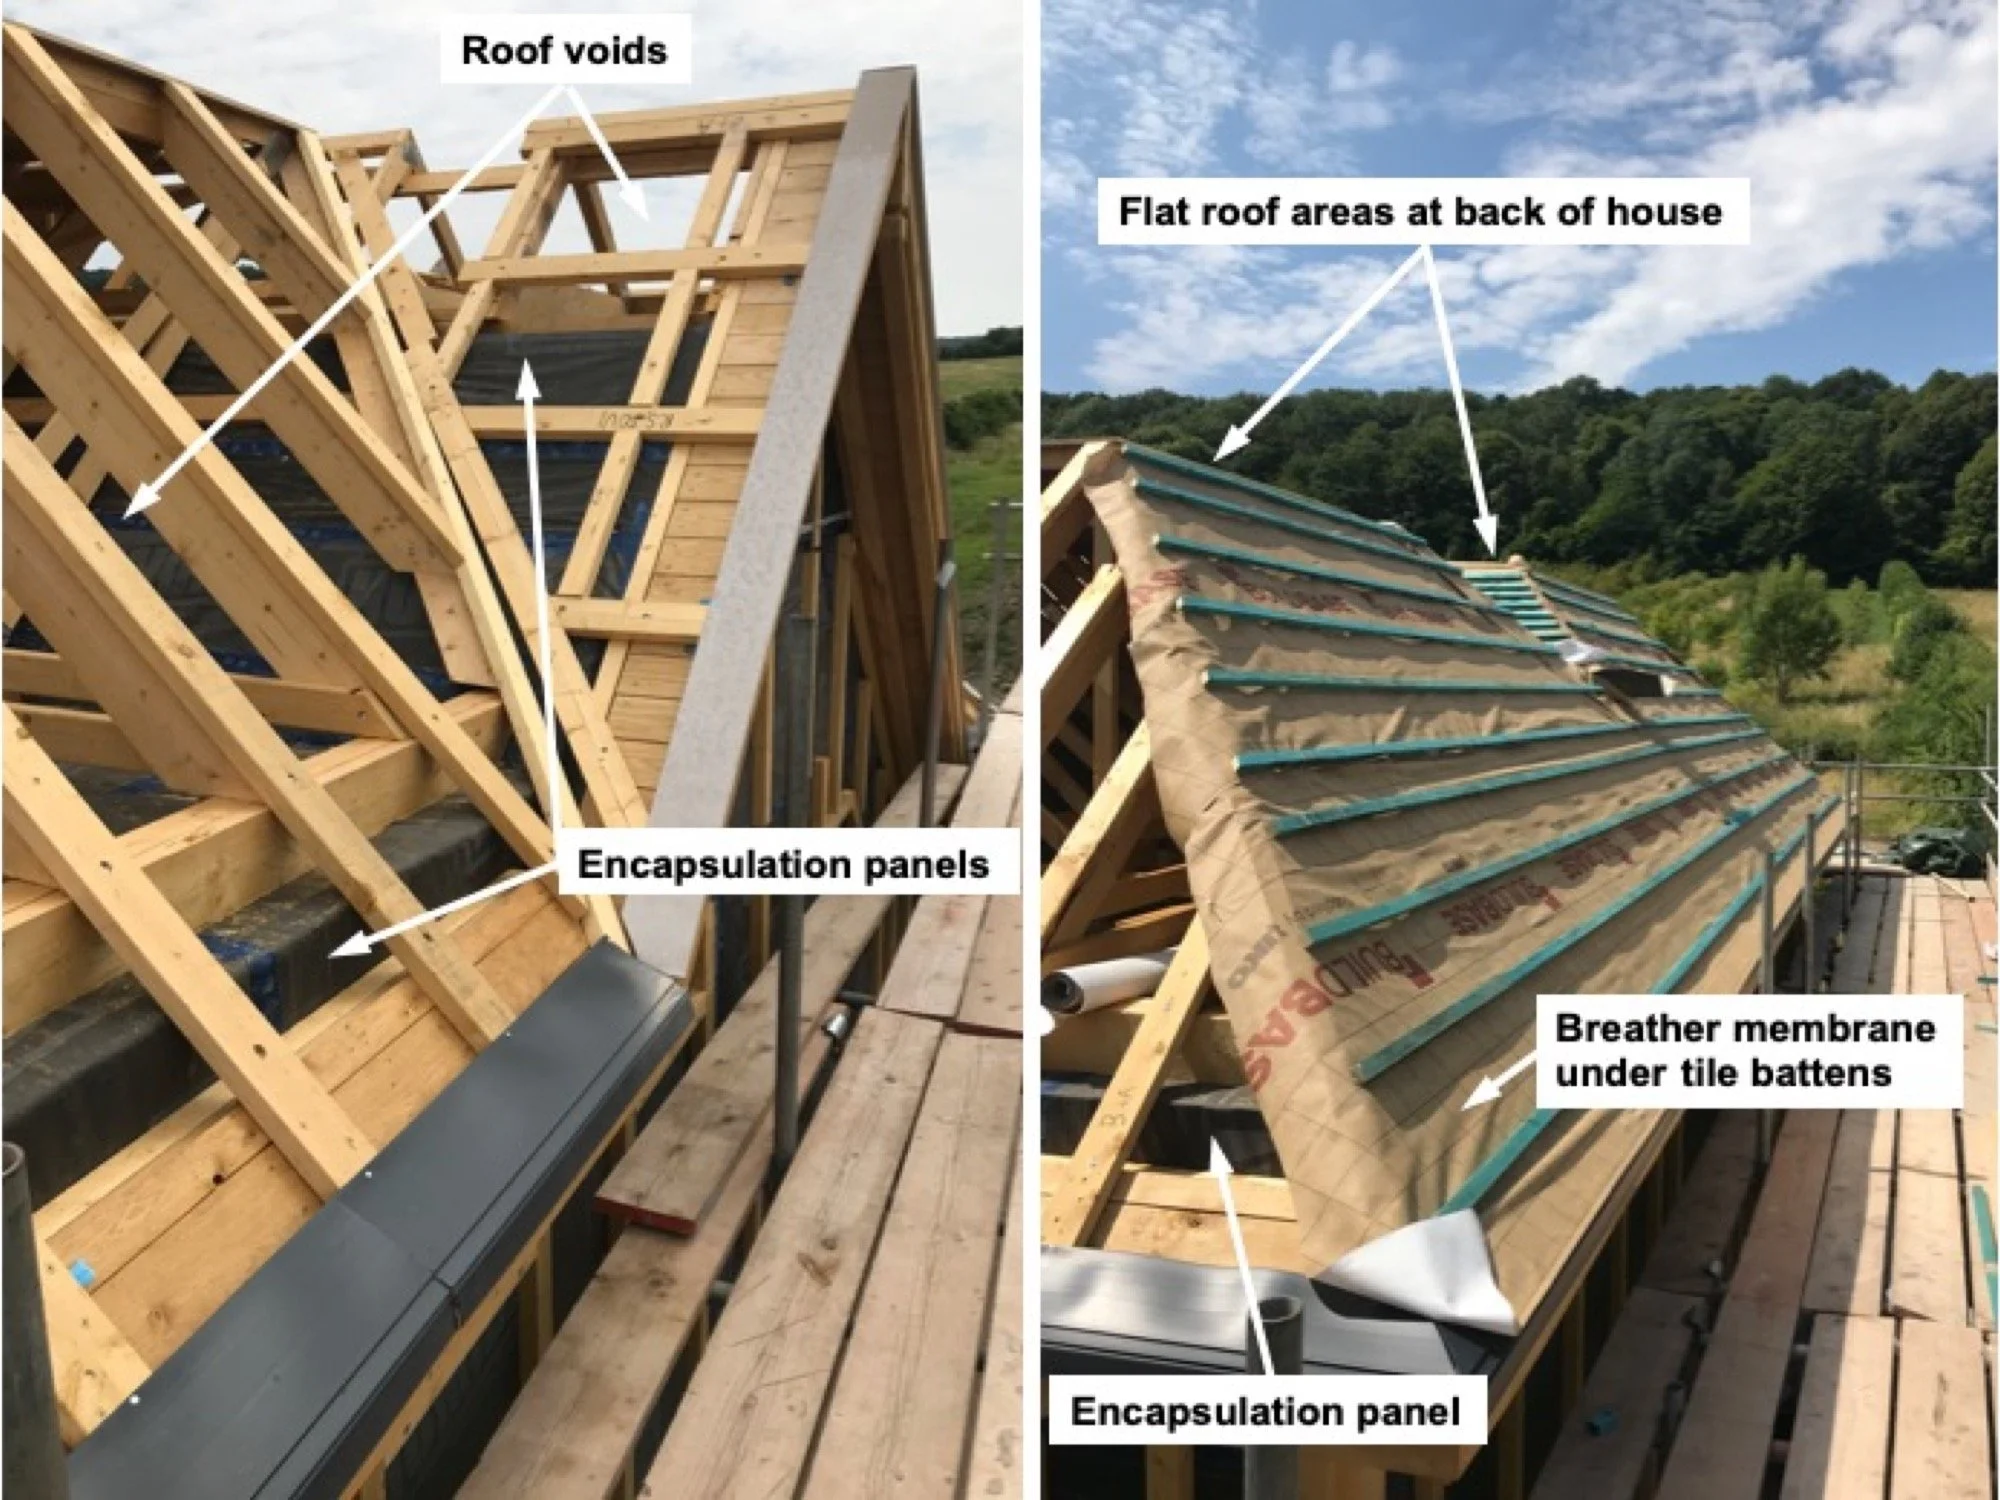
The Oakwrights’ encapsulation system covering the top of the house is essentially the same as that covering the sides (there are minor differences but each is designed to achieve a U value of 0.10W/m2K). Both are designed to minimise the flow of water vapour from inside the house into them but – crucially – to allow it to easily escape to the outside should any do so, and to completely prevent liquid water from entering from the outside. (As referred to in another post, the innermost layer of the encapsulation panel is the most impervious to water vapour and the outermost one is five times as permeable to ensure that any water vapour that does enter can easily escape to the outside.) It is the rainscreen, discussed in this post, that stops liquid water entering from the outside.
The layers on the outside of the roof encapsulation panels – the breather membrane and the roof tiles – similarly, allow any water vapour, including condensation in the roof void (which is ‘cold’ as it is outside the insulating encapsulation panel) to escape, and to prevent ingress of liquid water from outside.
The breather membrane used for our roof, as are most modern ones, is intended to allow the escape of any water vapour and condensation occurring within the ‘cold’ roof void without the need for additional ventilation. However, preferring a belt-and-braces approach, we got our builder to install ventilation grills in some of the roof tiles and at the ends of the gables. These, and the roof structure in terms of ‘cold’ voids and breather membranes, are shown in the pictures below. This is a link to a discussion on breather membranes.
However, a key point is that in a passive house the mechanical ventilation heat recovery system helps to keep the house’s relative humidity low; you can see a year’s worth of our relative humidity data in another post, so there should be minimal water vapour to escape in a passive house anyway – most of it is vented to the outside through the continuously operating ventilation system – so, unlike a more traditional, less airtight and less-well insulated building, the Passivhaus standard can be expected to allow much less water vapour to enter any cold roof voids from inside the house (although this won’t prevent condensation occurring within a cold roof).
The picture on the right shows a pair of roof vent tiles and, inset right, a vent at one of the gable ends next to a bat box. These vents provide direct ventilation to the roof void areas, as well as the breather membranes helping any water vapour to escape.

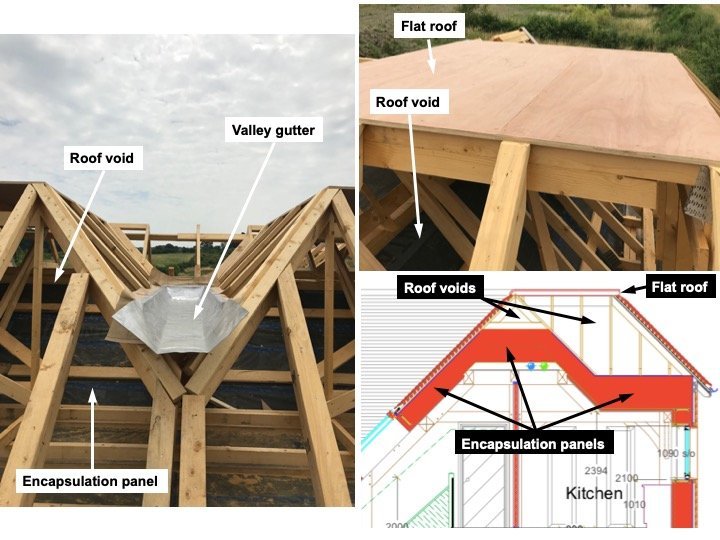
The flat roofs
We needed two areas of flat roof, effectively cutting off the top of two gables, to keep the ridge height to an acceptable level for planning consent purposes. One of these, plus the valley gutter between the two of them, is shown in the picture below, which, on the top right shows how the two flat roofs keep the overall height of the house to that of the central ridge.
There are various ways of covering a flat roof to weatherproof it, each with their proponents and detractors. After much research into the subject we chose to have a fibreglass (glass reinforced plastic – GRP) covering because we considered this was likely to be the longest-lasting and most reliable. Here is a link to the first of a series of videos giving an idea of what is involved in covering a flat roof with GRP; this video series played a part in our decision to use GRP.
The image on the bottom right, below, shows the structure of the valley gutter between the edges of the two flat roof areas and the voids beneath them, which are connected to the other voids under the pitched roof areas.
This image also shows a cross section of the house taken from the building regulations diagrams and demonstrates the different levels (and thicknesses) of the encapsulation panels and thus the different amounts of cold roof spaces.


Indoor water vapour – our experience of relative humidity levels
Whilst the bricks, timber cladding and roof tiles are primarily concerned with keeping rain and snow out and letting water vapour generated within the building that has got into the building fabric escape, a passive house’s mechanical ventilation heat recovery (MVHR) system plays the major role in humidity control. By continuously changing the air in the house, the MVHR is making a significant contribution to the venting of water vapour from inside the house.
There are three important aspects to this. The first is that the MVHR is turning over the air in a passive house more slowly than in a traditional house with much lower levels of airtightness so the internal relative humidity does not necessarily equilibrate with that of the outside; it tends to remain drier. The second is that by continuously turning over the air, water vapour from cooking, showering and the occupants’ breathing is continuously extracted, whilst in a non-mechanically ventilated house water vapour from bathing and cooking is only extracted if an extractor fan is turned on or a window is opened to create a through-draught. And the third is that, in the colder seasons, the heat recovery component of the MVHR system warms the incoming air so it holds more water vapour and thus does not encourage condensation as colder air would. This is discussed in this blog and in greater detail in this video from Energy Quarter.
In the first two to three weeks after we moved in – the house only just being completed and thus having a lot of water vapour in it from both the green oak frame and the new plaster work and concrete foundation slab – the relative humidity was in the order of 60-70%. We turned up the MVHR to its highest level and the relative humidity quickly dropped to 45-50%. You can see a year’s worth of our relative humidity data in another post. We feel comfortable at all times and have not experienced condensation anywhere other than an occasional, short-lived light misting of a bathroom mirror when showering. This level of relative humidity is also much lower than that in the draughty and somewhat poorly insulated bungalow we rented whilst building our house. Here with a relative humidity pretty constantly about 60% we experienced mildew and a sense of dampness in the internal environment. Living in our passive house is much better: there is no sense of dampness or mildew.