Building a passive house

When building our new home we wanted to achieve the Passivhaus standard. We explore some of the benefits of doing this below.

Exhibitions are great places to get ideas and to learn more about self-building
We found it helpful to go to exhibitions to learn more about self-build and, especially, building an oak frame passive house. There are many of these and we visited several oak frame suppliers’ stands (such as the Oakwrights one on the right) and self-building expert presentations. At that time, only one of these, Oakwrights, when asked about house insulation, told us about their encapsulation systems and showed us examples. They also introduced us to the idea of passive house. (We found it particularly useful to ask sales staff at these exhibitions “Why should we buy your product instead of X’s one? What makes yours better?” Not only did we learn more about individual products this way but we also gained insight into suppliers’ credibility.)
There is a plethora of information in the internet about Passivhaus and we’d especially recommend reading the Passive House Handbook (available in hardback and e-book versions), and looking at some good quality Youtube videos such as the Energy Quarter series. We liked the idea of reducing our need for space heating in a climate of seemingly ever-increasing energy costs. [Note, September 2022: this post was written before the substantial energy price rises in 2021 and 2022.] We viewed future-proofing heating costs as being somewhat like a pension where you invest a lump sum in an annuity and receive a regular sum of money for life; with a passive house you invest in a specially-designed and built home and have much lower outgoings on heating (one of the biggest running costs) for as long as you live there.
But there are additional reasons to choose Passivhaus (principally the consistently high level of living comfort) and we discuss our take on some of these later in this post. And in another post, we describe our subsequent experience of living in a passive house.
Fabric-first approach: maximising performance through design
When it comes to building a passive house, taking a ‘fabric first’ approach means optimising the building’s design to maximise performance before using man-made heat sources such as boilers and electric heaters. Oakwrights worked with us to design our passive house. And whilst many properties can be retrofitted to the Passivhaus EnerPHit standard it is preferable to take a ‘fabric first’ approach with a new building so its design and materials minimise heating requirements. This is not just about insulation but also, for example, eliminating ‘thermal bridges‘ as far as possible so aspects of the structure don’t breach the insulating layer and enable heat loss.
There is no significant restriction on what a passive house can look like but there are aspects of design that will make it easier to achieve the Passivhaus standard. For example, the lower the ratio of the house’s footprint (area) to its volume the more efficient it will be from a space heating perspective; put another way, it’s cheaper to heat a square or rectangular-shaped house than one with a complex shape, but that doesn’t necessarily prevent you achieving the Passivhaus standard if you want something a little exceptionnel.
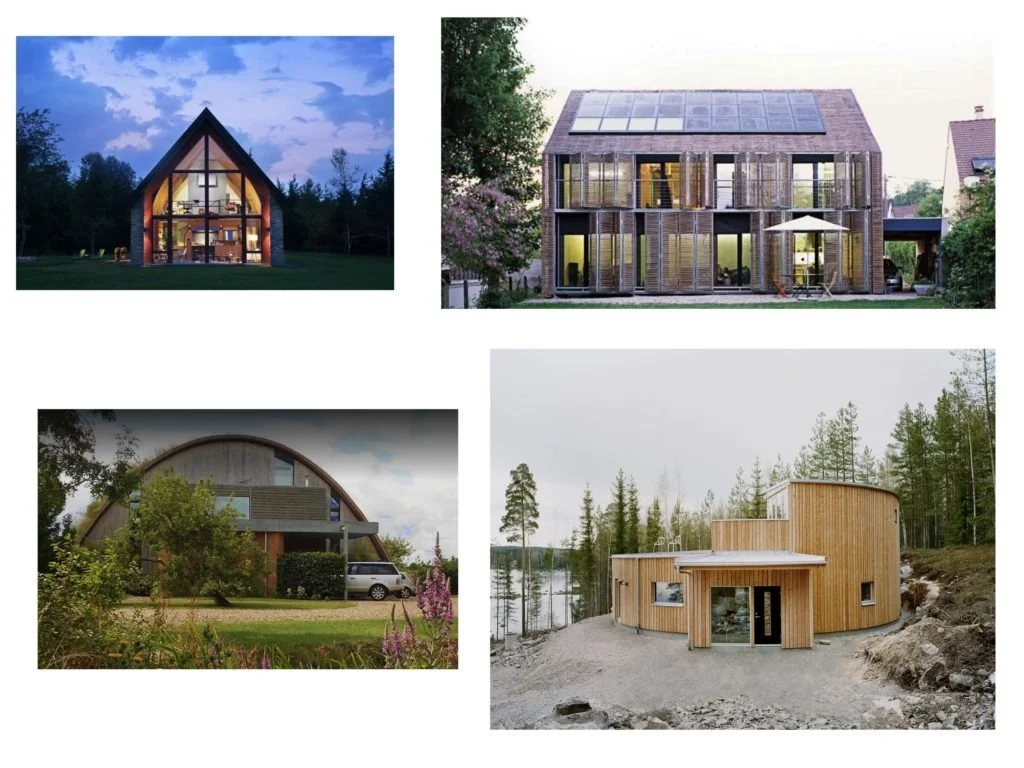
Some examples of different passive houses. More details, and links to websites about the individual houses, can be found at Brilliant Passive Houses (That Will Cost Pennies to Heat)
For us, there was also an issue concerning the internal volume of our proposed house and the effect the insulation thickness had on overall size. If you want reasonable-sized rooms then the house will be a little taller and wider than a standard one because of the thicker insulation. And we also found that these internal volume and insulation considerations meant that we couldn’t have the traditional vaulted ceilings of an oak frame house together with the other aspects of the design we wanted because this would have made the internal volume to be heated too large to achieve the UK Passivhaus standard. (However, it’s noteworthy that the Hudson Passive Project in New York State, USA (top left picture above) shows that it is possible to achieve vaulted ceilings in a certified Passivhaus in certain circumstances, although it’s important to note that the Passivhaus standard is defined differently in the USA).
To illustrate the situation with our house, the drawings below, by the Oakwrights’ certified Passivhaus consultant, shows three key aspects of our house’s design:
the insulation (depicted in yellow) is continuous both around the house and with the Isoquick floor slab insulation system – this is a fundamental aspect of passive house design;
the house’s internal volume is limited by the strict maximum heating limit of the Passivhaus standard necessitating truncating the gables internally, so inside there are some flat ceilings rather than triangular-shaped ones (the white areas in the diagram show the ‘lost’ gables internally, but they are fully visible externally) – and we are delighted with the internal appearance, which you can look around in this 3D ‘dolls house’ tour (although some views can seem a bit distorted); and
the thickness of the insulation makes the house a little larger externally, as shown by the red dashed line which indicates the outline of a similar, non-passive house with a cavity wall structure (note that it is perfectly possible to build a passive house with cavity walls).

Drawings by our architectural designer at Oakwrights showing the encapsulating insulation system and how this makes the house slightly bigger externally than a standard cavity wall construction
Comfort and indoor air quality: another benefit of Passivhaus living
Much reduced heating bills and a pretty constant internal temperature throughout the house are not the only benefits of living in a passive house. The interconnection of various aspects of the design (particularly airtightness), triple glazing and mechanical ventilation with heat recovery also ensure high levels of both comfort and indoor air quality.

This diagram, on the Green Building Store website, shows the use of different types of airtightness tapes for different purposes
Minimising air leakage becomes more important with high levels of insulation: even the smallest gaps breaching the insulation layer will lead to substantial heat loss through heat leaking out and cold air entering. Achieving this requires great attention to detail at both the design and, especially, the building stage; the building needs to have a contiguous airtight layer on the inside of the insulation layer. This is achieved in a number of ways but the main one is an overall airtight membrane or covering on the walls and roofing and floor and sealing of the joints between airtight membranes with special airtight tape (for example between the windows and walls and where pipes and cables have to penetrate the insulating layer).
The substantial reduction in air leaks through the house plays an important part in both reducing drafts and minimising heat loss if a window or a door is opened: a significant amount of warm air will only leave through an open door or window if cold air from outside can get in somewhere else to replace it. (It’s a common misconception that a passive house’s windows can’t be opened. In fact, the window opening period for a passive house is much longer than in a non passive house. Indeed, one aspect of the Passivhaus standard is that there should be at least one openable window in every room.)
For us, one of the attractions of the Oakwrights’ structural insulation panel system was that it creates a simple and effective airtight layer around the whole house that is joined to the insulation under the floor slab and sealed with airtightness tape. This is shown diagrammatically above and in the photographs below (the join between the structural insulation panel and the upstand of the Isoquick expanded polystyrene insulation is arrowed: see also our post about foundations).
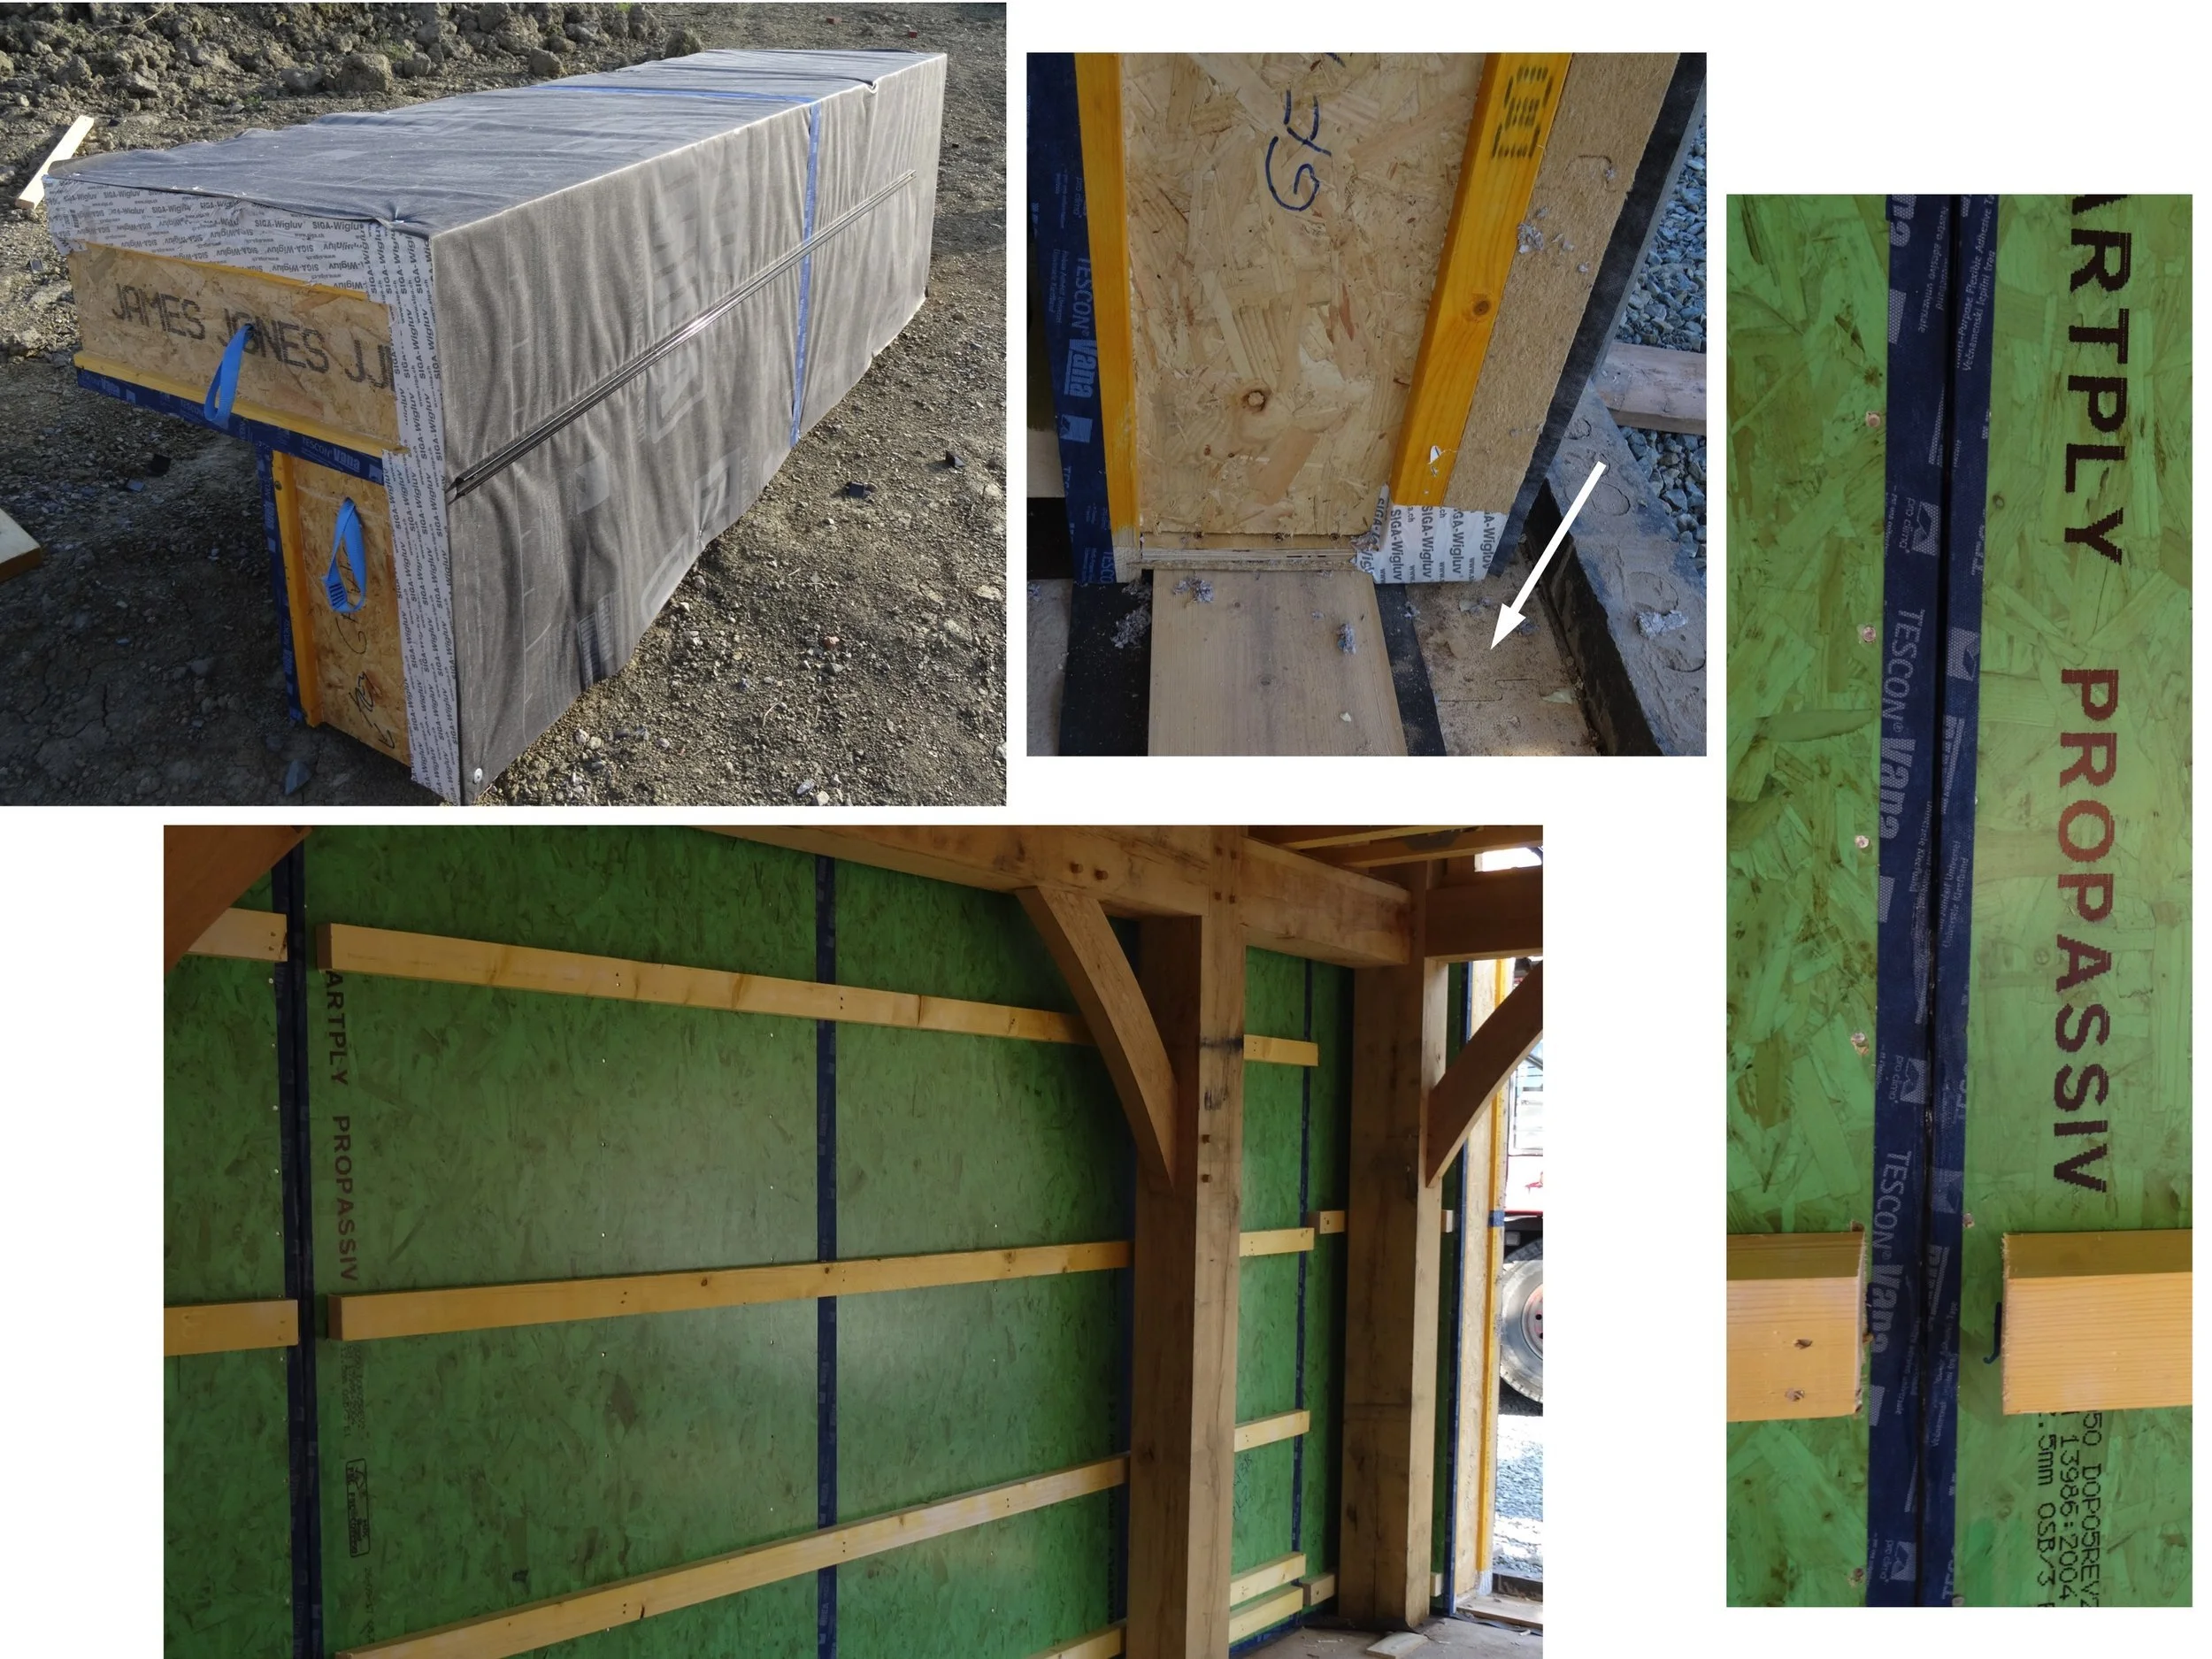
Airtightness: Oakwrights Wrightwall Natural corner section (transit wrapping still in place) is shown in the top left picture; it is also shown (middle top picture) positioned partly over the Isoquick foundation insulation upstand (arrowed) and the rest of it sitting on an integral base plate sited on the reinforced concrete slab (itself wholly within the Isoquick expanded polystyrene raft). And airtight-taped joints of the corner and wall panels ensure a contiguous airtight layer on the inside of the house’s insulation (pictures bottom left, and right)
Whilst all new-build houses in England are now required to achieve a certain degree of airtightness, the Passivhaus standard is much more demanding: it is the equivalent of having no more than a hole the size of a 5p coin in every 5m2 of insulation whilst the current UK building regulations standard is equivalent to five 20p coins in the same area. The pictures below show additional taping to ensure airtightness, and a representation of the difference in maximum permitted air gaps between a Passivhaus and a house build to current building regulations requirements. The airtight tapes sealing the structural insulated panels to the foundations inside and out are arrowed.
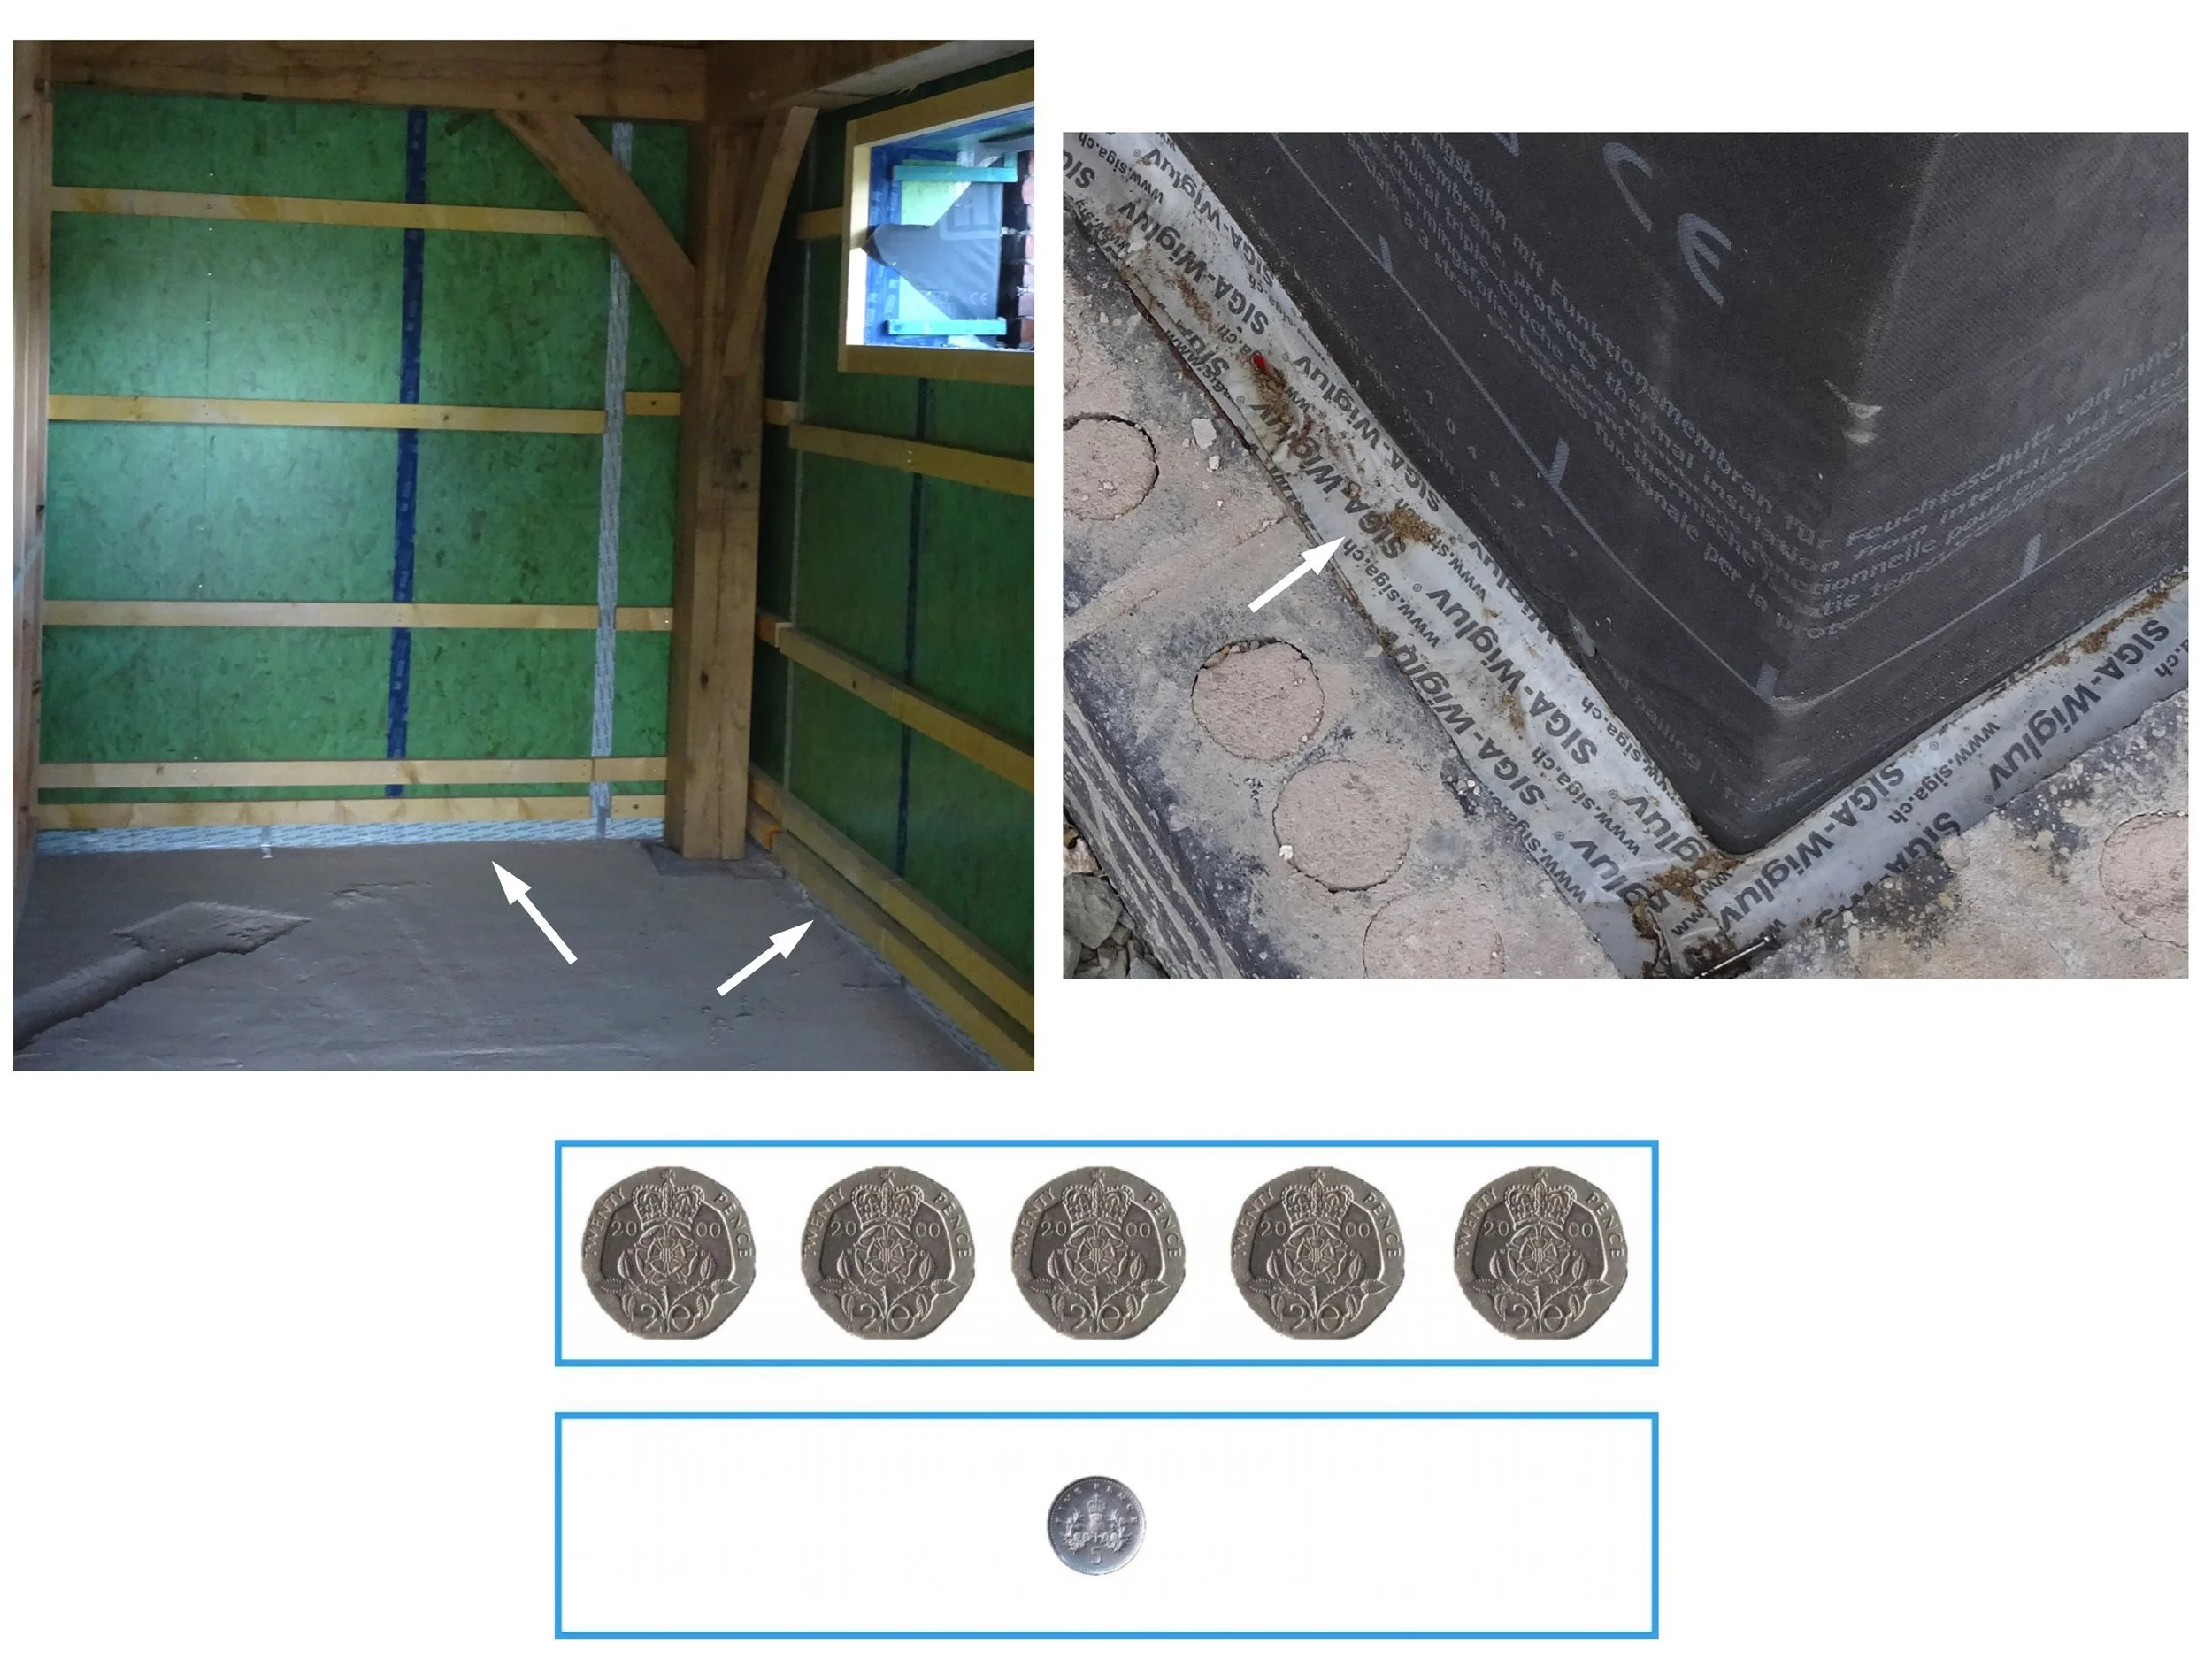
The pictures above show taping of part of the encapsulation system to the insulated concrete slab internally (arrowed), before pouring the floor screed, and externally (arrowed); and the coin analogy comparing the current building regulations airtightness standard above (holes the equivalent of five 20p coins per square metre) and, below, the Passivhaus standard (equivalent to holes the equivalent of one 5p coin per square metre).
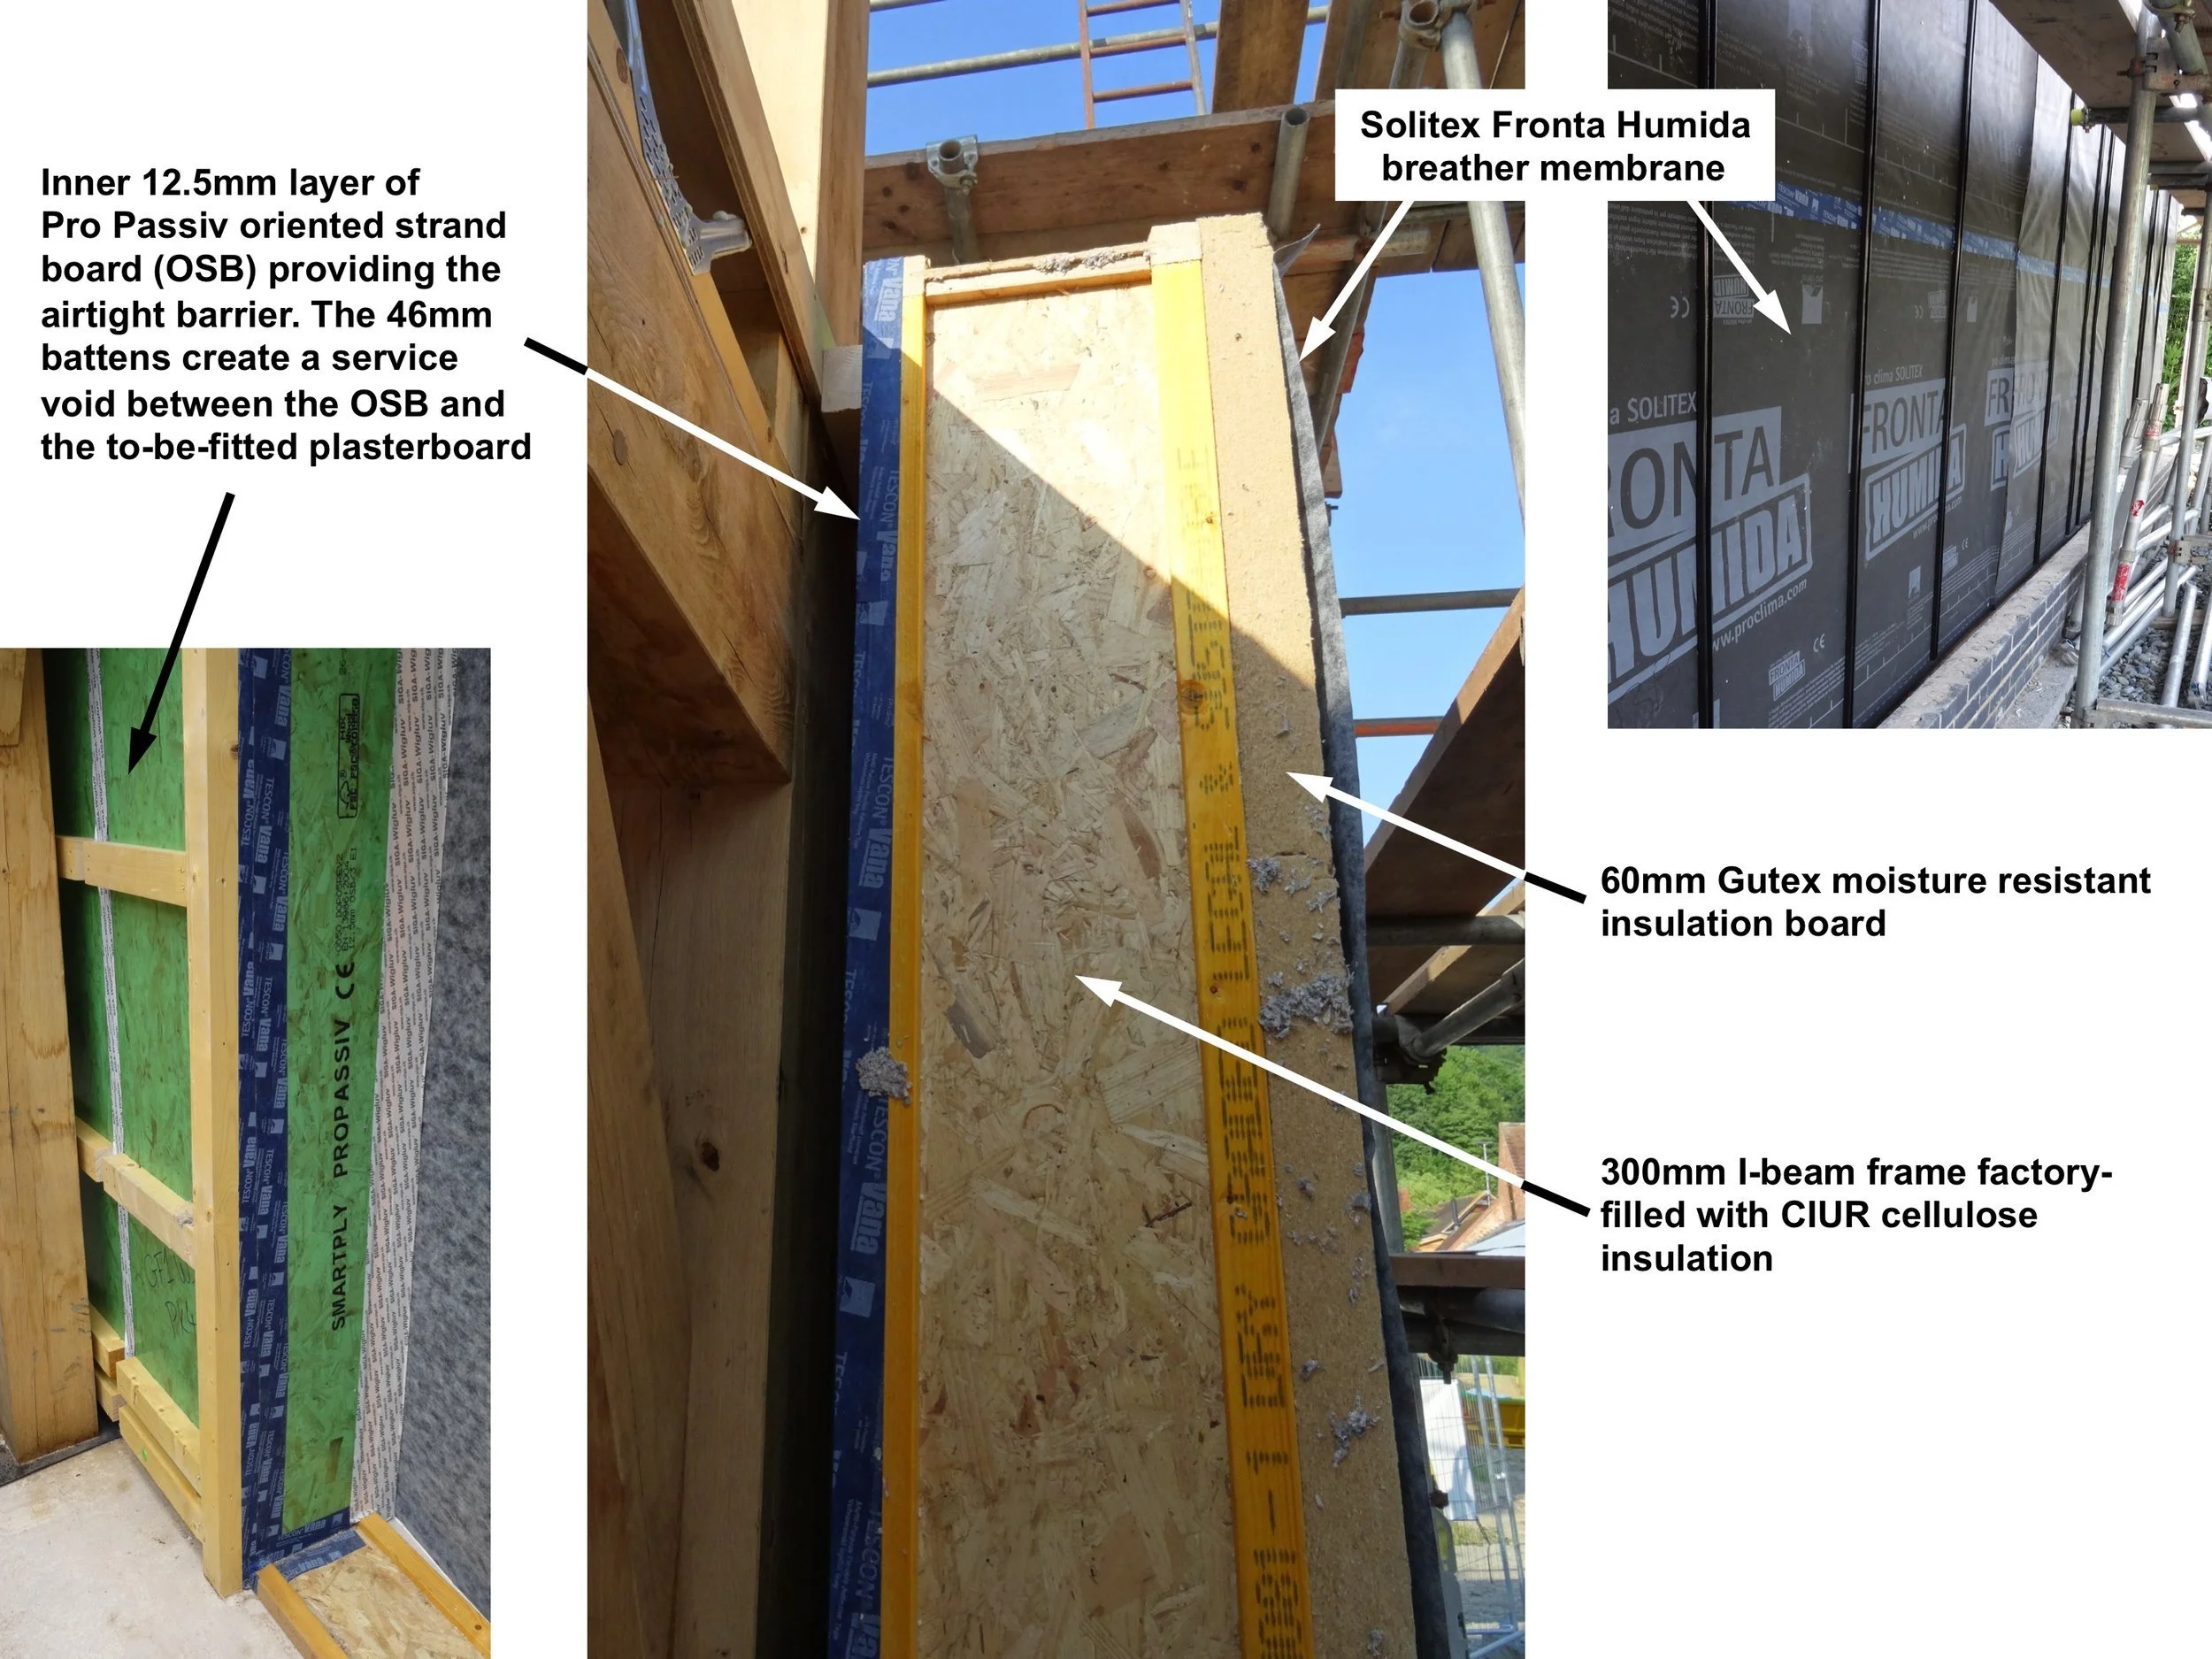
Incidentally, the horizontal battens you can see on the inside of the encapsulation system in the pictures above create a service void. The walls’ plasterboard is attached to these leaving a 46mm space for wiring, sockets, switches and pipework. This further enhances the integrity of the airtightness: these items are all sited inside the airtight layer rather than penetrating it. In a conventional build, unless great attention is paid to creating an airtight layer, power sockets and switches are a common source of air leakage and draughts.
There is further information about the structural insulation panels that we used in the section below on managing moisture.
Windows and doors: triple glazing is a key component of the Passivhaus standard
Windows and doors (especially doors with large glass panes, as we chose to have) are a particularly important aspect of a passive house’s design: they have to balance the views outside, the amount of natural light coming in, solar heat gain, and heat loss. And whilst one might initially think that the glass is the most important consideration, both the frame design and – crucially – the way the windows and doors are installed are critical to the way they function in terms of heat loss and draught prevention. See also our post on Passivhaus window and door installation.
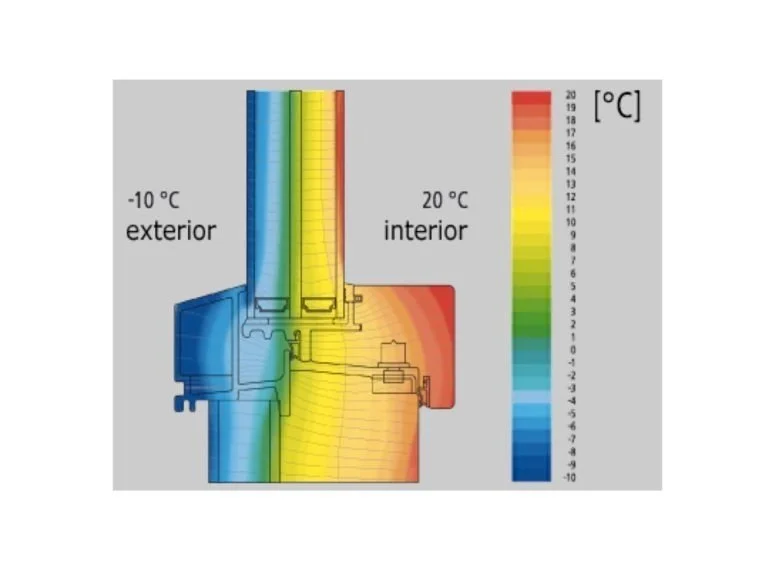
The thermal image of a triple-glazed window, above, shows that the middle pane (which would be the inner one in a double-glazed unit) is cold relative to the room temperature but the inner pane of a triple-glazed unit is the same as the room. Picture: PassivhausPA.blogspot.com
Managing moisture: avoiding structural problems and improving comfort
The diagram on the right shows the effects of lower and higher levels of relative humidity on various factors that can affect people’s health. High levels of both insulation and airtightness will lead to the retention of water vapour within the building if there are no adequate mechanisms to get it outside.
This water vapour is mainly caused by humans: breathing, washing, cooking and so on. Increases in the relative humidity of indoor air risks mould development (and can allow micro-organisms to thrive) and, through interstitial condensation, can lead to water condensing within the building’s fabric reducing the effectiveness of insulation, causing cold bridging, and, ultimately, possibly significant deterioration and failure of structural components.
These problems were (and still are, in some cases) less of an issue in much older buildings which are inherently leaky and thus draughty, albeit that such ventilation is to some extent dependent upon the weather and on wind direction and strength (and usually requires occupants to wear more layers of clothing to keep warm).
One aspect of managing moisture within a highly insulated airtight building is using an MVHR system, especially when the weather makes opening windows inappropriate. But another important one is using materials that are ‘breathable‘, that is, they allow the controlled passage of water vapour from inside the building to the outside so that any that penetrates the building’s fabric can escape. Aspects of this are required by building regulations but others by the materials that you choose for the building’s walls and roof.
We were attracted by the Oakwrights Wrightwall Natural encapsulation system because it is designed to both provide high levels of insulation and allow the building to ‘breathe’; it lets water vapour escape from inside the building to the outside. This is a vital aspect of preventing interstitial condensation within the building fabric and maintaining the insulation’s performance.
As shown in the picture of some of the panels in our house, below, the structural insulation panels for the walls and roof are made of:
on the inside, Smartply Propassiv, a 12.5mm layer of oriented strand board with integrated vapour control and airtightness properties;
a 300mm wide I-beam structural frame factory-filled with CIUR cellulose insulation;
60mm thick Gutex moisture resistant board; and
an outer Solitex Fronta Humida breather membrane.
This ‘breathable’ encapsulation system is designed to be relatively resistant to the passage of water vapour from inside the house but increasingly permeable though its structure towards the outside to allow the passage of any water vapour out of the house (the water vapour permeability should be five times as great on the outer layer as the inner one). This is important because the encapsulation system isn’t intended to be a hermetic seal: any water vapour in the structure must be able to escape to the outside. This reduces the risk of structural damage caused by water condensing within the structure which would lead it to fail, albeit over a long time. Also, the external breather membrane must allow water vapour to pass from inside to outside whilst preventing liquid water (rain) from entering from outside.
The pictures below show part of the ground floor brick rain screen with a ventilation gap between it and the outer layer of the encapsulation system. On the right can be seen the completed interior aspect of a ground floor wall wall, with a lift-and-slide door frame in situ, but with the gap between the rain screen and the encapsulation system still to be insulated and closed: overall the house walls are clearly thicker than those of a standard house.
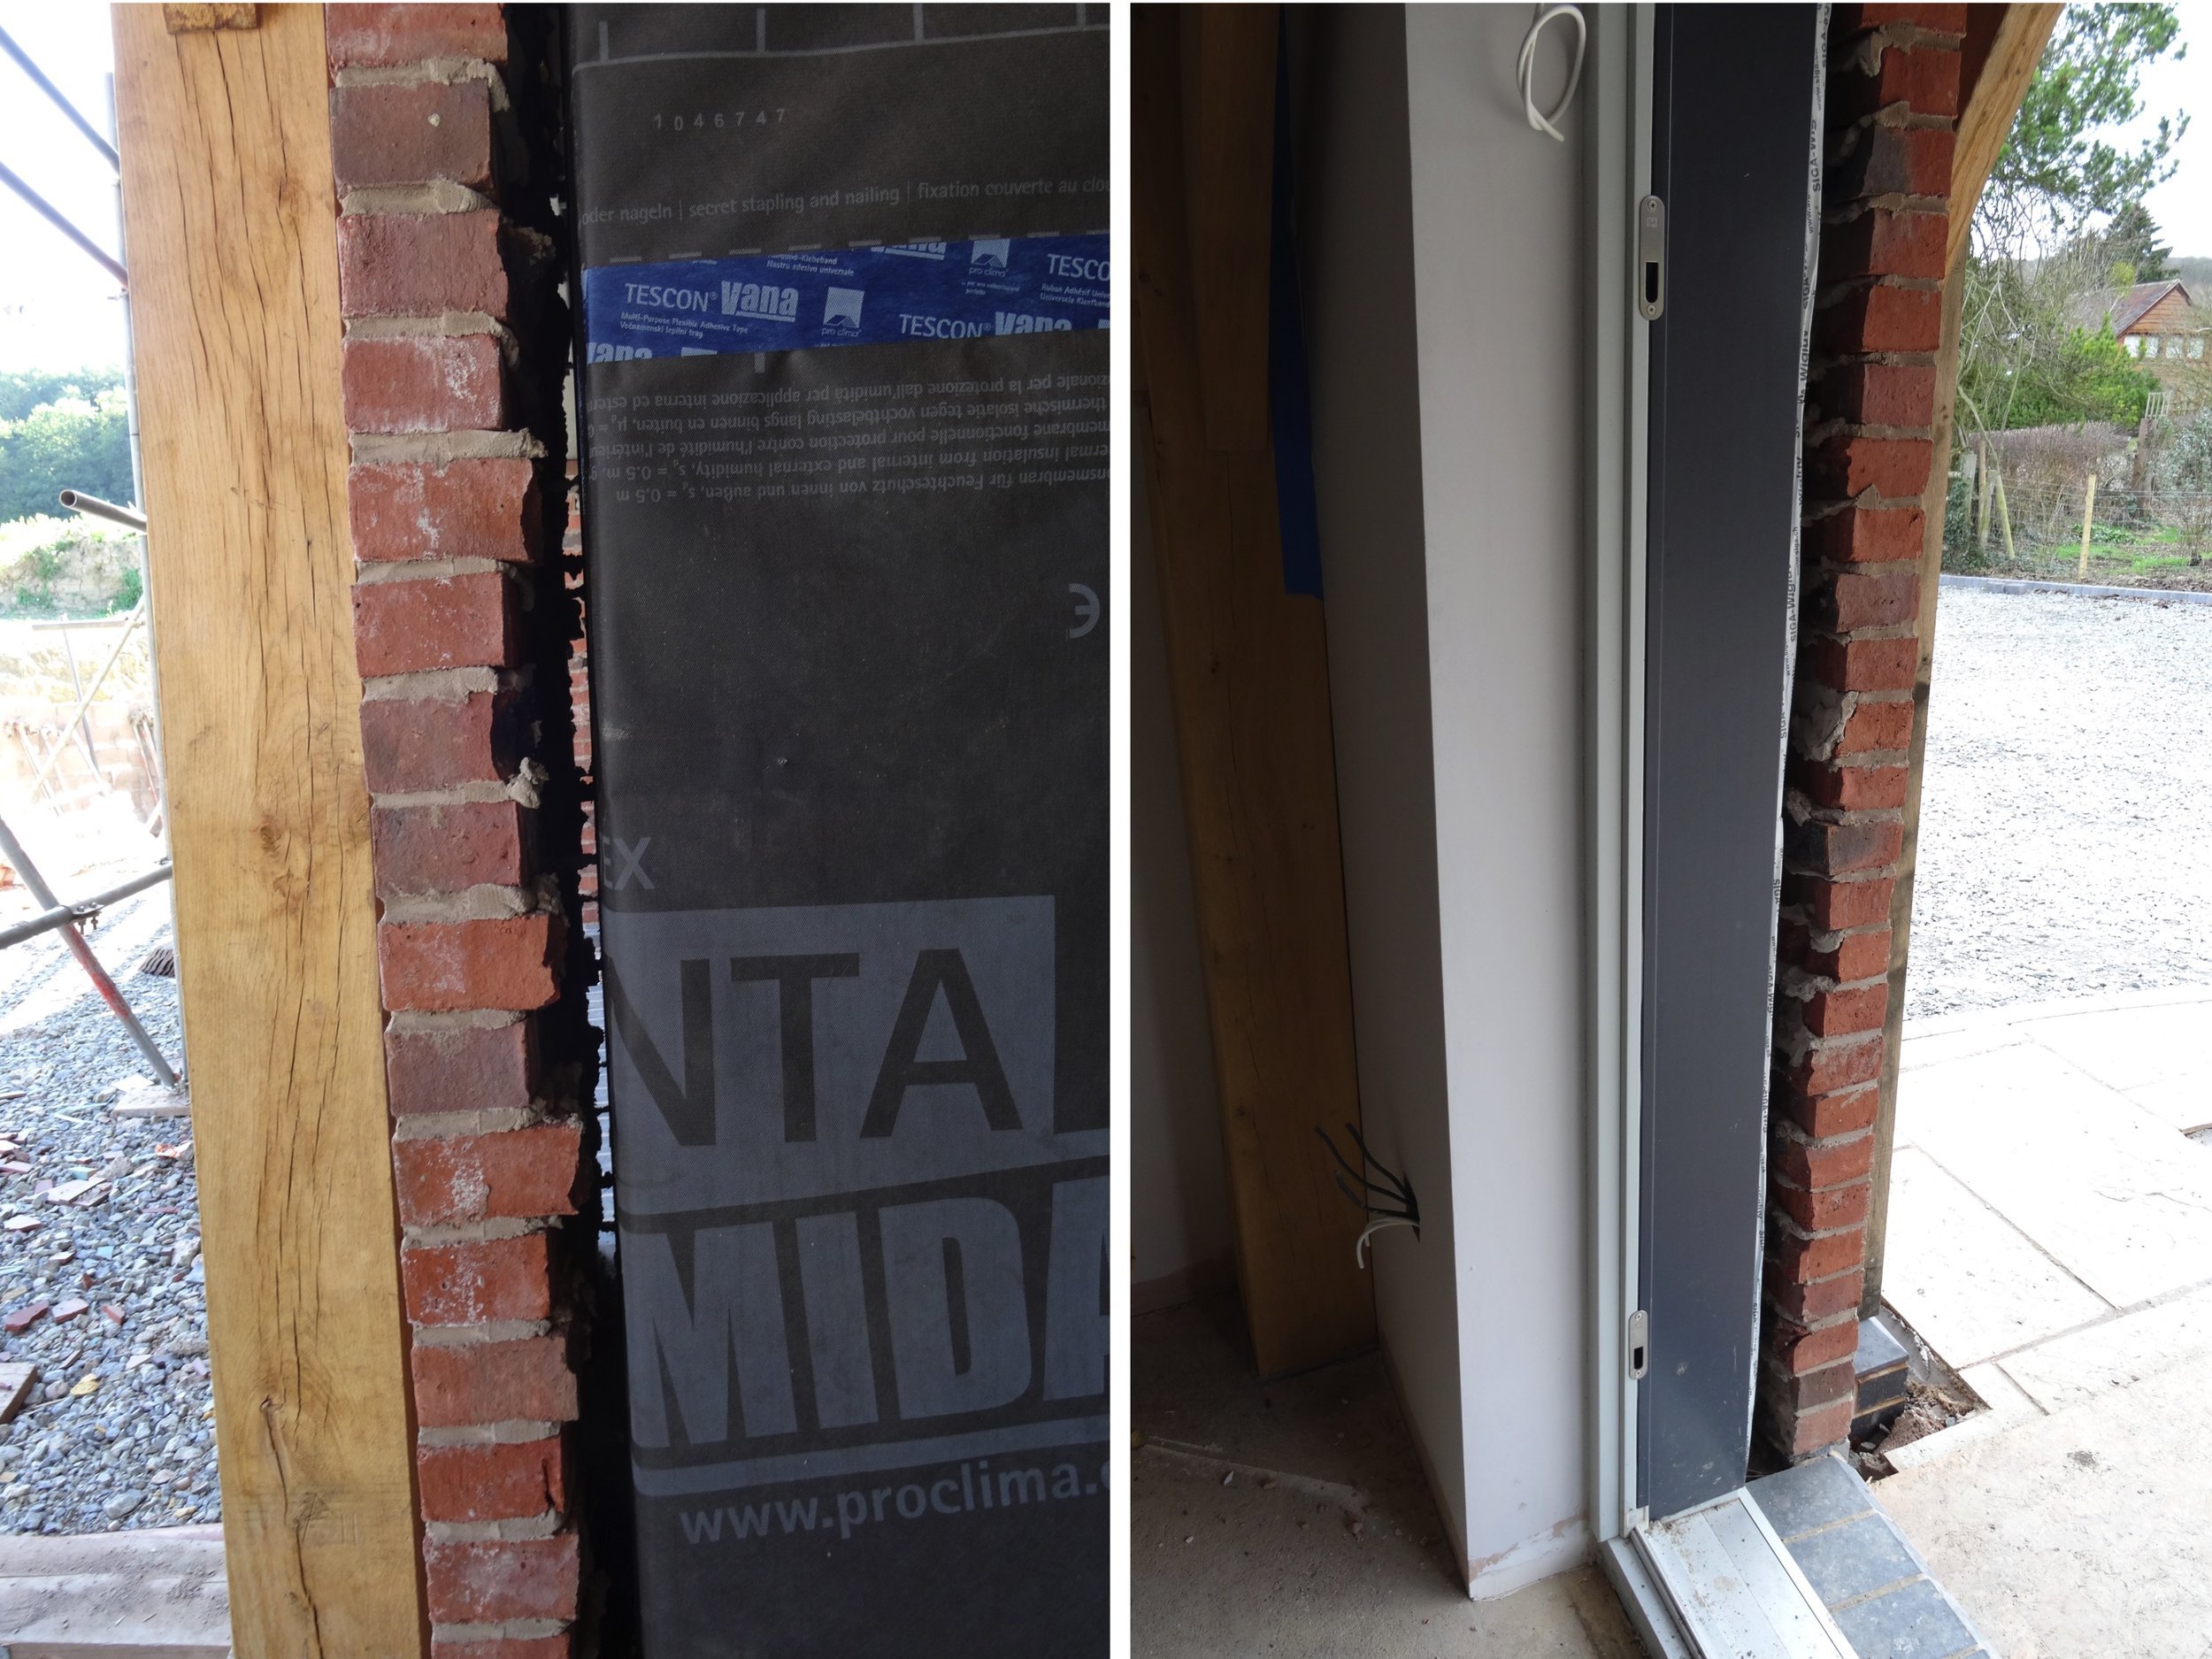
The final aspect of moisture management is the rain screen. On the ground floor this consists of a brick layer with a ventilation gap between it and the outer layer of the encapsulation system. The first floor has a similar arrangement but using Western Red Cedar cladding. On the right of the picture can be seen the completed internal wall and installed frame of the lift-and-slide door. The outside of the frame has yet to have its external insulation applied and the gap between it and the outer brick layer closed
More, technical, information about vapour permeable membranes can be found in a webinar run by Proctor Group.
Is cellulose insulation (the main component of our encapsulation system) safe?
Cellulose wall and roof insulation is made from recycled paper and is treated to make it fire resistant. Whilst some people demonstrate its insulating and non-flammability properties by applying a lighted blow torch to a pile of it in the palm of their hand, we were more impressed by demonstrations of its fire resistance in comparison with fibreglass insulation in The Big Burn experiment in the USA and in burning tests of various commonly-used insulating materials.
You can see videos of these at the links above and in the video lonks opposite and below.
These were sufficient for us to feel happy about living in a house made of wood with walls made from wood and recycled paper. The picture below shows screen shots from the three YouTube links in this paragraph: the top one being from The Big Burn where three mock-up buildings (one having fibreglass and another having cellulose insulation) were set alight, and the other two pictures show the effects of a blow torch on cellulose and another type of insulation.
Precision design: the Passive House Planning Package is a vital tool for designing to Passivhaus standard
The final consideration that made us want to build to the passive house standard was the precision with which the various aspects of the design can be put together with confidence about how the house will perform. This is where the Passive House Planning Package comes in.
For example, among other things, a passive house is designed to enable a substantial amount of its space heating to be provided by the sun. Ideally, in the northern hemisphere, this means that the house should face as close to south as possible (that is, facing the equator) with the largest windows sited on this aspect. (Several Australian internet sites about Passivhaus design are very helpful but, being down under, their equivalent orientation is towards the north.) Similarly, back this side of the equator, north-facing windows need to be minimised because of heat loss (windows let heat out as well as in) and care has to be taken with east and west-facing ones to avoid overheating because the sun is lower in the sky from these aspects and thus penetrates through windows further into the building.
But how can you be sure that the house will be the right temperature inside? If the windows are not the right size or are not ideally sited the house could be too hot in summer or too cold in winter. For example, overheating from solar gain on the southern aspect (and east and west, depending on design) can be reduced or avoided with shading, which can be structural or from trees or other aspects of the immediate environment. Most of us will have experienced buildings that are too hot in summer and too cold in winter) because of sub-optimal design. The key concepts for Passivhaus buildings include that overheating can designed out at an early stage, and windows should not be used as the main source of heating: solar gain is optimised rather than maximised. This is why using a tried-and-tested design tool, like the Passive House Planning Package, is an integral part of designing a passive house.
The Passive House Planning Package is a comprehensive Excel spreadsheet that is a fundamental tool used in the design of any Passivhaus building. Taking into account such factors as local climate, the insulation effectiveness of the various materials proposed for the building’s construction, window and door design, the length of hot water pipe runs, and a host of other things, it calculates the extent to which the strict criteria of the Passivhaus standard are achieved at all stages of the design. It is then possible to tweak features (a smaller window here, a thicker bit of insulation there, etcetera) to achieve the required standard without over-engineering.
Our Oakwrights certified Passivhaus consultant came up with a design meeting our wish for lots of light internally and windows to take advantage of the good views all round. We are especially pleased with the large lift-and-slide doors on the southern aspects and the many other windows that go to floor level (although be aware that this can restrict wall space for siting furniture). The windows are shown in the drawings below: note especially the smaller windows facing north and the limited number of windows facing east to reduce the risk of overheating because of the sun being lower in the sky and thus coming further in to the room year-round. There are more windows facing west because the side of the valley and woodland at its top provide some natural shading on that aspect to reduce low-level sunlight causing overheating. The balconies on the southern aspect provide shading (adjustable through the use of horizontal blinds above) to reduce the risk of overheating in the summer and the two south-facing roof windows have integral shades.
