Passivhaus MVHR: replacing the exhaust fan
Here, we describe replacing the exhaust fan of our Zehnder Comfoair Q350 mechanical ventilation heat recovery (MVHR) unit. Usually all you need to do is clean/replace two filters every six months and clean the heat exchanger every three years or so. Fan replacement (it’s usually the exhaust one, apparently) is a pretty unusual requirement - it seems we were just unlucky to need to do this.
Replacing this fan is not difficult if you’re confident dismantling relatively simple but precision items and dealing with straightforward electrical fittings. You’ll need a Torx T30 screwdriver and probably a pair of long-nosed pliers or similar. A head torch is invaluable - it’s dark inside the unit!
Background
Just before Christmas, after nearly four years of continuous service, our MVHR unit developed a squeak which turned into a louder, mechanical grinding noise. We sent a sound file of this to our Green Building Store MVHR engineer who diagnosed an exhaust fan bearings failure. Immediately after the holiday period they sent a replacement unit and a link to a video showing how to replace the fan, with an offer of an engineer’s video call or site visit to help with installation if needed.
Being away over Christmas, we turned off the MVHR for a few days. The house was noticeably less fresh on our return but was quickly back to normal after we fixed the fan. This was a clear demonstration of how an MVHR ensures indoor high air quality and comfort in a tightly sealed home - it’s easy to take such things for granted.
Getting started
You must first shut down the unit properly. Simply open the front cover and remove the top sliding cover [1] and follow the steps described at the beginning of this video: hold the ‘shift’ key on the menu screen until the login code is shown and, using the + or - keys, one digit at a time, enter the code 1010. Then use the menu and the + or - keys to get to ‘installer settings’, then ‘main board settings’ and then ‘service mode’. The screen will then tell you when to turn off the power to the unit.
You can then remove the three Torx screws holding the front cover [2 and 3] to reveal the heat exchanger [4]. With very gentle jiggling, and then pulling on the black strap, slide this out to access the fans [5]. This is also shown in the video above (but there’s no need to remove the filters which was done in the video for a different job).
You can see how to clean the heat exchanger at this link if this is needed (see ‘general maintenance information').
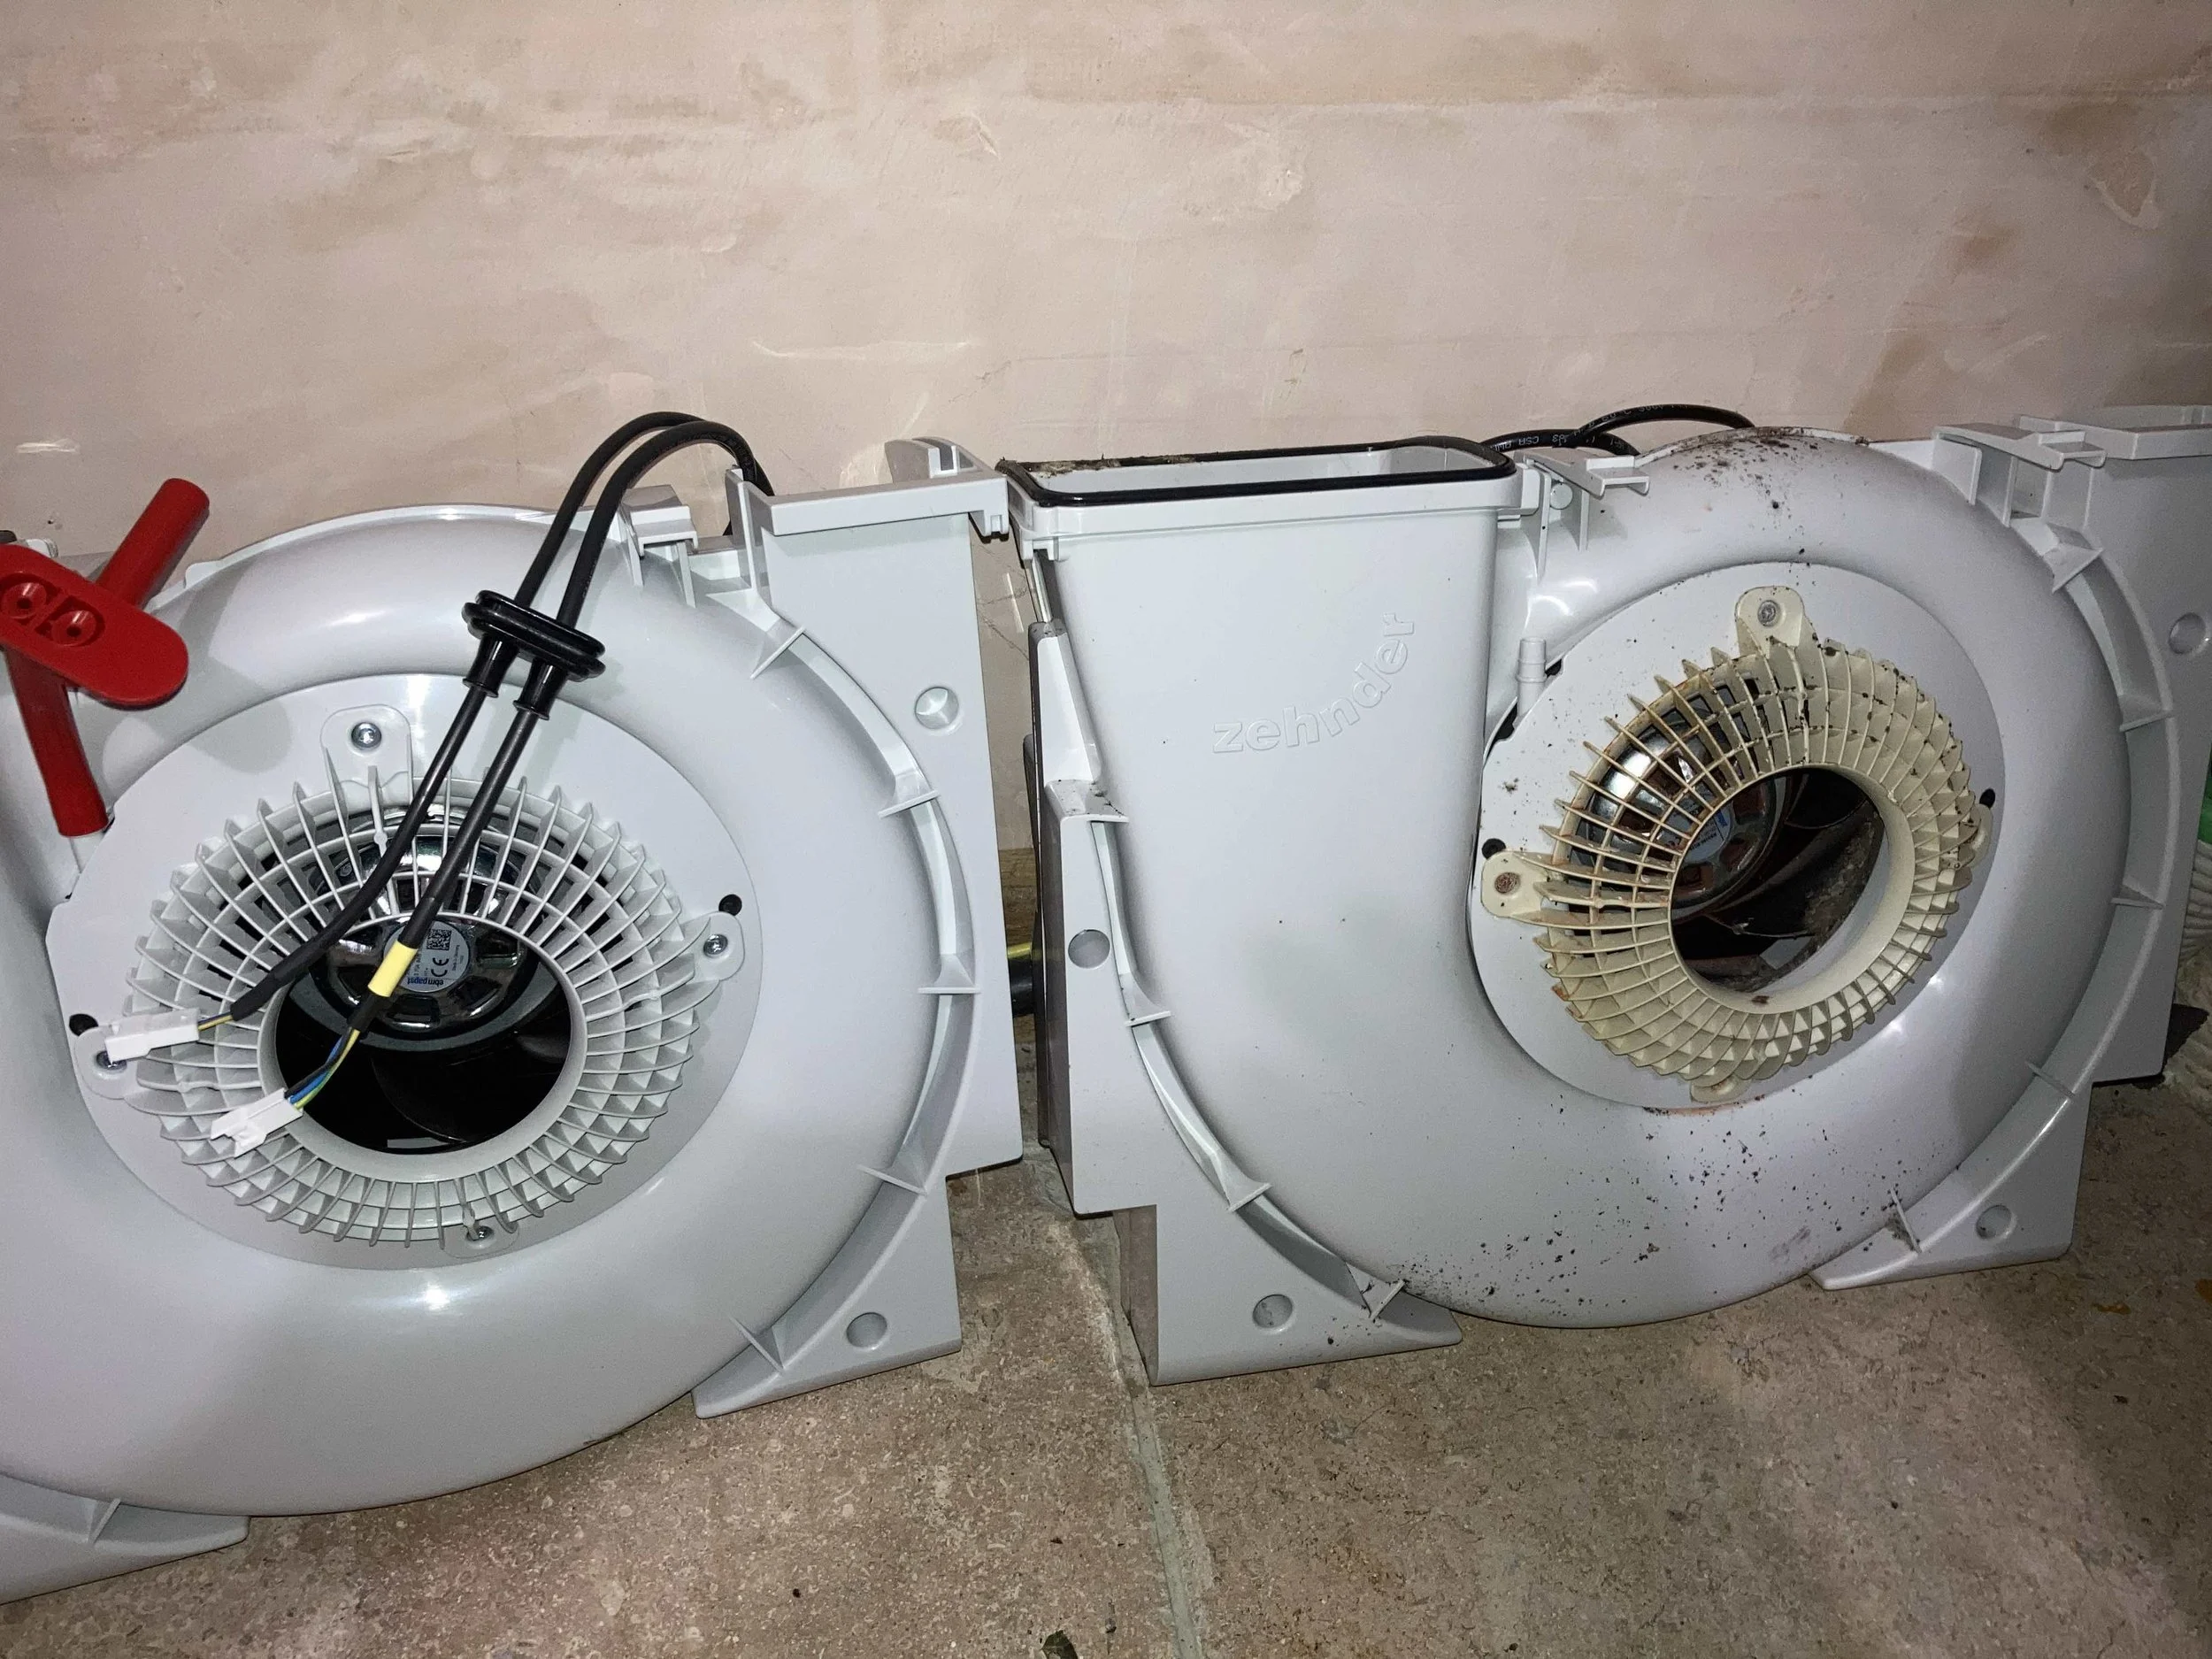
Our exhaust fan was on the left (6). Check with your installer/supplier which side it is when you order yours as this will depend on how your unit was put in.
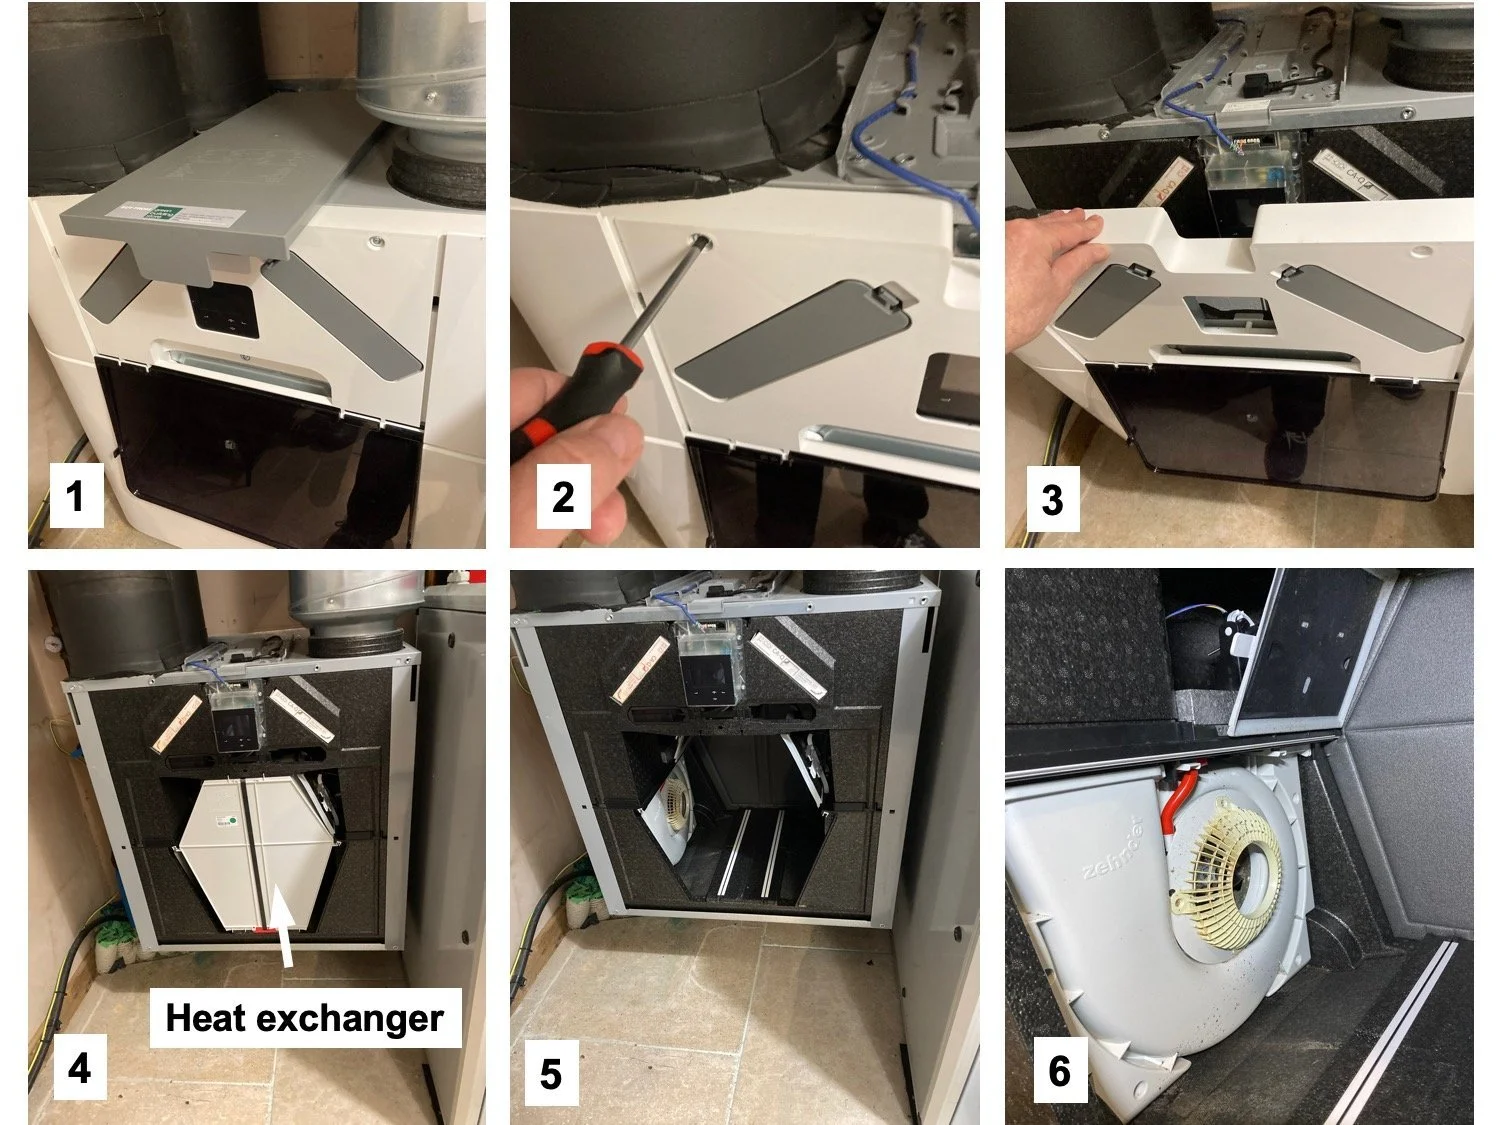
Exposing the exhaust fan. Set the unit in service mode before turning off the power so it shuts down properly
Removing the exhaust fan
Green Building Store’s MVHR engineer was right. Our exhaust fan was dirty, was rusty inside [7] and squeaked when turned. The inlet fan was pristine and noiseless.
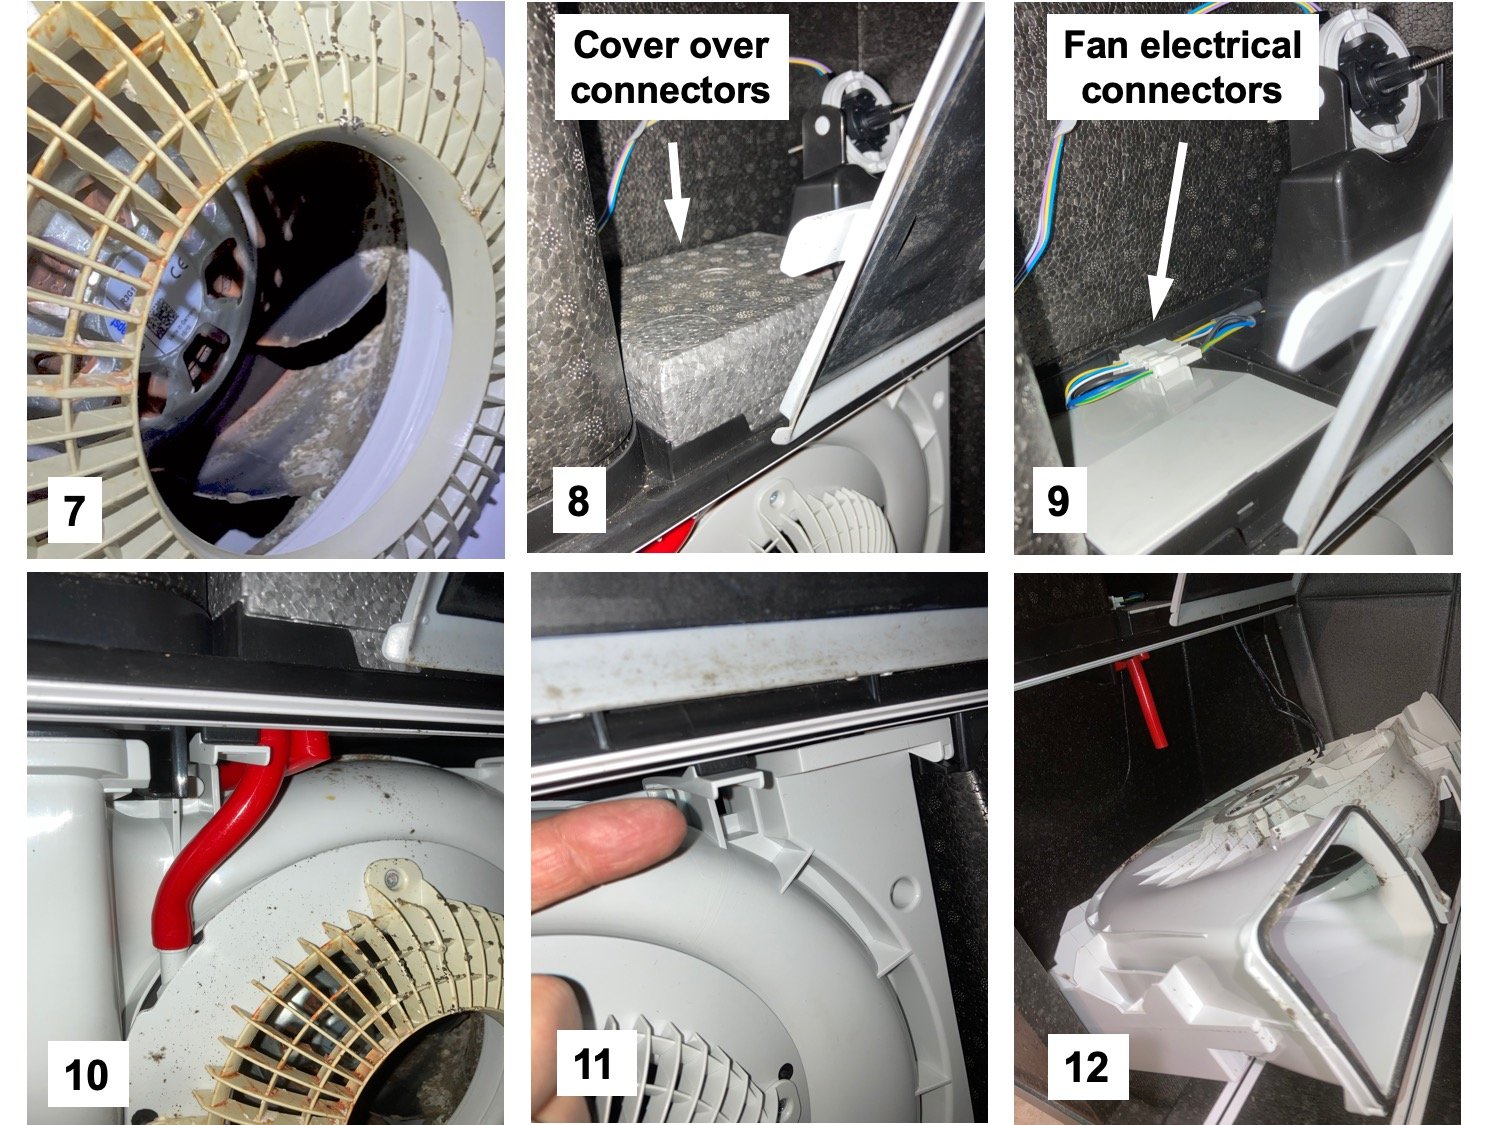
Disconnect the wires supplying the fan and the red pressure tube
Carefully remove the expanded polypropylene cover over the fan’s electrical connectors in front of the damper and its actuator (this automatically manages bypass mode) [8]. Carefully pull the two connectors out of their holding bracket and disconnect them [9]. They are different sizes so you can’t mix them up. These wires pass through a grommet that’s out of sight behind the damper/actuator mechanism. I used long-nosed pliers from underneath to help in removing this grommet [16].
Carefully disconnect the red pressure tube from the fan [10]. Check that it’s the right one for the new fan with the instructions that come with it. In our case they were the same so I left the old pressure tube in place.
Then press down the two lugs that hold the top of the fan [11] and tip the fan unit to remove it [12].
Connecting the replacement fan
Angle the new fan so you can feed the wires up and behind the damper/actuator [13]. Fit these to the connectors and place them into the holding bracket [14], passing the cables snugly behind the damper/actuator [15].
Siting the grommet with these cables is a fiddle [16] (this picture was taken holding the camera under the housing; you’ll need to position it by feel). Make sure that the grommet is properly fitted all around the opening.
Pass the fan end of these wires through the slots on the fan ensuring that all cables are snug and not kinked [17].

Installing the replacement fan is basically the reverse of removing the old one
Gently hinge up the fan and click the lugs into place [11].
Connect the red pressure tube [10].
Replace the cover over the connectors [18] ensuring it’s properly re-sited and not trapping any wiring.
Installing the replacement fan is basically the reverse of removing the old one
Slide the heat exchanger back in place (the red mark at the bottom should be showing at the front) and replace the front cover. You can see these final steps towards the end of this video.
When you turn on the power the unit will automatically re-set itself.
What’s happened since?
We have our constant ventilation and air heat exchange system back! It’s functioning as unnoticeably and as effectively as before.
As it’s winter, we’re now experimenting with the MVHR’s ‘warm’ setting and will try its ‘cool’ setting in the summer instead of just leaving it on ‘normal’ all the time. You can find out more about the controls on the Zehnder Comfoair in this video.
And many thanks to Green Building Store for their swift and supportive service!