Our Passive House Heating System

Here, we explain why we chose to install a ground source heat pump, provide a guide to how heat pumps work, and describe the installation of our heat pump, underfloor heating and domestic hot water system. You can find a lot of detail about heat pumps in John Cantor’s book Heat Pumps for the Home.
Why we chose a ground source heat pump
We liked the idea of not using fossil fuels for heating. Heat pumps take warmth out of the ground or the air (most commonly) rather than burn something to heat a building and/or its hot water. Our building plot included a field, and a ground-working machine was on site for the building works, so for us installing a ground source heat pump was a sensible option. Digging the trench for the heat collector is the most disruptive aspect of the installation of a ground source heat pump. But with a new build, this should not be more problematic than digging for the foundations and drainage, albeit probably a bigger job.
Below you can see some pictures of the trench being dug for the ground array heat collector including the loop at its far end and where it comes into the house.


How does a ground source heat pump work?
The diagram below depicts how a ground source heat pump works. Considering some of the underlying principles, described in the next few sections, may help in understanding this better.
Heat is the kinetic energy in atoms and molecules
Atoms or molecules make up everything and these are constantly moving. In a solid they ‘vibrate’, in a liquid they move around quickly, and in a gas they fly about at high speed. This movement of atoms and molecules is a result of their inherent kinetic energy and they move faster at higher temperatures and slower at lower ones.
We are familiar with the three ‘states’ of water: it’s a liquid in most of the circumstances we experience it, but at 0°C it becomes a solid (ice) and at 100°C it becomes a gas (steam). Most other substances are in a solid, liquid or gas state at other temperatures. For example, refrigerants used in fridges, freezers, heat pumps and air conditioners, turn from a liquid state into a gas (that is, they boil) at temperatures in the region of -29°C.

The movement of atoms and molecules decreases as their temperature drops towards ‘absolute zero‘. This is the temperature at which atomic movement just about ceases and it is not possible to get any colder. Put another way, and importantly for a heat pump, whilst there is no more heat to be extracted from a substance at absolute zero there is at temperatures above this.
The concept of absolute zero is depicted in the diagrams on the right (taken from a BBC webpage about the kinetic theory of gases). The red line in the upper diagram shows how the pressure of a gas in a sealed container is greater at higher temperatures and lower at colder ones.
If we extrapolate this red line on the graph, as in the lower diagram, we can see that the gas pressure gets lower as its temperature reduces until it reaches, effectively, no pressure at all. The temperature at which this happens is the same for all substances. It is called ‘absolute zero’ and is approximately -273°C or zero on the Kelvin temperature scale.
Moving heat from one place to another
Most houses already have heat pumps: fridges and freezers extract heat from the food and drink inside and transfer this into the room. Heat pumps for space and water heating use the same ‘refrigeration cycle’ to move heat from one place to another. And some buildings have air conditioning units which are also heat pumps. (These are inherently less efficient in the summer because they work by pumping heat from inside a room to the outside where it is already very hot.)
Even when it’s cold outside there is enough heat in both the air and in the ground to be used to warm things with a heat pump. For example, one or two metres below the surface, the ground in this country has a pretty stable temperature of some 8-12°C all year round. In degrees Kelvin, the ground would therefore be about 283°K (10°C) and thus, relatively speaking, it contains a lot of heat. There is also heat in the air but it varies from sometimes as low as -10°C to 30°C this makes it less efficient as a heat source in the colder months.
How a heat pump makes useful heat from an outside source
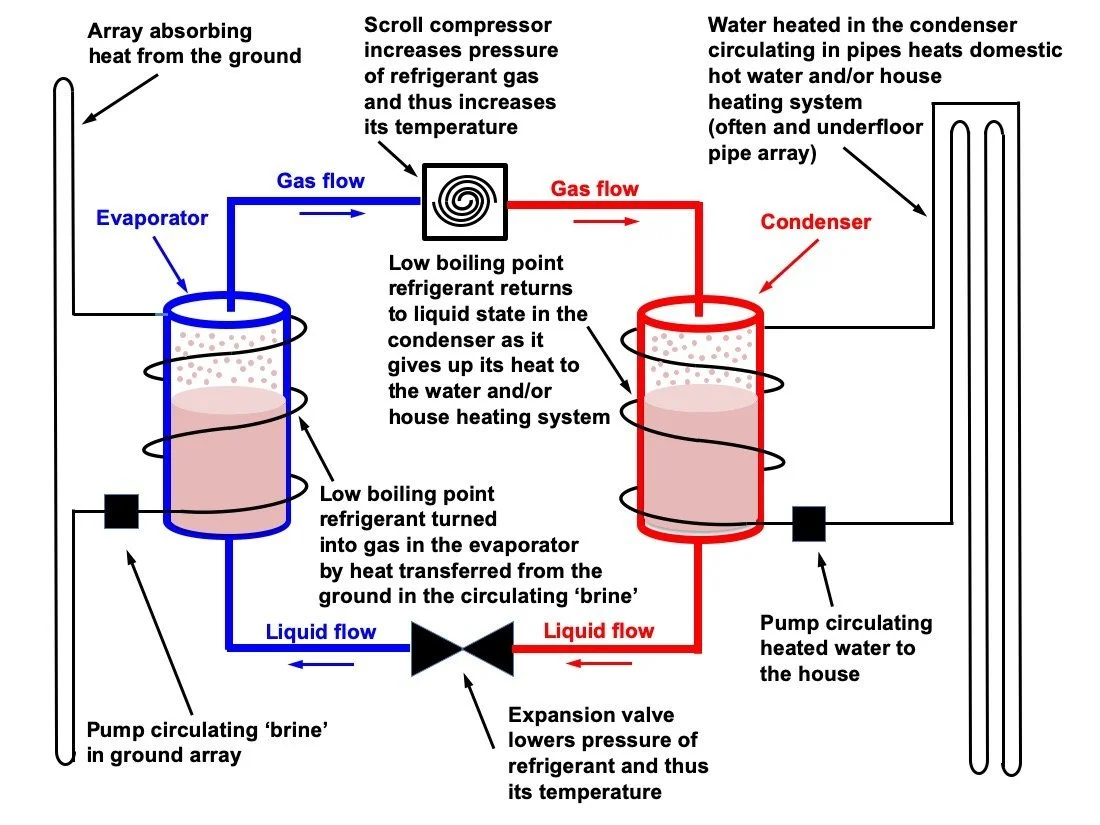
A ground source heat pump has a long ‘collector’ pipe in the ground (there are various configurations for these ground arrays, including deep boreholes). This heat collector contains a mixture of water and an antifreeze which is commonly called ‘brine’. Because the brine circulating in the ground array is colder than the ground, heat moves from the ground into the brine and is taken to the heat pump.
Within the pump is a separate circulation system filled with a refrigerant that turns from a liquid into a gas at a relatively low temperature. Heat from the brine is transferred to this gas in a heat exchanger called the ‘evaporator’. Here, this heat turns the liquid refrigerant into a gas. The brine and the refrigerant do not mix but heat is passed from one to the other usually over a series of plates, rather like a heat exchanger in a mechanical ventilation heat recovery unit.
If you have used a bicycle pump you will know how hot the bottom of the barrel gets. This isn’t due to friction between the pump’s plunger and the wall of the cylinder or the whole of this would get hot. Rather, it is due to the compression of the air as you push the plunger. With increasing pressure, gases get hotter, as shown in the diagrams above. This video shows, quite spectacularly, the effect of pressure on gas temperature. This property of all gases (increasing their pressure raises their temperature) is key to how a heat pump takes ‘low grade’ heat from the ground or the air to create a high temperature output.
The now-warmed refrigerant gas passes from the evaporator into a compressor which, by increasing its pressure, substantially increases its temperature. Put another way, it ‘concentrates’ the heat extracted from the ground. Rather than using a pump in a cylinder (like a bicycle pump), most heat pumps use scroll compressors which squash the gas between two metal spirals (one of which moves around the other which is fixed). This video also shows the action of a scroll compressor.
Leaving the compressor, this now very hot refrigerant gas passes through a second heat exchanger called the ‘condenser’. Here, without mixing with it, it heats water which is circulated to the ’emitter’, that is the house’s heating system and/or its hot water system. The refrigerant gas cools as it loses heat in this process and thus condenses into a liquid. It then passes through an expansion valve which lowers its pressure, and thus its temperature, still further before repeating this cycle.
How a heat pump works is depicted in the diagram below.
The four pictures on the left below (each taken within a few moments of each other) show the surface temperatures of the pipes taking fluids into and out of the heat pump. These were taken with a thermocouple probe pressed firmly onto the each pipe but may not precisely reflect the temperatures of the fluids inside them. However, it is clear that:
the brine coming into the pump from the ground array loses heat to the evaporator (11.1 vs 7.9°C);
the compressor substantially increases the temperature of the refrigerant gas which is transferred (at 33.7°C) to water circulating in the underfloor heating pipes; and
heat is lost from this water as it passes through the underfloor heating system (33.7 vs 27.8°C) but the tile surfaces are warm (over 25°C) and these warm the house.
The two pictures below on the right (using an infra-red ‘no touch’ thermometer) show the surface temperatures of the floor tiles in the hall and in the master bedroom en-suite bathroom at 25.3°C and 25.6°C, respectively. (The temperatures are shown in different positions on the screen for the thermocouple and the infra-red readings.)
The heat pump takes heat from the ground entering the pump at 11.1°C to create a temperature of over 25°C on the floor tiles
This video also explains how a heat pump works and describes ground arrays and the internal workings of a heat pump.

Electricity drives the heat pump components
Obviously, a heat pump requires energy – electricity – to make it work. But the heat transferred into the house from the ground (derived from the sun) is free and this, combined with they way these machines work, makes them both inexpensive and cost-effective to run.
Most modern ground source heat pumps deliver about four times as much heat as an equivalent-output electric heating system. Put another way, for every kilowatt of electrical energy put into a ground source heat pump, about four kilowatts of heat energy comes out. They are also relatively environmentally friendly and should become more so as electricity is increasingly generated from renewable sources.
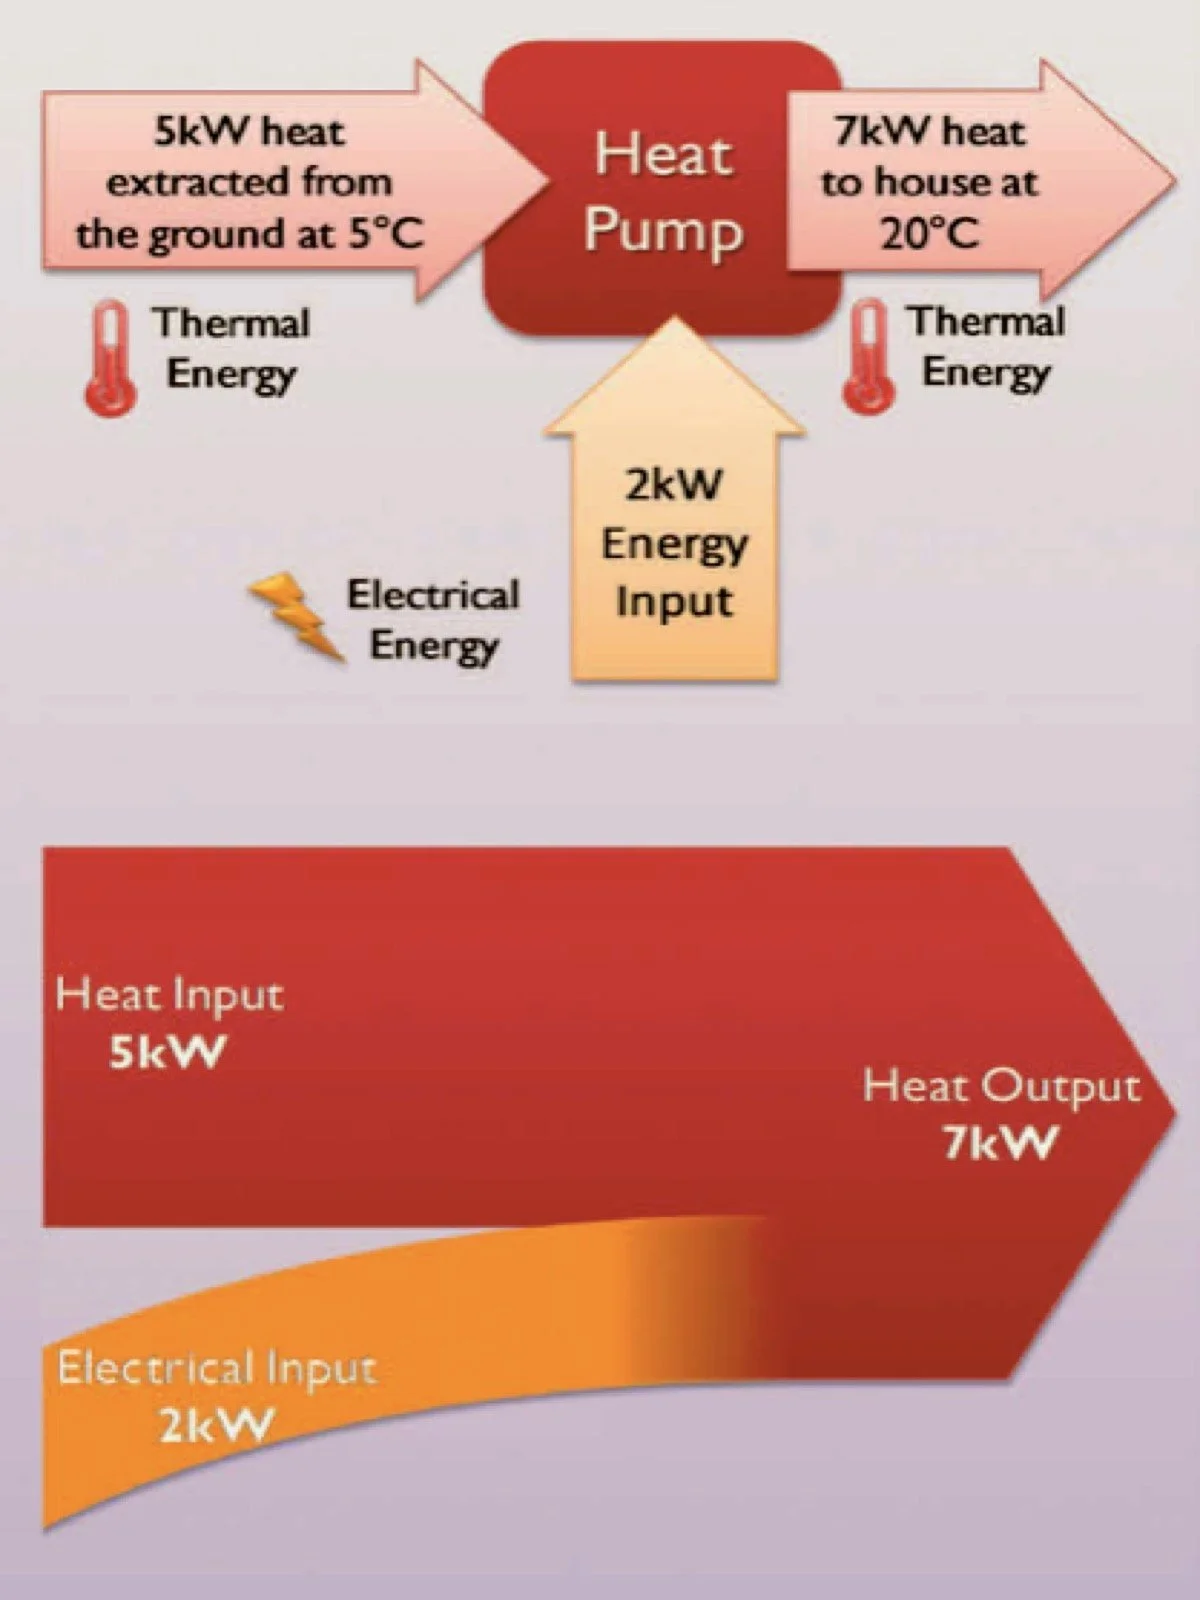
This effect is depicted in the Sankey diagram on the right (taken from the book Heat Pumps for the Home) which gives an example the principal energy flows for a heat pump.
What happens is that heat is taken from the ground at a low temperature. This heat has its temperature raised by the heat pump compressor which, along with the other components of the heat pump, requires electricity. Because the heat in the ground comes from the sun and is therefore free, a heat pump delivers a much larger amount of heat to a house for a small electrical input than if electricity had been used to provide the same amount of heat. In this example, 7kW of heat is delivered to the house for the cost of 2kW of electricity.
How is a heat pump’s performance affected by its heat source?
Different substances retain and transfer heat at different rates. The efficiency of a ground source heat pump also depends upon the nature of the ground its ground array is set in
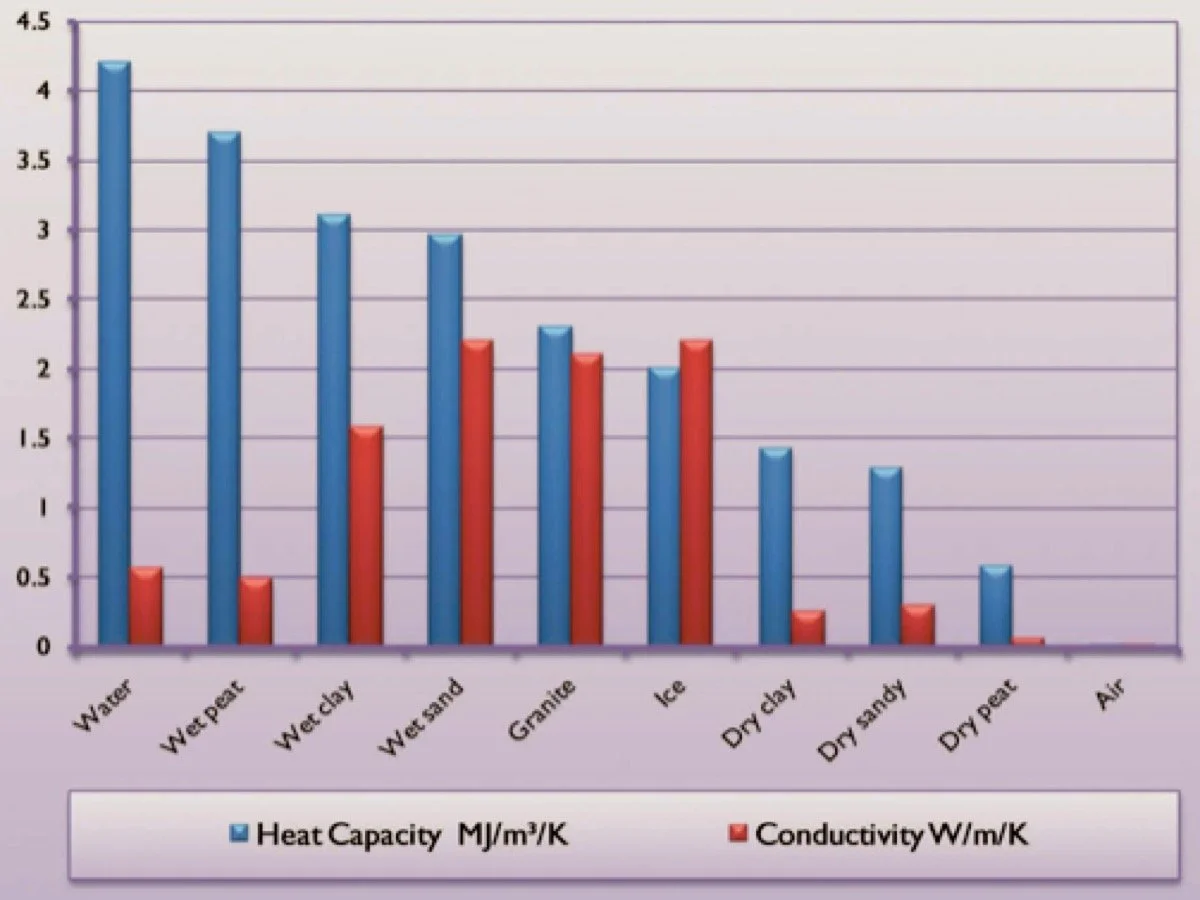
Different heat sources have different thermal properties, as shown in the diagram below taken from the book Heat Pumps for the Home. Under a relatively thin layer of topsoil, ground, for example, may consist of clay, sand, rock or a combination of various things.
The diagram above shows that, for example, the greatest amount of heat is available from a water source (such as a deep river or lake) and the least amount from the air. However, whilst few houses will have a nearby deep water source, all will have a plentiful supply of air, and, alternatively, ground can be used if it is large enough or it is possible to sink boreholes. Despite the potential inefficiencies of air (it holds little heat and it is coldest when most heat is required, making heat extraction less efficient) an air source heat pump can be a good option for low cost heating when the alternatives are limited.
We are lucky to have a clay-based site and, being near the bottom of a valley, have a further advantage of water flowing within the ground across the area where we have our ground heat collector. This both brings heat to the area from higher up the valley and increases the clay’s conductivity to the ground array. The photographs at the top of this post show part of our heat collector pipe being located in this wet clay.
For us, a ground source heat pump was relatively simple choice because of the land we had available, despite its greater initial cost which we factored in to our budget. The trench soon became invisible outside and the heat pump itself is out of sight in the plant room. And with heating from an underfloor system (see below) the only things in the living areas to suggest any heating are three towel rails.
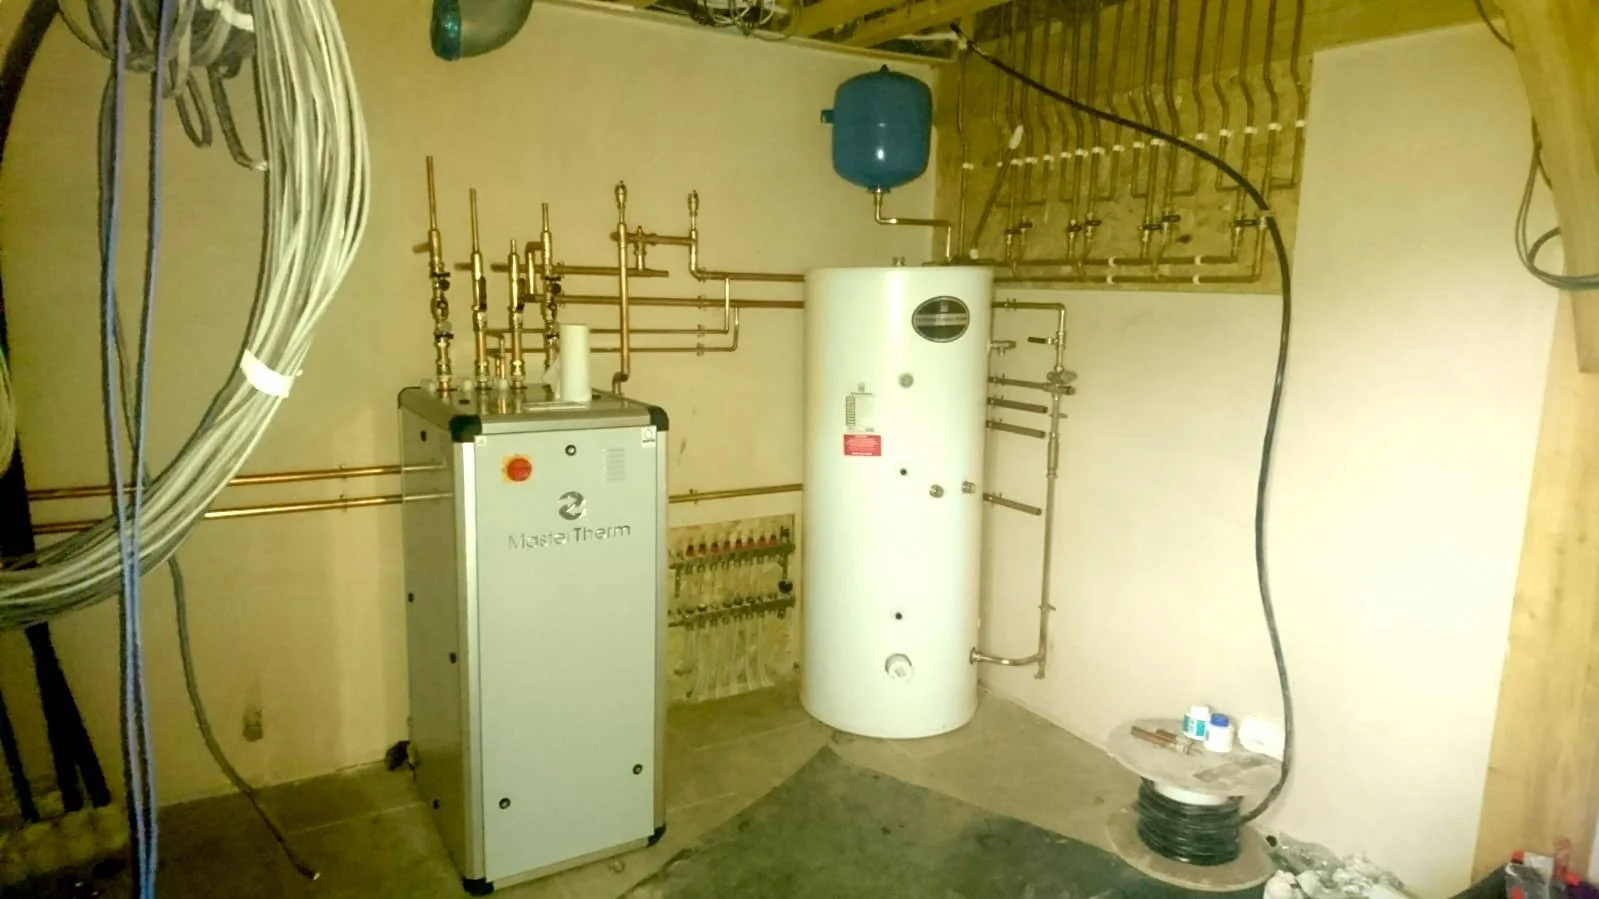
The picture on the right shows the heat pump (centre) and the hot water cylinder (right) being installed in the plant room. The ground array heat collector pipes (black) are visible on the left emerging from two sealed (white) ducts in the floor. These pipes are also shown in one of the pictures above at an earlier stage of the house build.
The heat pump and domestic hot water cylinder being installed in the plant room
Because we had enough ground we chose to have a single ‘straight’ pipe for the ground array rather than a Slinky in a 125 metre-long trench, and didn’t need to consider having a borehole collector. We thus have a pipe that is some 250m long extracting heat from the ground that is supplied by the sun. We anticipate that this array design and our modest space heating needs will mean that the ground heat we use will be easily renewed each year.
Why a heat pump is ideal for a Passivhaus
Heat pumps are most efficient when the difference between the heat source temperature and the emitter temperature is small.
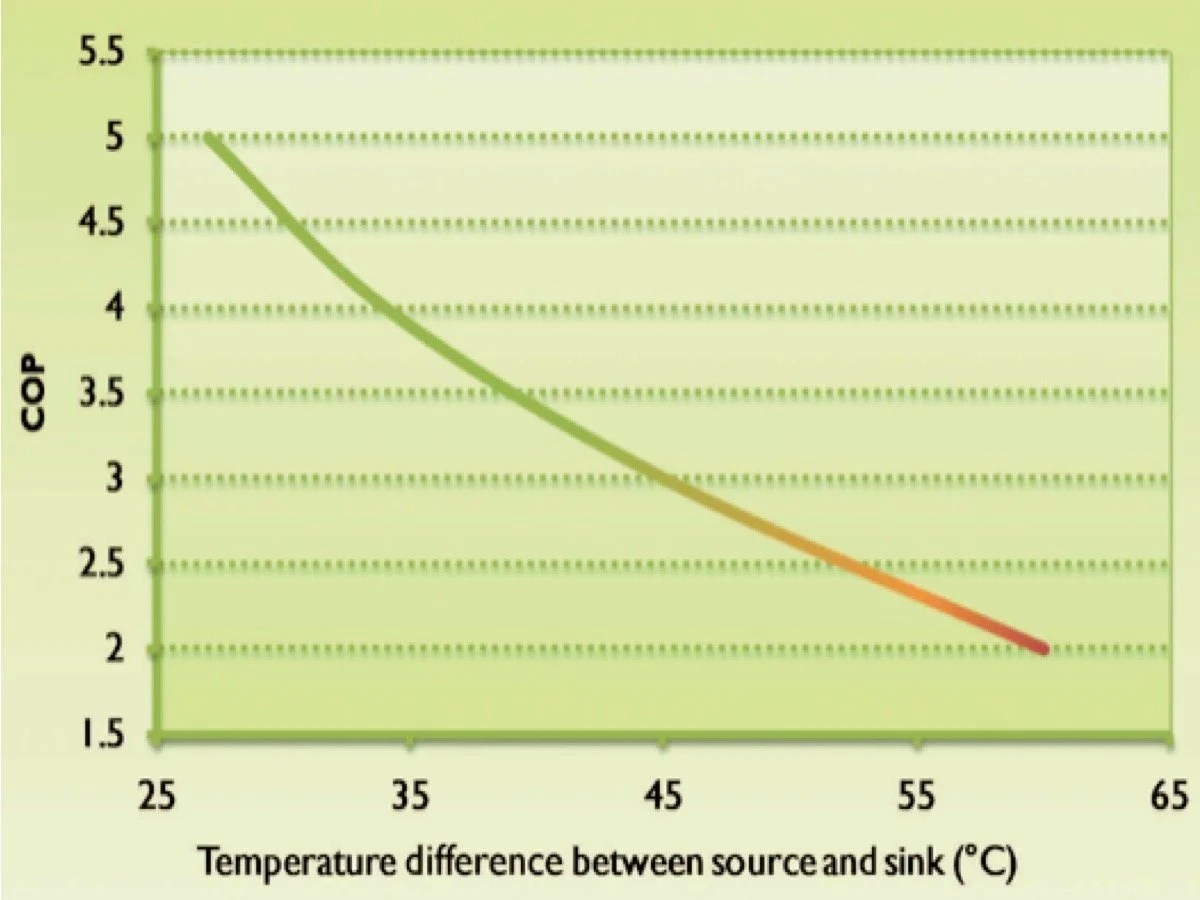
The graph on the right is taken from Heat Pumps for the Home. It shows how the coefficient of performance (the ratio of the electrical energy put into the pump and the heat obtained from it) varies with the difference between the source temperature (say, ground at 10°C) and a heating system at 30°C (a difference of 20°C), and a hot water system at 60°C (a difference of 50°C). Clearly, heating water is less efficient than space heating but it is still better than heating by electricity alone.
Most boilers are set to put out water to conventional radiators at 75°C. In a passive house this would be too hot. However, the low level of heating required in a passive house makes low temperature underfloor heating ideal. It is also more efficient for a heat pump.
Underfloor heating system installation
Underfloor ‘hypocaust’ heating featured in some ancient Roman buildings. Like these ancient systems, but with different technology, modern underfloor heating (whether electric or ‘wet’) warms the floor, which becomes a very large low-temperature radiator, providing gentle heat with an imperceptible temperature difference between floor and ceiling which further increases comfort.
Because of the minimal heating requirements of a passive house, we only needed underfloor heating in the three en-suite bathrooms, the hall, the boot room and the downstairs toilet. We worked closely with our heating engineer and our Passivhaus designer to ensure that the heat output from these would be sufficient but not too much. It has proved to be ‘just right‘.
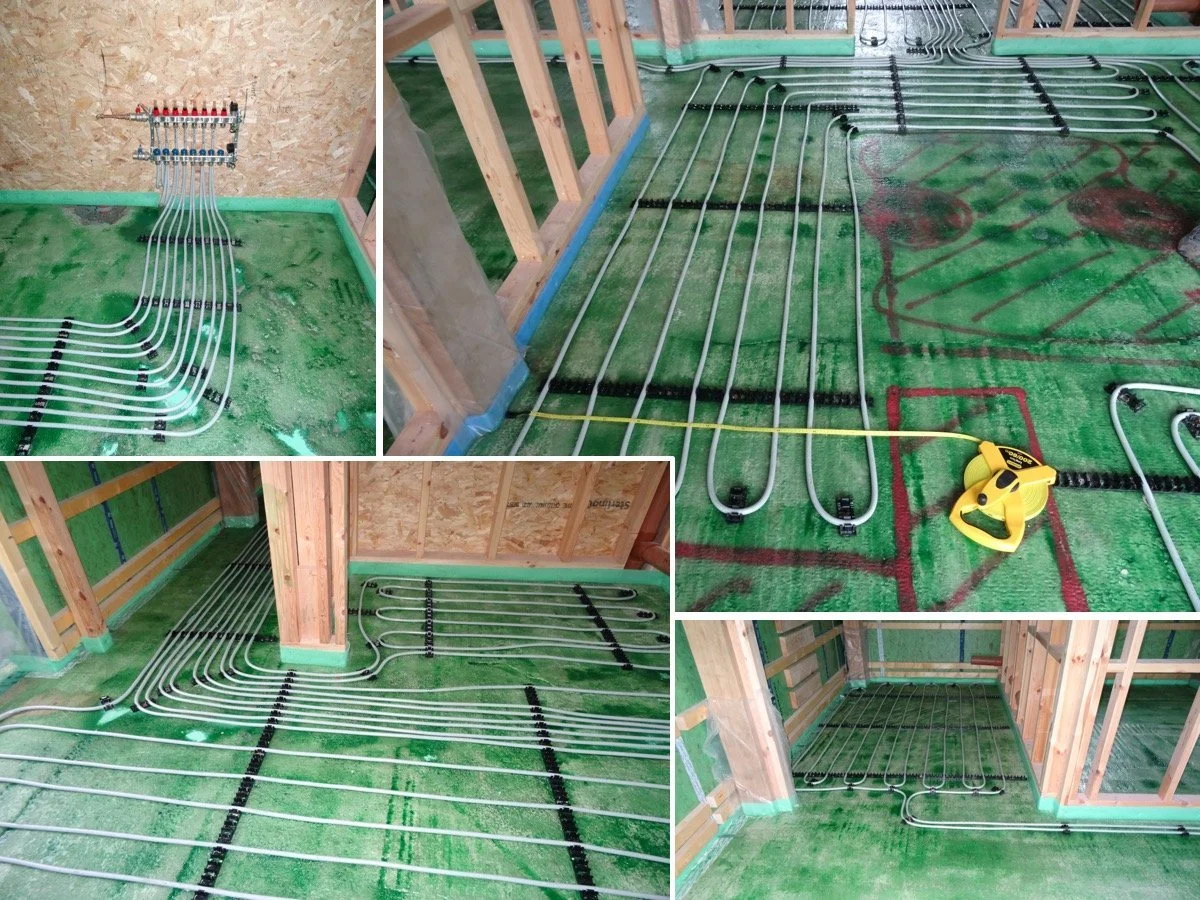
The pictures above show some of the underfloor heating pipes that were installed before a 50mm thick screed was laid. The surface of the concrete foundation slab was cleaned and then covered in a primer to improve adhesion of the screed. Also visible in these pictures are the specially deep bottom plates of the stud walls (partially covered in foam as a barrier to the screed). Vital to an effective underfloor heating system is good insulation below the house ground slab, which is an integral part of any passive house.
The top left picture above shows the manifold for the underfloor heating pipes (also visible in the earlier picture showing the installation of the heat pump and hot water cylinder). This distributes warm water from the heat pump to the individual room circuits.
Bottom left is the plant room doorway through which all the underfloor heating pipes pass, opening into the boot room (foreground) and, to the top right of this view, the downstairs toilet area. The bottom right picture shows the underflor heating pipes in one of the guest room en-suite bathrooms.
And the top right picture shows part of the hall. Here, marked in red paint, two areas have been kept clear of pipes. In the foreground this is for the foot of the stairs and in the middle for the possible future fitting of a lift. (We took lots of pictures showing a tape measure by the pipes to define the precise location of this area to help avoid putting any future lift’s floor fixings through a heating pipe.)
Downstairs, the underfloor heating was exclusively laid in a screed overlaid with tiles.
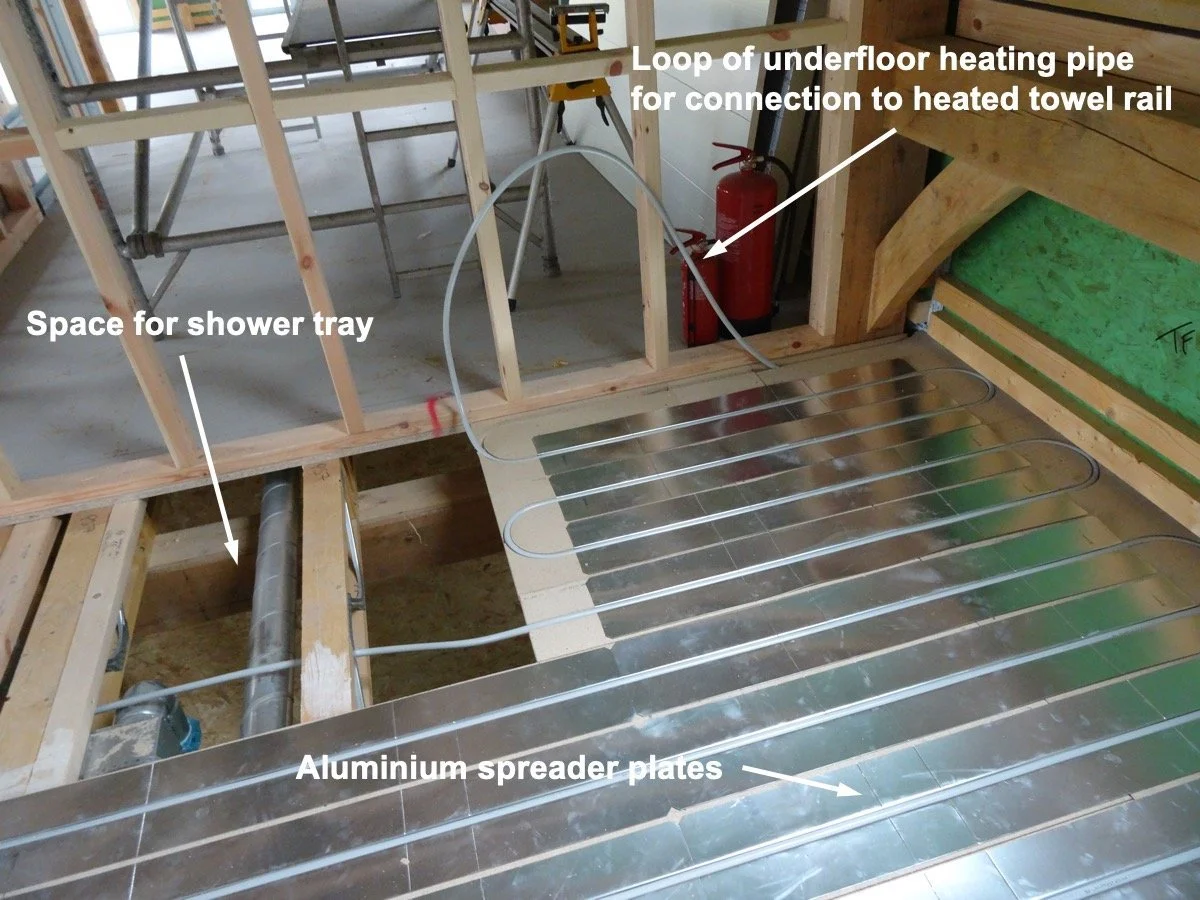
This was not possible for the single heated area upstairs: the master bedroom en-suite bathroom. Here we used special boards with aluminium spreader plates to help dissipate the heat upwards and into the overlying floor tiles.
A loop of heating pipe can be seen in the picture on the right. This was connected to a towel rail so that any air trapped in the entire heating system, which would find its way to the highest part, could be easily bled. Because the underfloor heating is normally only on for brief periods we fitted a ‘dual fuel‘ towel rail here which can also be heated electrically.
Domestic hot water
Whilst any heat pump is less efficient when heating water to the higher temperature required for a comfortable shower or bath it is still much cheaper than electrical heating, and the efficiency can be boosted with a ‘desuperheater’, as described below.
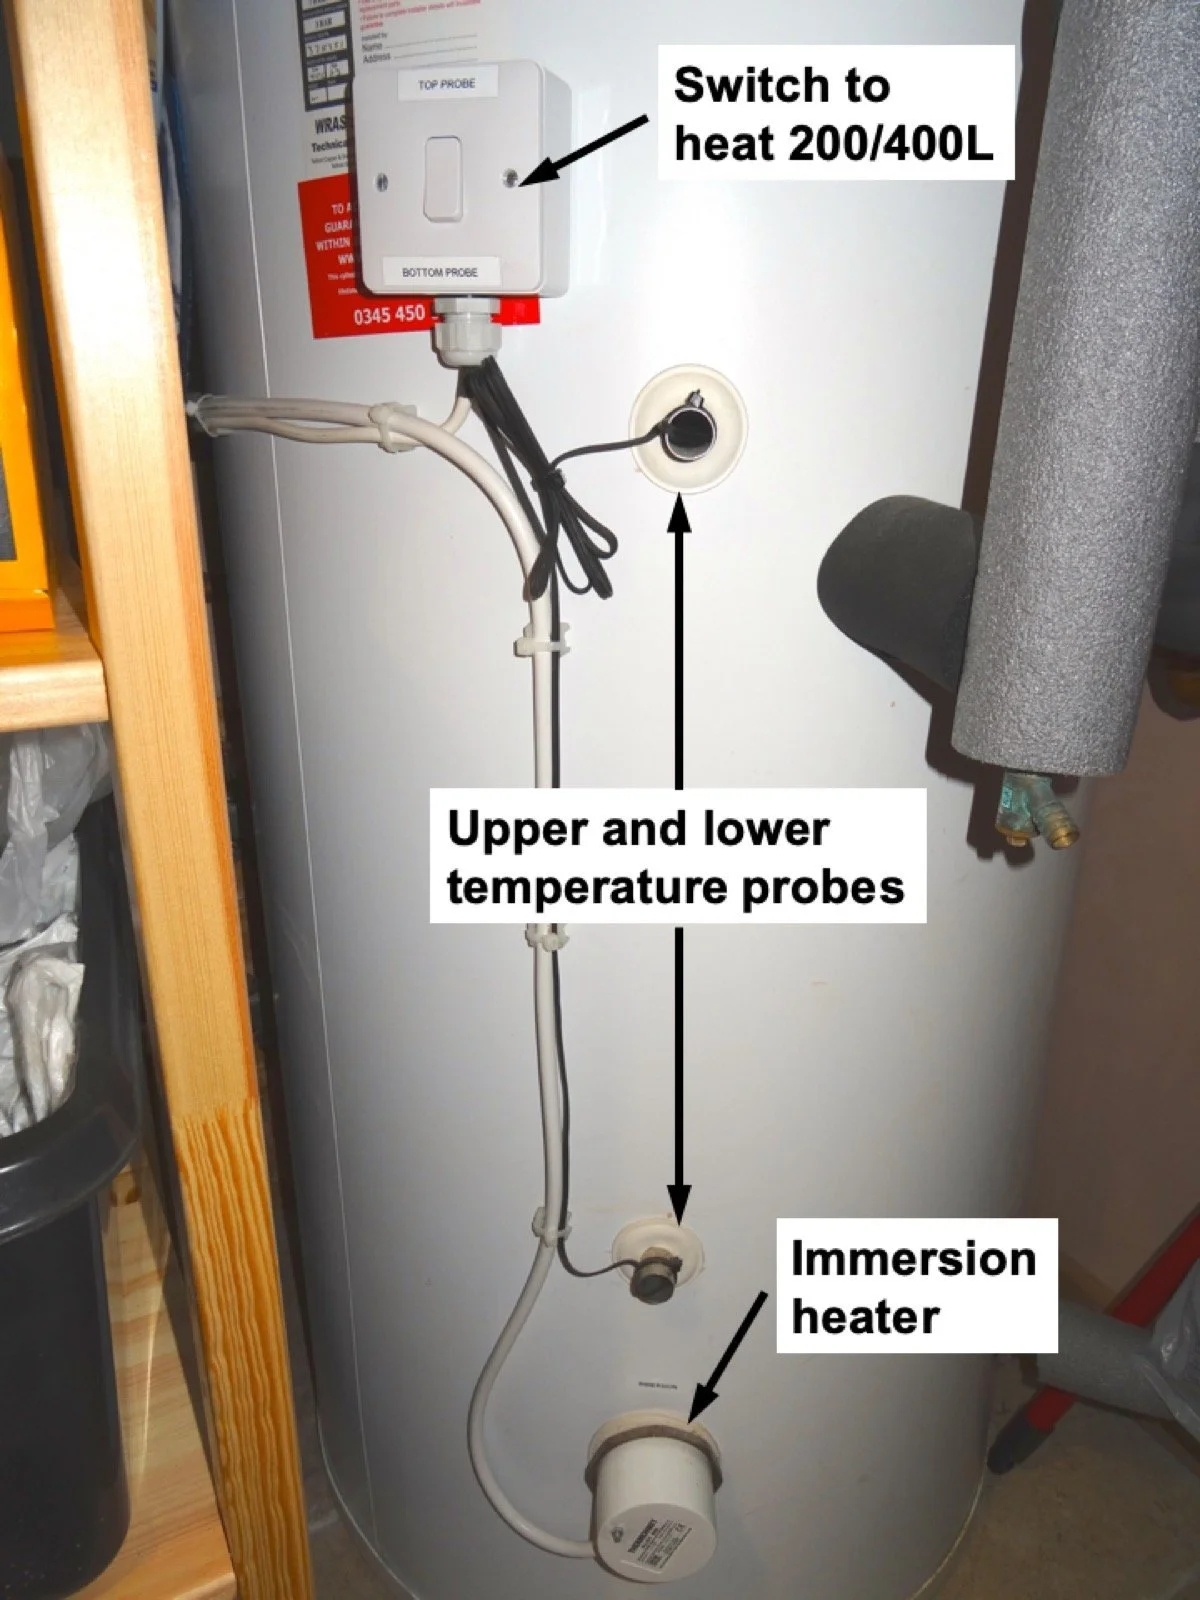
We had a 400L domestic hot water cylinder fitted to ensure a sufficient supply when both guest rooms are occupied. However, to avoid unnecessary water heating we had two temperature probes fitted to this. We can thus switch the heat pump input to heat the top half of the cylinder or the whole cylinder, as required. These are shown in the picture on the left.
Also shown in this picture is the electric immersion heater. This is programmed to switch on weekly to take the water temperature to just over 60°C to ensure that any legionella bacteria in the cylinder are killed. (We also frequently flush the showers, toilets, basins and bath to remove the risk of legionella-contaminated water in the pipes.)
Before the immersion heater switches on we heat the whole cylinder using the heat pump. This means that we only need electricity to raise the temperature of all the water in the cylinder by about 10-12°C instead of the lower section by more than twice as much. This is because the heat pump cannot heat the water to 60°C efficiently. We were advised that this approach is effective and a more efficient use of energy resources, especially, as keeping water at 60°C all the time would be much too hot at the tap and shower outlets without mixing with a substantial amount of cold water.
We have since added additional external insulation to the tank to further reduce heat loss.
A desuperheater increases heat pump efficiency
As referred to earlier, part of the heat pump process is to substantially increase the pressure, and thus the temperature, of the refrigerant gas. If you heat a liquid (say, water) so that it boils, its temperature will increase until it starts to boil. It will then stay at this temperature until all of the liquid has turned into a gas. If this is done within a sealed container so that the gas cannot escape, and you continue to heat it, then the temperature of the gas will start to increase from this point. In these circumstances the gas is said to be ‘superheated’.
This is what can happen in a heat pump compressor when the pump is in heating mode. Under high pressure, all the refrigerant in the compressor becomes a superheated gas before passing into the condenser. Often, this excess heat is wasted into the surrounding air. But if a heat exchanger, called a desuperheater, is placed between the compressor and the condenser then much of this excess heat can be captured and used to help heat domestic hot water. This has been shown to both increase heat pump efficiency and reduce electricity usage which is why we had a desuperheater fitted. And our experience has been that when the underfloor heating is on (such as during the December 2022 cold snap) the domestic hot water was some 2-3°C hotter than normal, which must have been because of heat being transferred from the desuperheater and not being wasted.
Gas superheating and heat pump desuperheating is described in this video.
Choosing a heat pump
There are two main types of heat pump for domestic use: ground source and air source. There is also a wide range of manufacturers most of whom make both types. Which you choose will depend on your circumstances and preferences. For example, an air source heat pump could be a good choice if you have a limited amount of ground, and it has lower upfront costs and should produce enough heat for most purposes including domestic hot water. However, it is less efficient than a ground source heat pump in the colder months because the temperature difference between the heat source and the inside of the house is greater than it is with a ground source heat pump.
We researched heat pumps and different manufacturers on the internet and visited lots of suppliers at building exhibitions and got a number of quotations. We also visited Thermal Earth, the company that imports the Mastertherm ground source heat pump that we eventually decided to buy. This visit enabled us to see a number of systems and options and to gain confidence in the company and in the Mastertherm product range.
We were also impressed that Mastertherm makes heat pumps with inverter technology. Unlike a fixed output heat pump, which is either off or fully on, inverter heat pumps have a variable speed compressor which can match its output to heating requirements. This technology can be quieter, and is said to be more efficient and to lead to a longer life of the heat pump. Certainly we continue to be very pleased with the performance of our heat pump.
It is also important to chooser an installer who is certified under the Microgeneration Certification Scheme to be eligible for payments under the government’s Renewable Heat Incentive (RHI) grant, which has been replaced by the Boiler Upgrade Scheme which can help to offset some of the up-front costs. Unfortunately, and somewhat perversely, under this RHI grant the lower your space heating requirements the lower your payments, which is not such good news if you live in Passivhaus. You will need to check out the latest situation on grants available to support the installation of renewable energy heating systems.