Second fix: plastering, carpentry, plumbing, electrics, flooring, tiling…

Here we describe the ‘second fix’ stage of our build process; possibly the most exciting one after the oak frame erection. The second fix stage is when plaster boarding and its covering skim coat goes up and hides the studwork; and the visible woodwork, tiling, sinks, baths and showers, and electrical light and power fittings go up before decorating.
Plastering
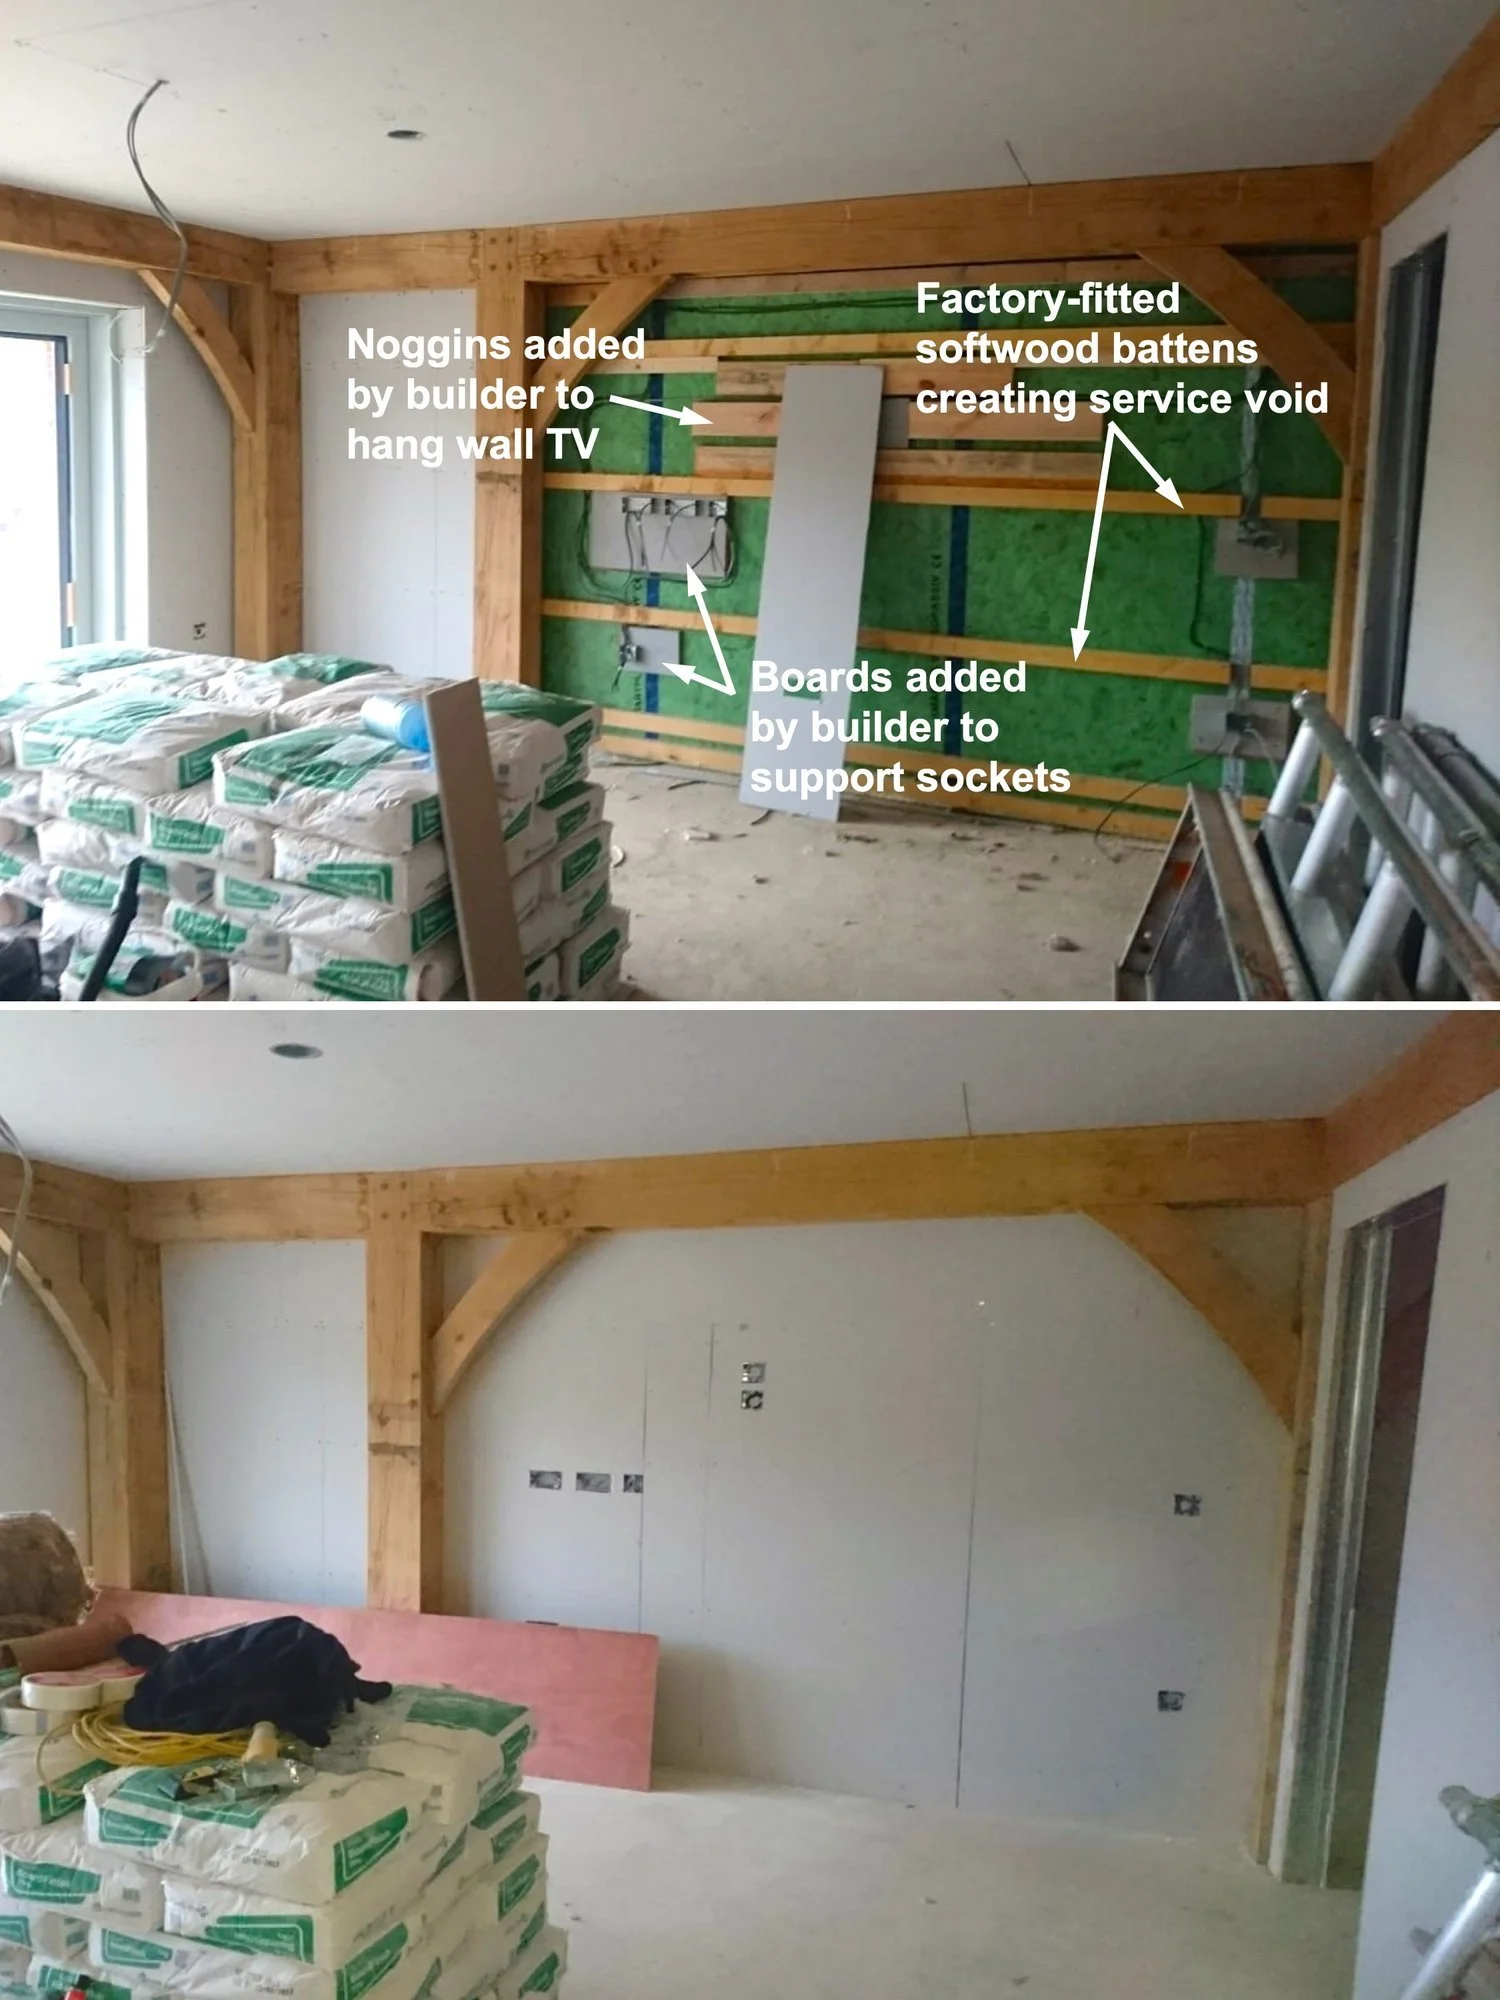
Self-building requires a lot of planning. At an early stage you need to work out where you want things like power sockets, light switches and where things need support if hanging on a wall.
For example, the photographs on the right show before and after plaster-boarding in one of the guest bedrooms. We needed to decide exactly where we wanted certain things before the second fix stage, such as light switches, power sockets and a wall-hung TV.
The upper picture also shows how the factory-fitted softwood battens on the Oakwrights encapsulation system create a void behind the covering plasterboard for wiring, switch and power socket back plates, and (elsewhere) plumbing. Vitally, this service void allows for the installation of pipes, wiring, sockets, light fittings etcetera without penetrating the house’s airtight layer – a key aspect of achieving the Passivhaus standard.
The lower picture, taken before the application of the skim-coat plaster, shows the location of power sockets and light switches (some of which are also visible in the top picture).
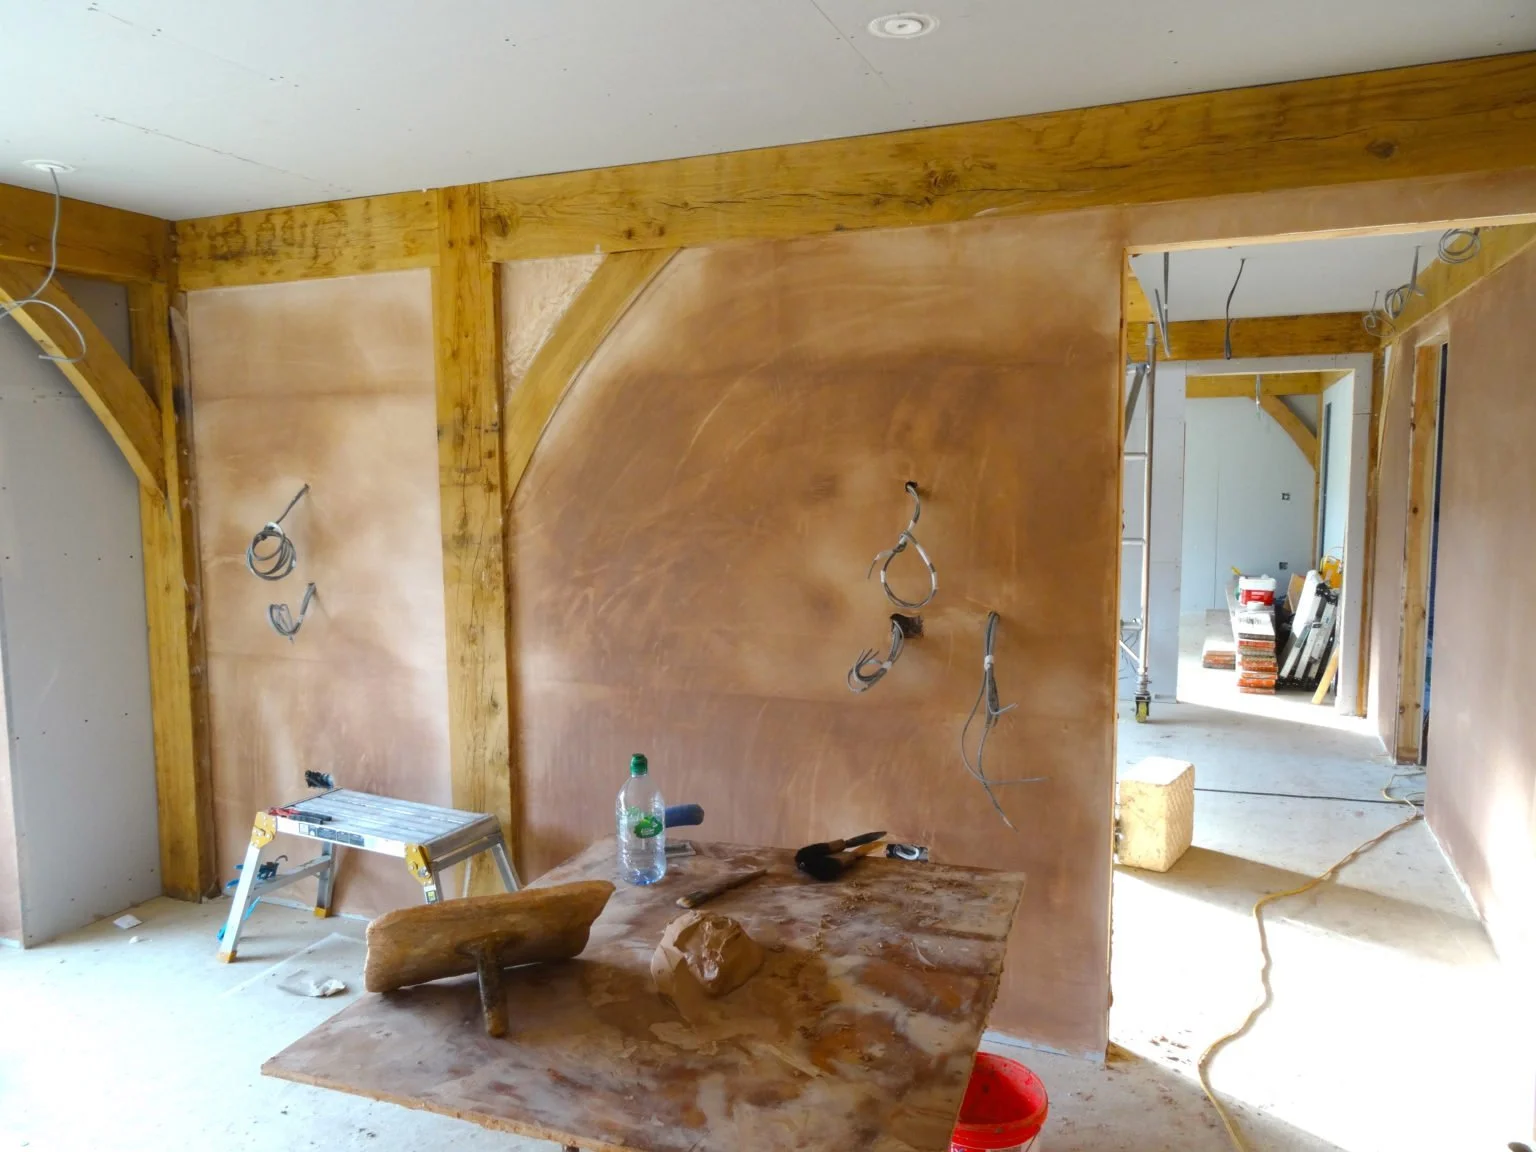
And, as can be seen in the picture below of the other guest bedroom, the skim coat plaster, leaving the oak frame exposed, finishes things nicely before painting.
Light fitting locations
Some light fittings we needed to locate ourselves and tell the builders exactly where we wanted them, as shown in the top right picture below. Bottom right is another plaster-in double adjustable downlighter. Both of these fittings were sited to illuminate specific items. And being ‘plaster-in’ these fitting are all but invisible when finished.
The top left picture below shows a fresh plaster skim coat on part of the master bedroom ceiling and the locations of ceiling lights, the wiring for a mains-operated smoke alarm, and an opening for the ventilation system, the first and last defined by the lighting and ventilation system designers, respectively. The bottom left picture shows locations for floor uplighters used to accentuate window reveals and an item to be displayed on the wall between two windows.
Cleaning the oak frame
In an oak frame house there is an additional build component: cleaning the oak frame. This is a messy, wet process and done after the plastering. The oak frame needs cleaning because the factory milling and joint-making of each of the beams inevitably causes black staining, and if it rains significantly before the house is watertight this will cause further staining. (We were lucky in having a completely rain-free period between the erection of the oak frame and reaching the water-tight stage.)
These surface discolourations can be removed in a number of different ways, but commonly by using a solution of oxalic acid and scrubbing it by hand with non-ferrous metal brushes. The oxalic acid solution then needs to be washed off and the frame has to dry before the rest of the second fix work can proceed. We were fortunate with our timings: we got the plastering and oak frame cleaning done shortly before Christmas allowing for two weeks’ drying before our builders returned after the holiday period.
The pictures below show several parts of the oak frame before cleaning (on the left) and some other parts afterwards (on the right). Following cleaning and drying, the marks and staining were gone and the frame had an even, ‘clean’ appearance that is mellowing with time.

Tiling
As with many other things for our house, we spent a long time looking for tiles that we’d be happy to live with permanently. Floor tiles and wall tiles have a big impact on the ambience of a room and are not something that you want to replace once installed. We decided to use Mandarin Stone products and found the staff in both of their showrooms we visited knowledgeable and helpful. We also considered that larger tiles tend to make an area look bigger, and that for the hall and boot room floors we wanted a modular pattern of tiles rather than a regular one.
The pictures below show, on the left, tiles being laid in the hall and, on the right before-and-after tiling in an en-suite shower room. Wall tiles were laid on specially-coated plywood (red colour in picture below). Floor tiles were laid on an uncoupling Schluter Ditra membrane (recommended by our builder) to reduce the risk of cracking in the event of the sublayer moving (orange colour in picture on the left, below).

Wood flooring
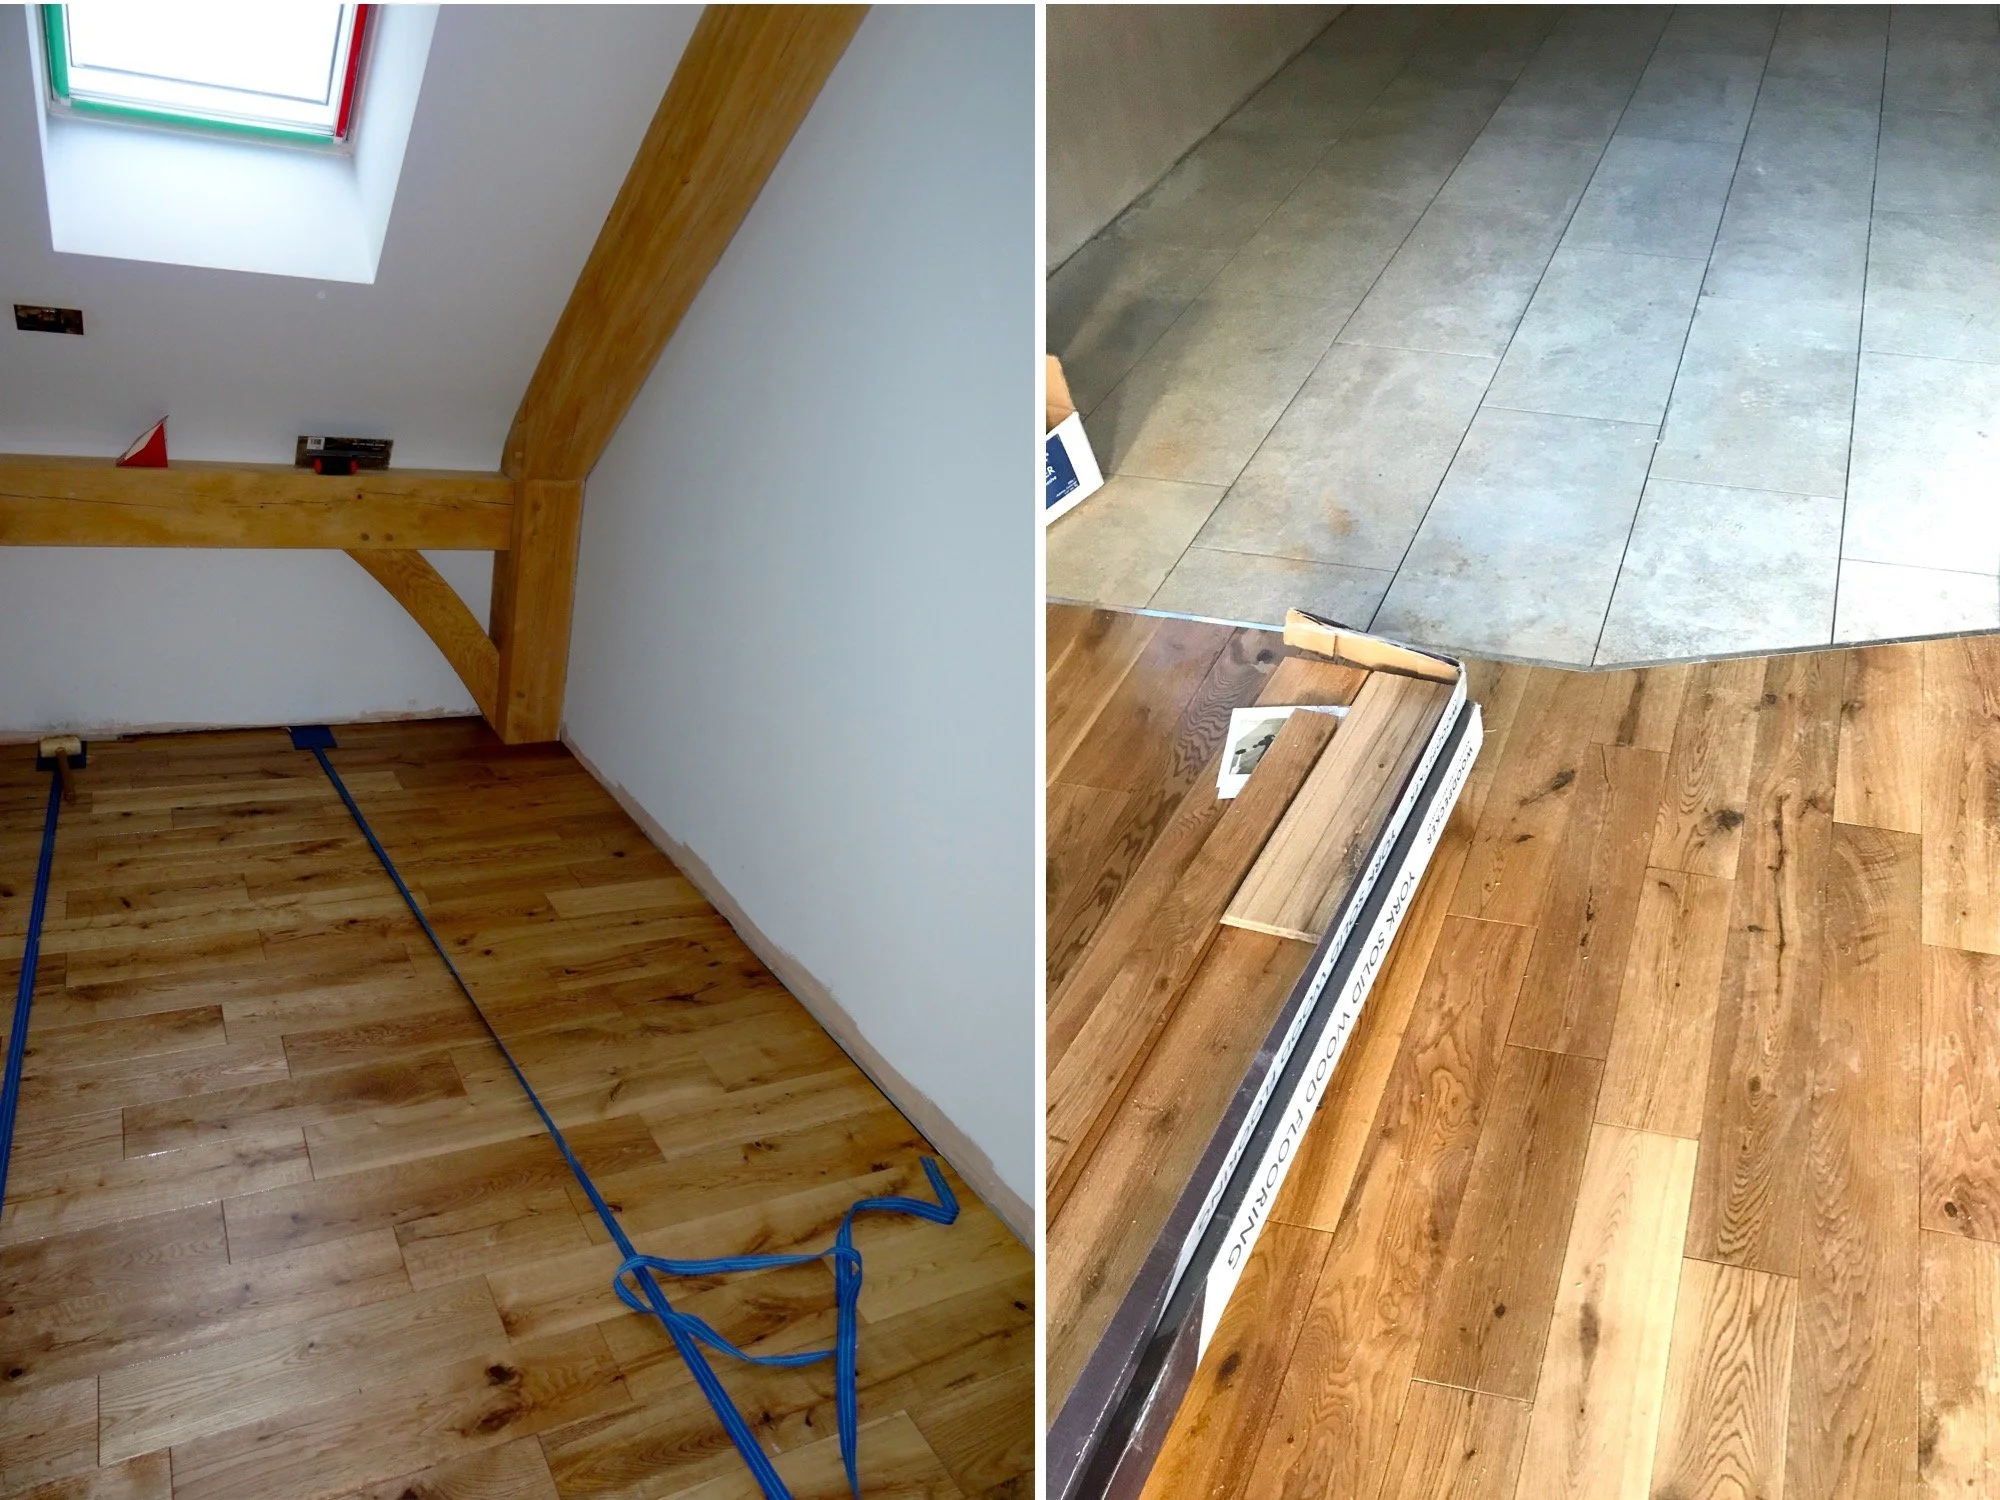
Having looked at wood floor options at various exhibitions and flooring supplier showrooms, we had originally planned to fit bamboo flooring because of its hardness, appearance, sustainability (bamboo grows very quickly) and lower cost. However, our builder was able to source some solid oak flooring at a still lower cost. We thought this looked even better than bamboo and, together with it being cheaper, this was an irresistible option.
The pictures below show this oak flooring laid in the master bedroom dressing room (left) and up to the junction with the floor tiles in the open-plan kitchen/dining area.
The direction of floor boards and tiles is important; these things should only go down once! For example, we tried out the rectangular kitchen floor tiles in different directions and bonding patterns before settling for a quarter/three-quarter overlap bond with the tile lengths parallel to the long axis of the kitchen, as shown in the picture below. This orientation not only complemented the shape of the kitchen but also the abutting wood flooring in the dining area.
And in each of the en-suites we had the same tiles on the floors as on the walls, with narrow grout lines aligned between the floors and walls. We think this style accentuates the space.
The value of planning: an example
We have referred to the importance of detailed planning for a self-build home in other posts. This exemplified in our master bedroom en-suite and we are very pleased with the end result. Here, we wanted to include:
a service riser (taking the inlet and outlet ducts of the mechanical ventilation heat recovery system for the first floor);
a large bathroom cabinet;
a wall-hung toilet with a hidden cistern; and
tiling on two aspects of the shower; one wall backing on to a pocket door frame and with a niche for toiletries in it.
Each of these required something to be hidden, or added to the existing stud work, and needed planning long before the second fix stage.
To demonstrate this, the pictures below show the service riser with the inlet and outlet ventilation ducts passing through the ceiling of the ground floor plant room into the upstairs en-suite bathroom (bottom left); up into this room (top left); and thence to the highest point of the roof and onto the upstairs rooms (on the right). The top left and right hand pictures also show the need for boxing-in or the creation of false walls/ceilings to cover these ducts, unless one wants an industrial style appearance (which can be appropriate in some designs). Green Building Store’s MVHR duct design is described in another post, albeit the diagram there shows the ducting before we changed the position of the service riser.
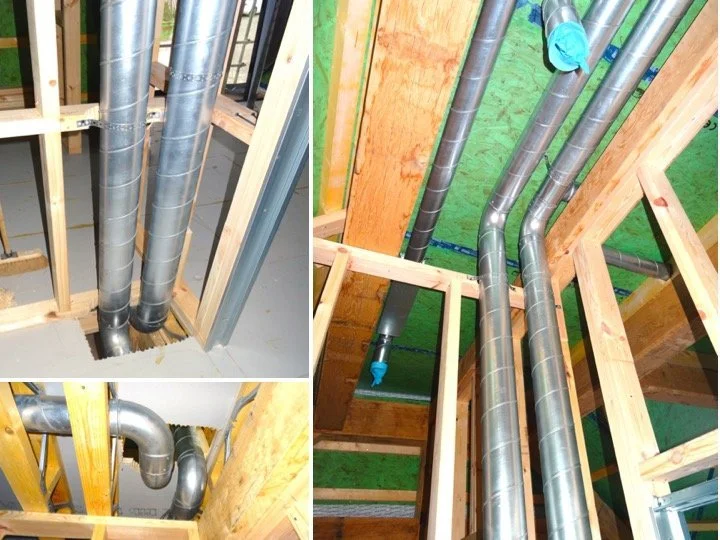
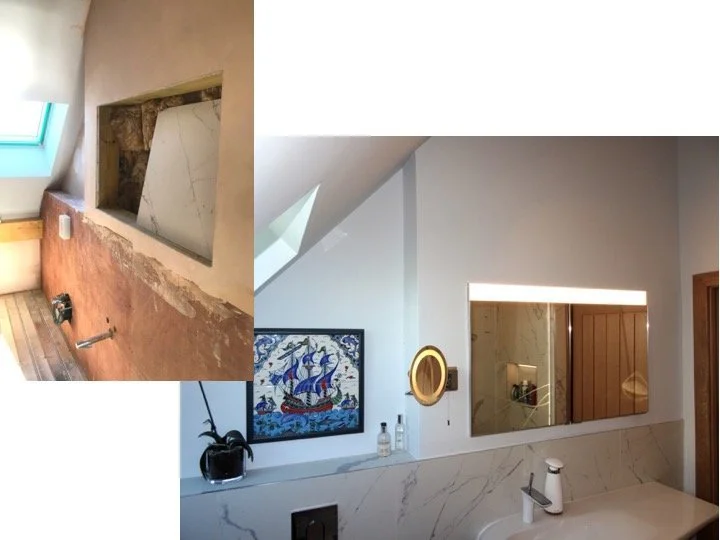
We were also smitten with the Keuco recessed bathroom cabinet range which requires a false wall for installation. We thus suggested at an early design stage that the service riser (accommodating the ventilation ducts between upstairs and downstairs) was moved from one side of the bathroom to the other and that this, the cabinet and the toilet cistern all be installed into the same false wall.
The pictures below show a false wall made to cover the service riser ducts and the toilet cistern and to house the bathroom cabinet. In the left-hand picture you can see a cut out made to receive the recessed bathroom cabinet and below this the fittings for the wall-hung toilet bowl. The right-hand picture shows the finished product. We considered that not taking the false wall right up to the roof window provided a point of interest, a useful shelf, and a more balanced look to the window frame itself. To the right of the cabinet, hidden by the wall, are the service riser ducts shown in the pictures above.

In addition, we wanted a pocket door for the bathroom to avoid losing the space taken by a hinged one. And we wanted a niche in one of the shower walls. So we needed an second false wall in the ensuite because a pocket door wall lacks the strength for tile hanging. The pictures below show what we did.
On the left is the galvanised steel frame for the pocket door. Whilst this can hold plasterboard it can’t cope with the weight of tiles or a shelf (the fixings of which would, anyway, protrude into the cavity and foul the door). We thus constructed a shallow false wall on the inside, as shown in the middle picture. Barely noticeable from within the en-suite, this provided sufficient depth for a niche to hold toiletries, and sufficient strength for the end wall of the shower to be tiled, as well as providing support for a heavy glass screen, as shown in the right-hand picture (copyright Mark Bolton Photography).

The kitchen
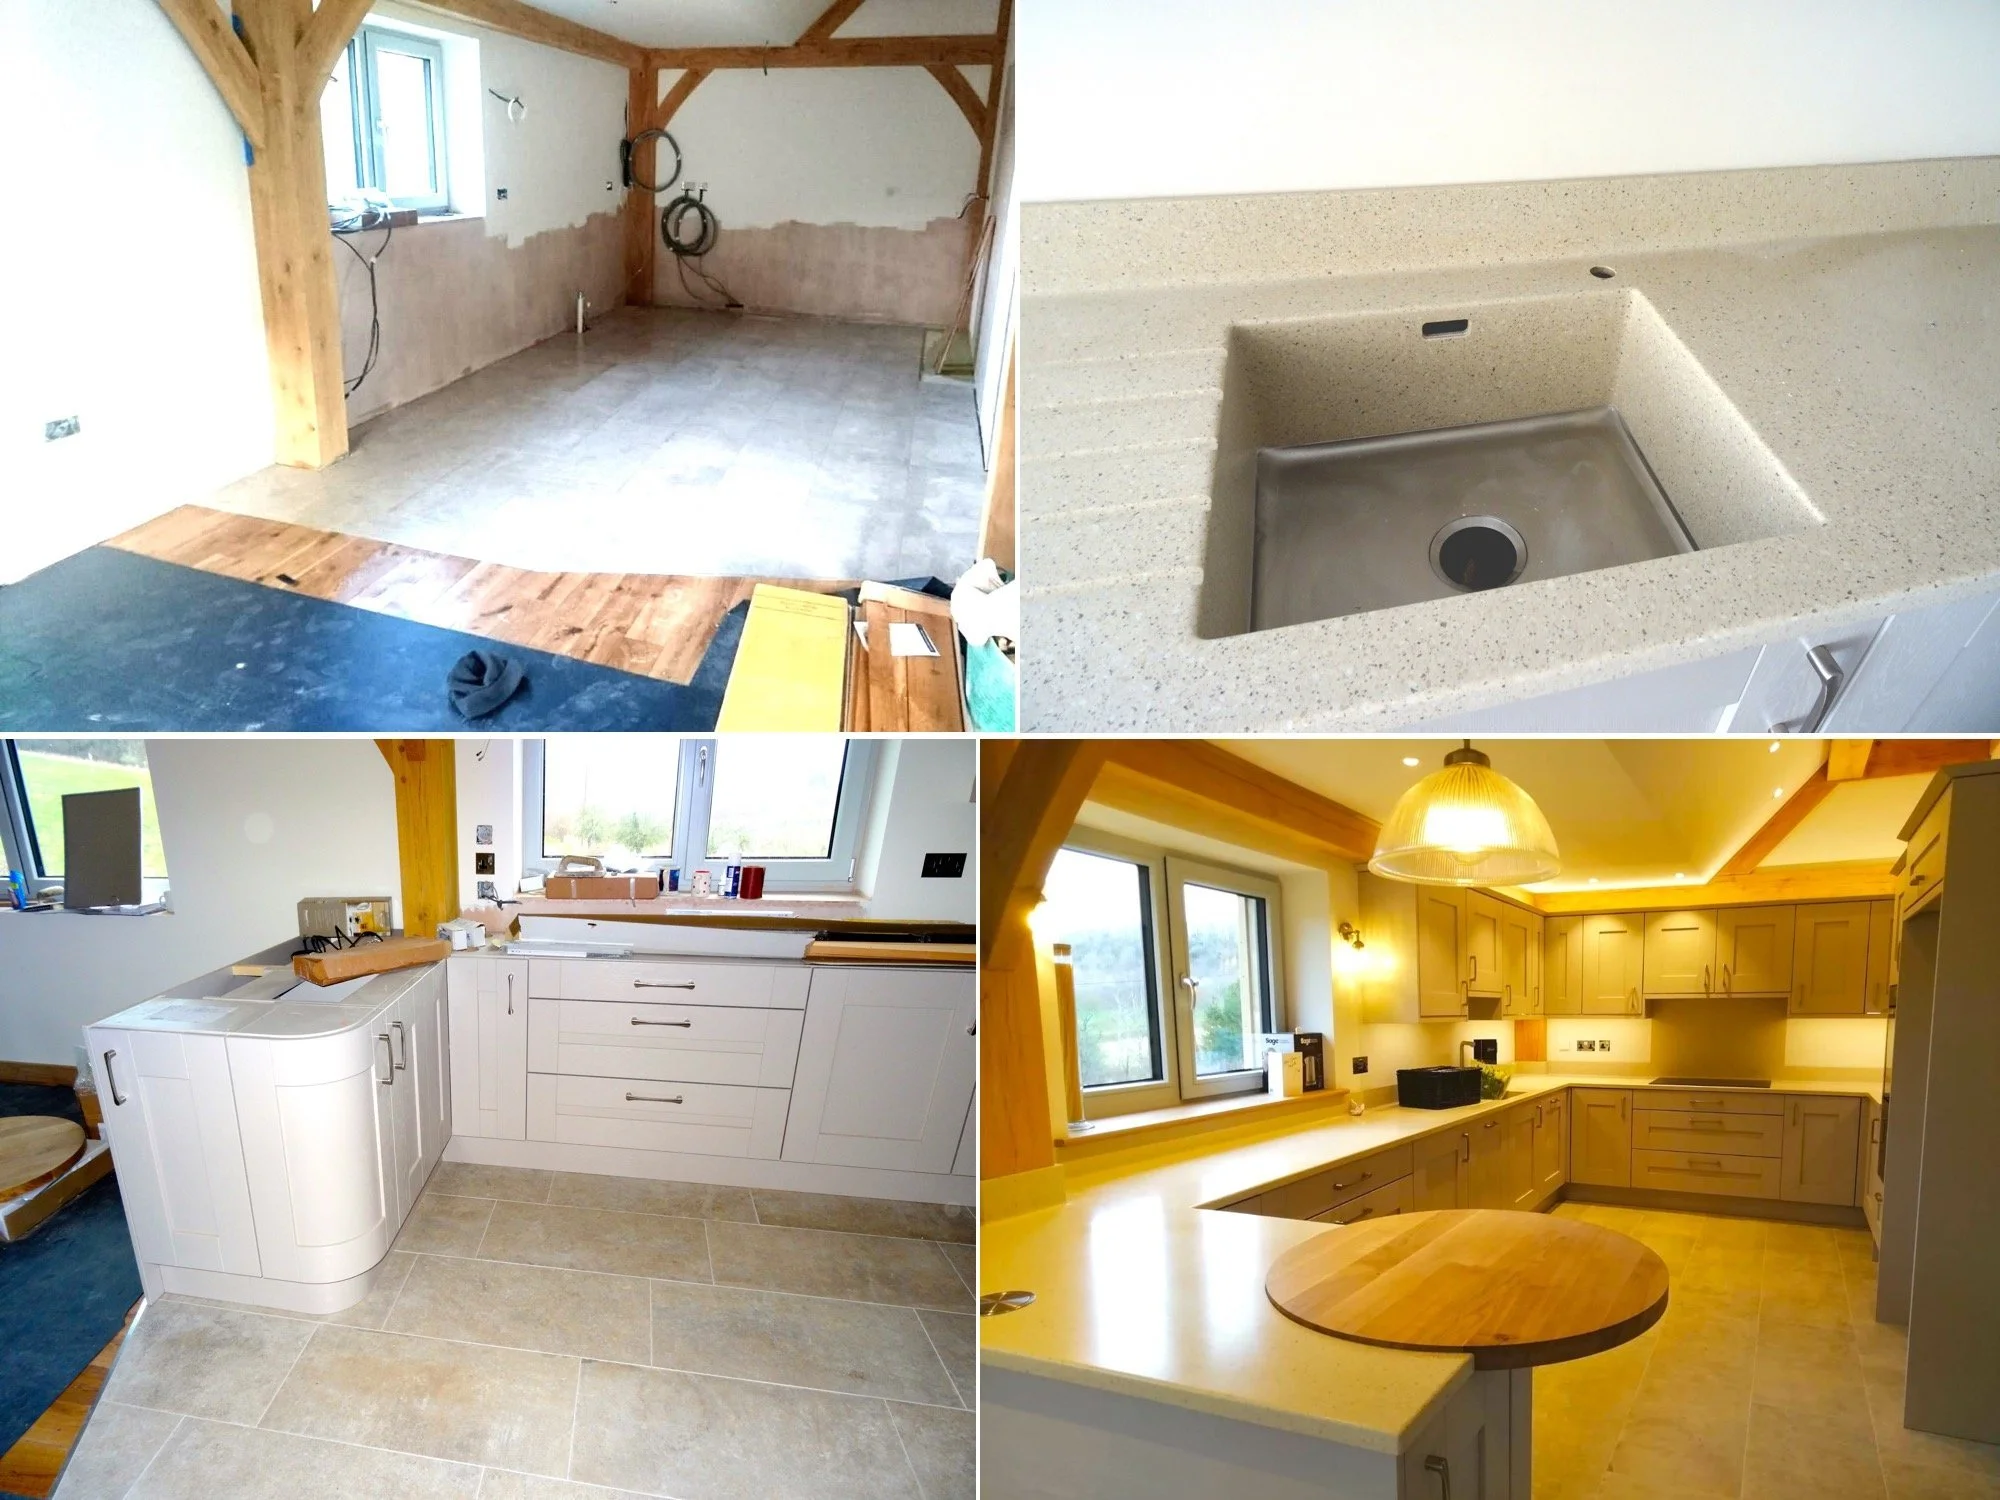
Getting the right kitchen design and fittings was also something we spent a long time researching; the kitchen is probably the room where this matters most. For us, the kitchen’s design was about functionality not just aesthetics: which type of drawers and which type of cupboards go where in relation to the sink, the hob, the oven, the fridge..? It’s necessary to imagine yourself bringing in and putting away shopping; preparing, cooking and serving a meal; doing the washing up; and eating a meal in the kitchen, all in order to optimise the design. We finally settled on Classic Interiors for our kitchen design (and for our wardrobe and other clothes storage in the master bedroom) and continue to be delighted with our choice.
The pictures below show the kitchen before and after fitting (top left and bottom right) and two other important features. One of these was our choice of Corian for the worktops (top right picture below). Corian is a ‘one piece’ worktop with no discernible joins anywhere, be they for the wall up-stands, the sink (top right, below) or between different surface areas. It included a splash-back for the cooker hob and we later had a matching splash-back fitted for the sink – and we can’t see the join for that even though it was added later.
Another important aspect shown below is in the bottom left picture. Whilst an oak frame inevitably consists of rectangular sections it is not necessary to follow these for interior areas. For example, we have an L-shaped open area comprising the kitchen, dining area and living area and chose to extend the kitchen into part of the dining area to create more kitchen space and to avoid a boxy appearance. The smooth transition between the landing, kitchen and dining room is helped further by the circular oak worktop (shown bottom right), which we daily sit around for a coffee or quick meal.
Stairs
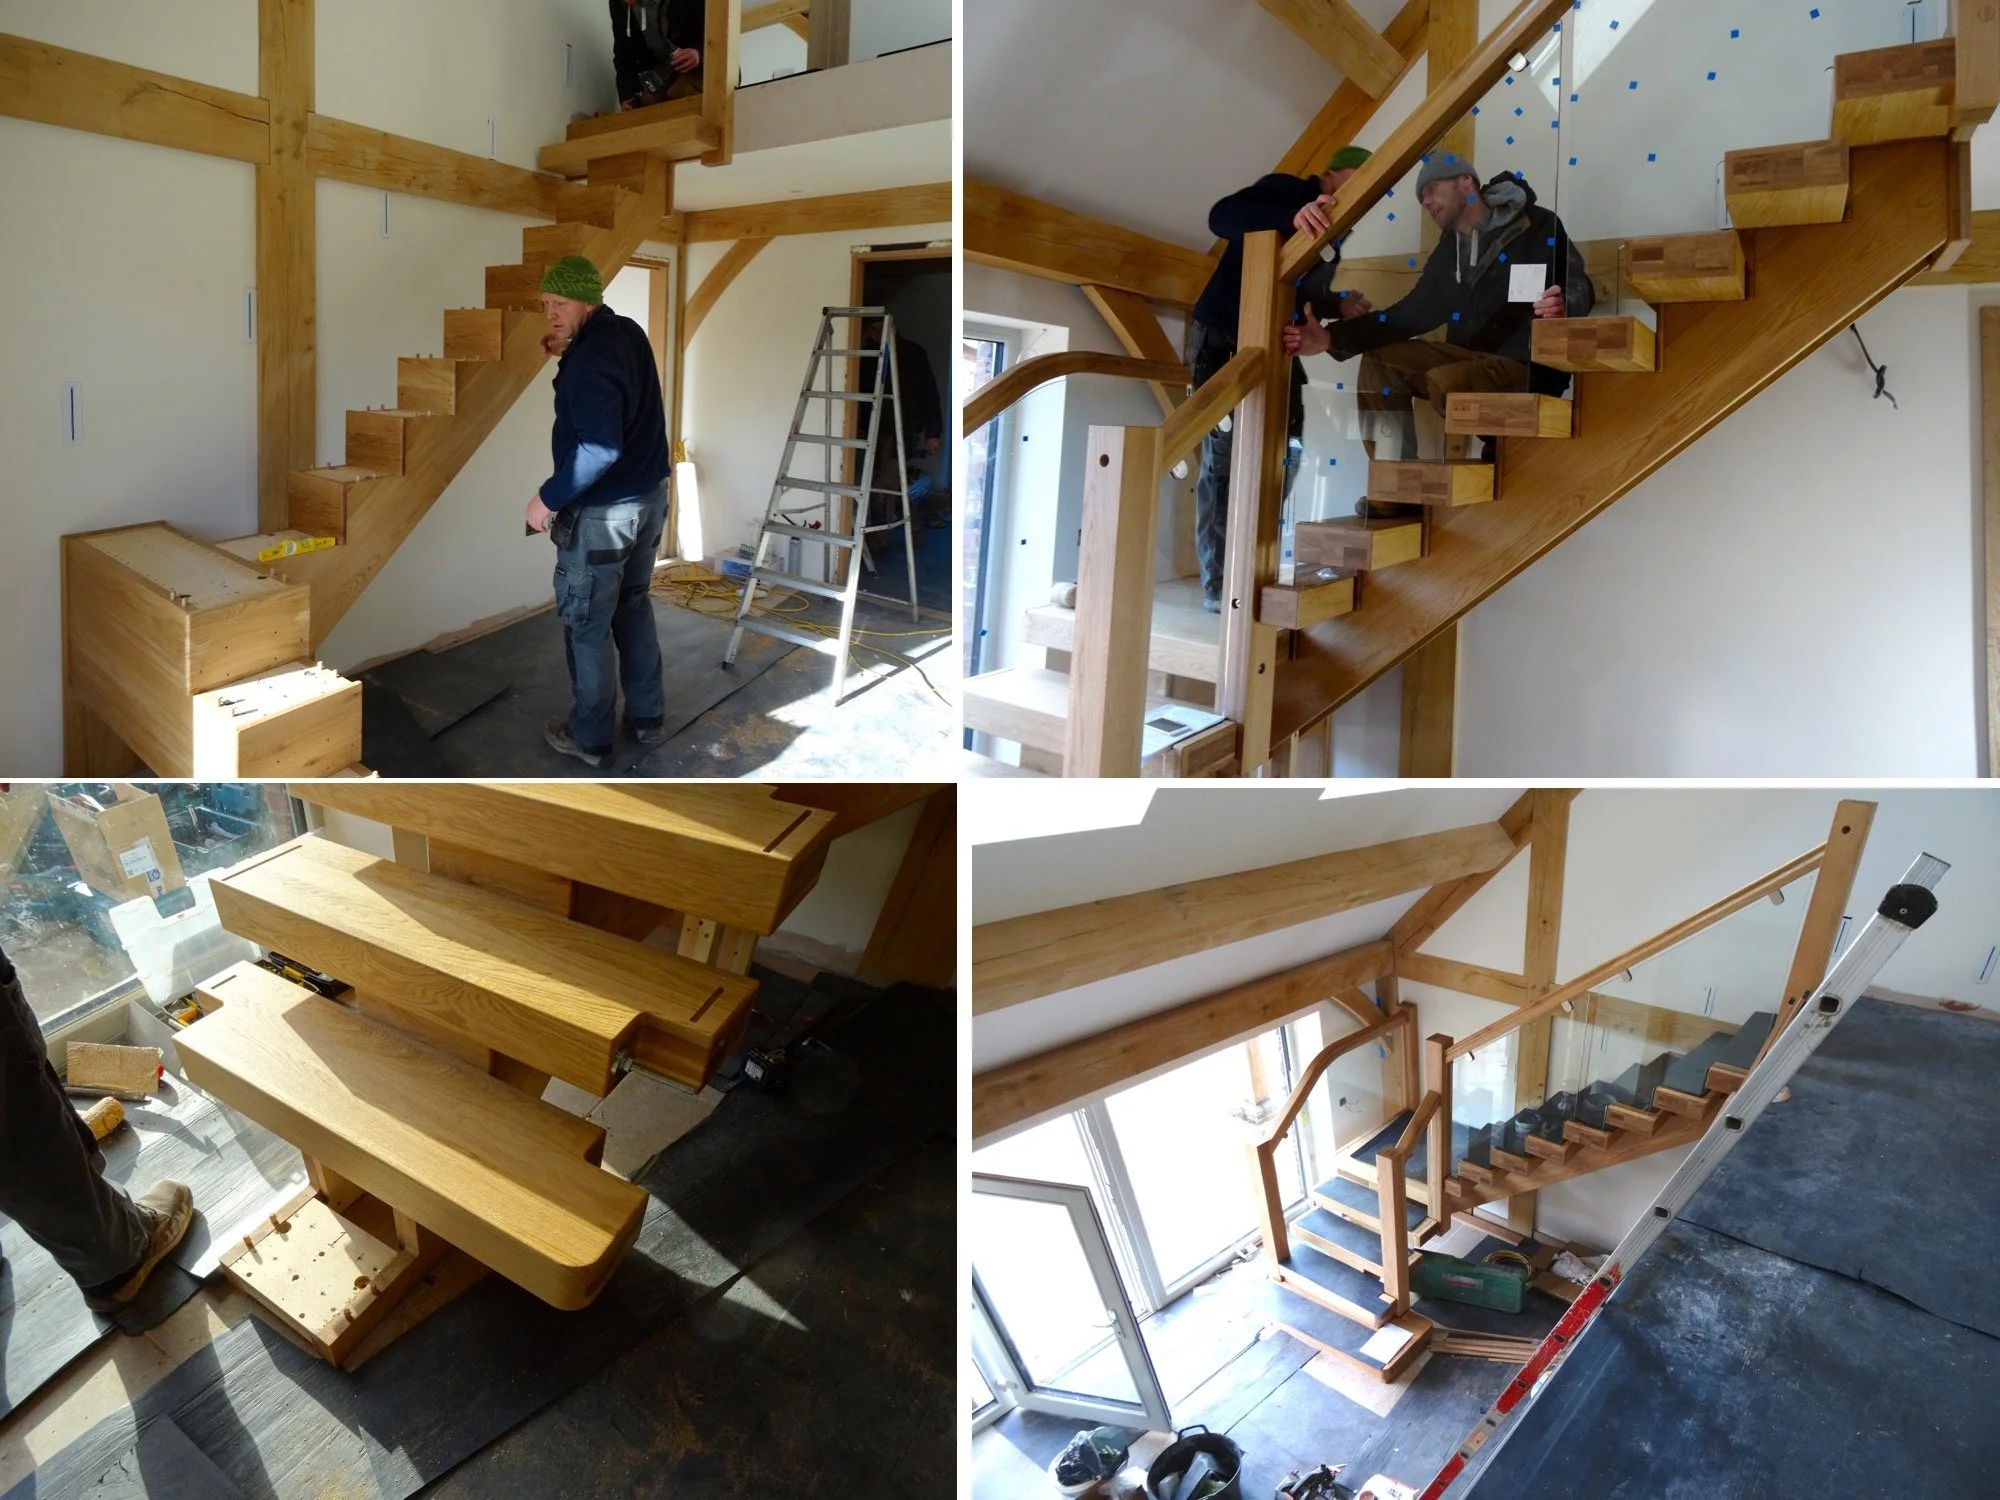
Enhancing an oak frame house Wow! factor, especially in the entrance hall, makes choosing the staircase especially important. Oakwrights sent us many photographs of stairs in oak frame houses and this helped us to think about what we might want. But it was also necessary to visit the showrooms of a number of staircase manufacturers. We finally decided to have an oak X-Vision staircase from Stairplan. Even then there were further choices; a vital one in our view was having a textured tread to reduce the risk of slipping.
Some pictures of the staircase installation are shown below from the installation of the ‘trunk’ (top left), the risers (bottom left) and the glass balustrade (top right). The end product (bottom right; the landing balustrade yet to be installed) left us with a question: would we miss using the builders’ ladder to get to the first floor?
Bathroom sanitary ware
We probably visited more bathroom suppliers, including at national exhibitions, than anything else before finding one we liked. The Bathroom Studio, Evesham proved to be an Aladdin’s cave of high quality sanitary ware and fittings and to have an excellent design service. Pampering yourself is an important part of pleasurable living; designing a bathroom and choosing sanitary ware that is ‘just right’ for you is a key aspect of this.
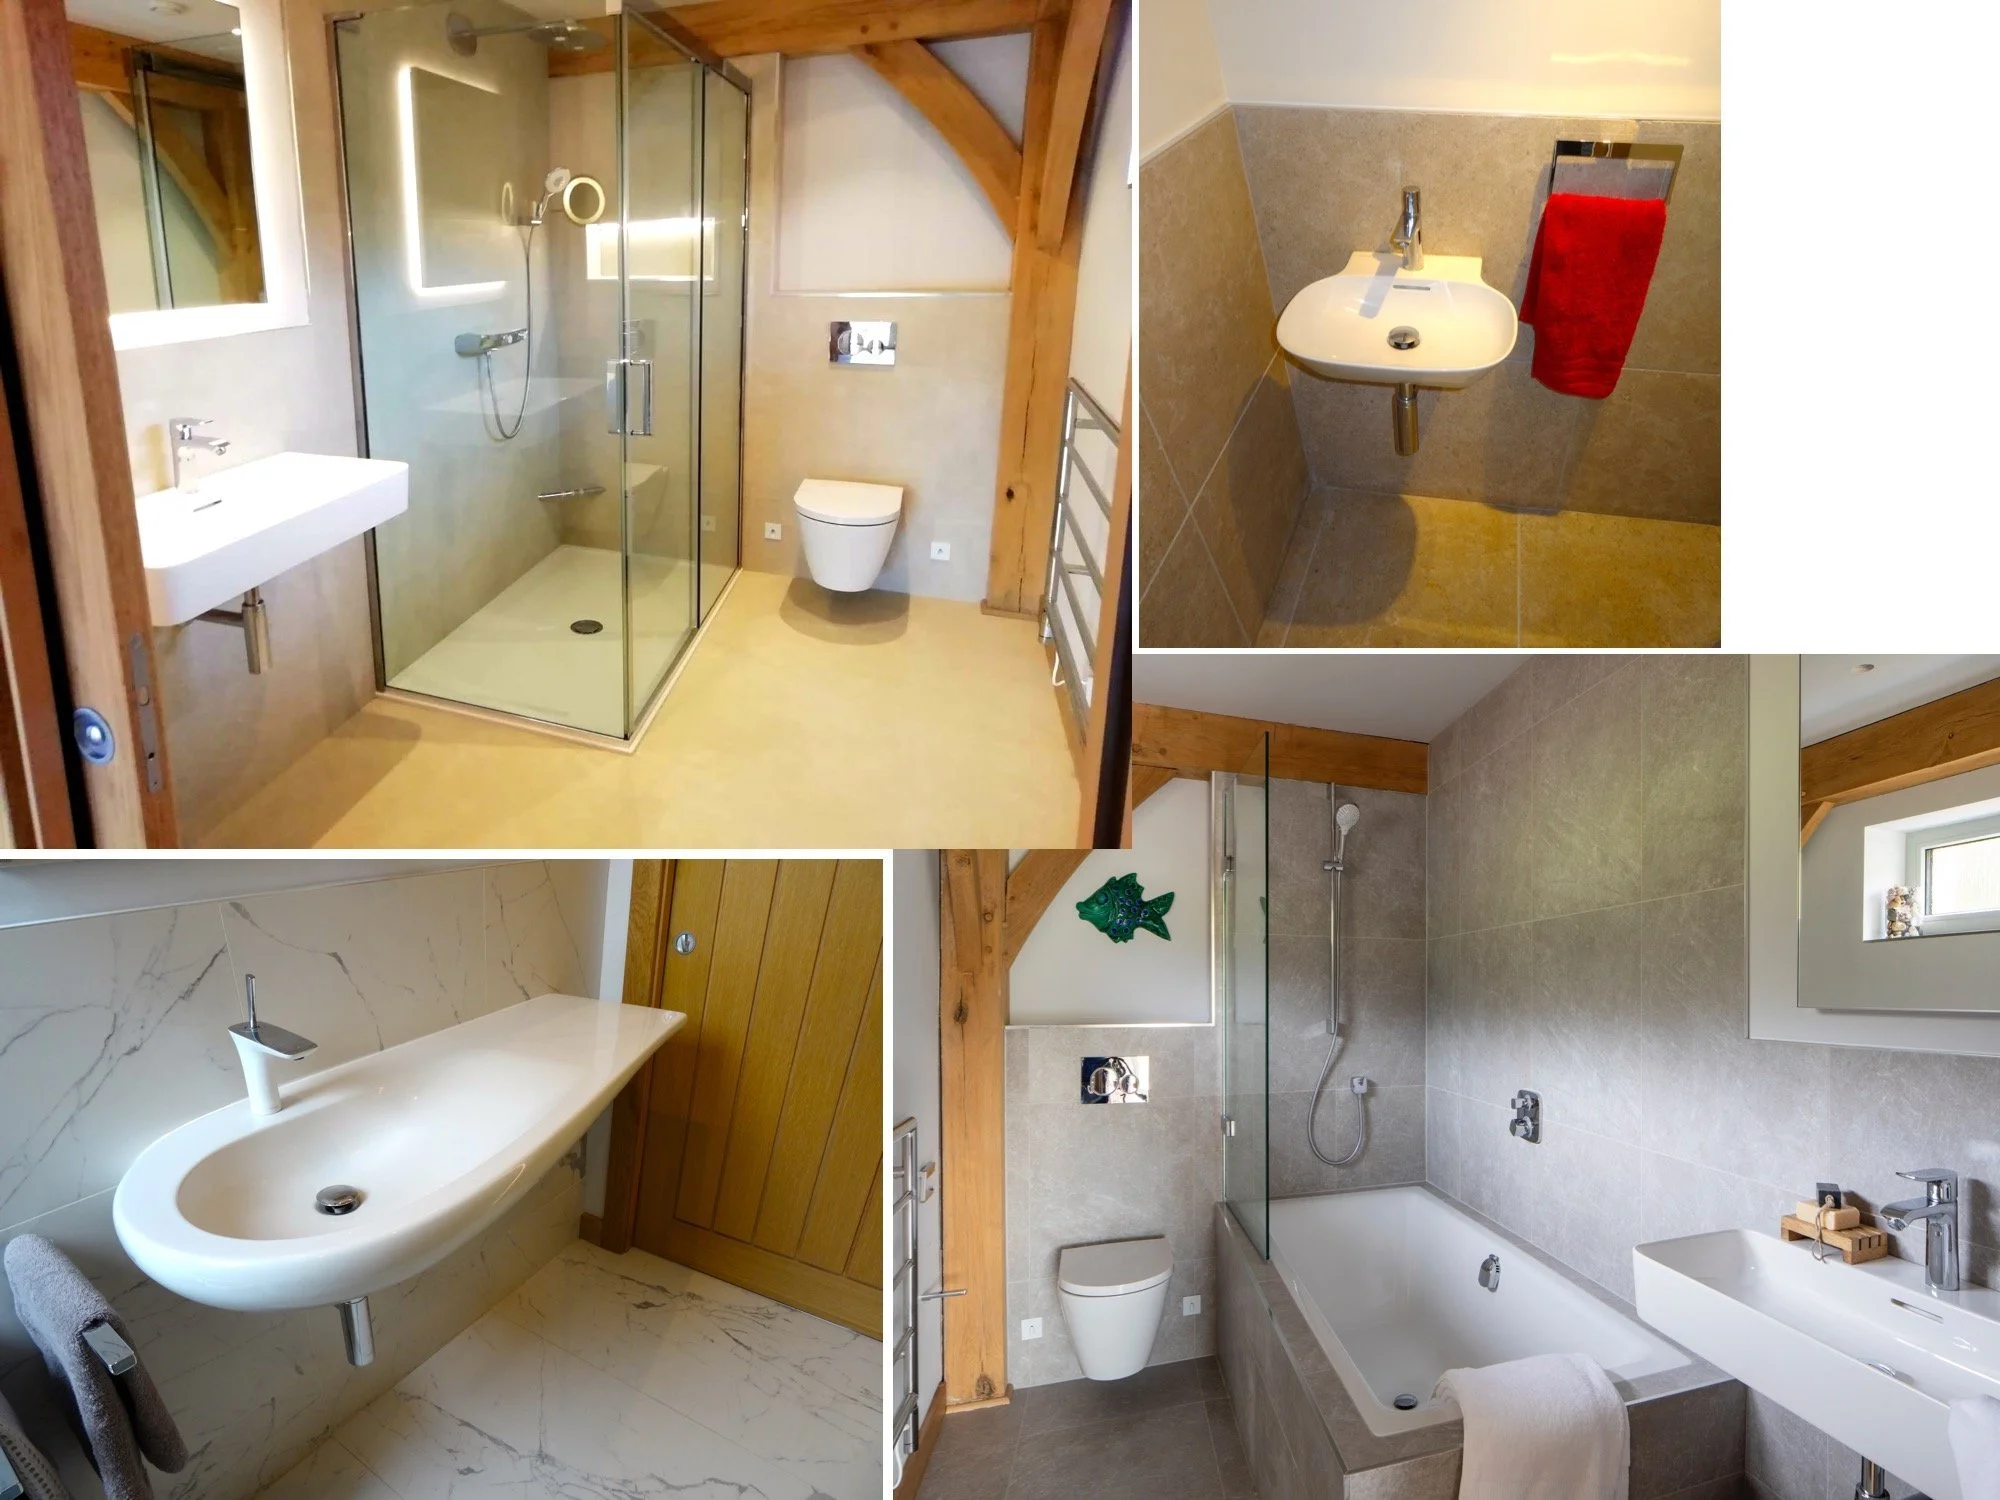
We found it very helpful to sit in (and get out of) a wide variety of baths – there are some wonderful, chic designs for baths but will you be able to easily get in and out of some of them as you get older? And where will the wine glass go? Also, consider different types of shower cubicle and shower fittings – there’s a plethora of these – and there’s more to having a shower than just having a quick wash. We also learned that you don’t necessarily need to get everything from the same manufacturer but can pick-and-mix white sanitary ware and fittings. And if you are considering a shower toilet, then research them thoroughly on the internet and try out as many as you can find on display (The Bathroom Studio, Evesham has one in its customer toilet). They differ widely in price and features and, for example, we don’t think you’ll need a pre-warmed toilet seat in a Passivhaus. The picture below shows some of the bathroom items we chose.
On the strong advice of our builder and plumber/bathroom fitter we had shower trays fitted rather than opting for wet room shower arrangements. This was because of the risk of leaks being caused by the inevitable oak frame shrinkage and thus slight structural movement leading to minute cracks in sealed areas. In more than four years we have had no problems having followed this advice.
Second fix carpentry
This includes, among other things, fitting the stairs and landing balustrade, already referred to. It also includes installing skirting, architrave, doors and any surface-mounted wooden backplates for light fittings and the like. Easily overlooked, this is a critical component of a house’s aesthetic appeal and requires more decisions. For example, what profile do you want for the skirting boards and architrave? (Complex designs trap more dust, as our builder pointed out.) What finish do you want the decorators to apply to the wood? What door furniture (hinges and handles and so on) do you want? Interestingly, one of Kevin McCloud’s ‘five tips for self-build’ is to spend time and money on the things you touch, like door handles, taps and, importantly, the bath, because this is where, daily, you ‘connect’ with your house: it’s just got to feel right.